Green recorder is a free, open source, simple desktop recorder for Linux systems and written using Python, GTK+3 and ffmpeg. It supports audio and video recording on most of the Linux desktop environments such as Unity, Gnome, Cinnamon, Mate, Xfce, etc.,. It is the first application that supports Wayland display server on GNOME session.
Currently it supports mkv, avi, mp4, wmv, gif and nut (And only WebM for Wayland’s GNOME session). You can simple start & stop the recording by clicking the appropriate button in main menu. A play button has been added in the main menu which allows user to playback of a recorded video.
If you are looking for gif recorder, navigate to following links.
Suggested Read :
(#) Peek – Create a Animated GIF Recorder in Linux
(#) Kgif – A Simple Shell Script to Create a Gif File from Active Window
(#) Gifine – Quickly Create An Animated GIF Video In Ubuntu/Debian
Select a capture option either an area or a window and choose the audio input source from the list, select the video format from the list, enter the filename as per your wish then finally hit Record button to start recording the video.
The Preferences window allows user to set the default values based on their requirements.
Green Recorder Features
- It supports many format such as mkv, avi, mp4, wmv, gif and nut
- Option to select an area or a window to record
- Choose audio input source from the list
- Enable and follow the mouse while recording
- Modify frames and set delay for recording
- Play button allows you to playback of a recorded video
By default it uses ffmpeg for audio and video as a input source to record video on Xorg display server. For wayland, it uses the D-Bus API to connect to the built-in screencasting tool in GNOME Shell for video and the same time it launches an instance of ffmpeg in the background for audio record. Finally these two files will me merged into the single WebM file.
It uses V8 encoder instead of the default V9 encoder on Wayland due to CPU & RAM consumption issue with V9. You will get an optimized GIF image size which is at least 10x better than the normal ffmpeg recording since its generating the GIF images from the raw video.
How to install Green Recorder in Linux
Green recorder package is not available in distribution official repository so we need to install from other repository.
For Ubuntu/LinuxMint users add below PPA and use apt-get command or apt command to install green recorder.
$ sudo add-apt-repository ppa:fossproject/ppa
$ sudo apt update
$ sudo apt install green-recorder
For Debian users, download the .deb package and use dpkg command to install green recorder.
$ wget http://ppa.launchpad.net/fossproject/ppa/ubuntu/pool/main/p/pydbus/python-pydbus_0.6.0.1_all.deb
$ wget http://ppa.launchpad.net/fossproject/ppa/ubuntu/pool/main/g/green-recorder/green-recorder_3.0.4_all.deb
$ sudo dpkg -i python-pydbus_0.6.0.1_all.deb
$ sudo dpkg -i green-recorder_3.0.4_all.deb
For Fedora 26 users add below repository and use dnf command to install green recorder.
$ sudo dnf config-manager --add-repo http://download.opensuse.org/repositories/home:mhsabbagh/Fedora_26/home:mhsabbagh.repo
$ sudo dnf install green-recorder
For Fedora 25 users add below repository and use dnf command to install green recorder.
$ sudo dnf config-manager --add-repo http://download.opensuse.org/repositories/home:mhsabbagh/Fedora_25/home:mhsabbagh.repo
$ sudo dnf install green-recorder
For CentOS/RHEL 7 users add below repository and use dnf command to install green recorder.
$ sudo yum-config-manager --add-repo http://download.opensuse.org/repositories/home:mhsabbagh/CentOS_7/home:mhsabbagh.repo
$ sudo yum install green-recorder
For Arch Linux based systems, green recorder is available in AUR repository, so use either Yaourt or Packer to install it.
$ yaourt -S green-recorder-git
or
$ packer -S green-recorder-git
How to use Green Recorder
Just launch the green recorder from main menu and start capture whatever you want. For testing purpose, we are going to make two videos (one for specific area and other one video for full screen capture).
To capture specific area. Launch the application, by default it’s taking .mkv format and if you want to modify, you can choose an other format from the drop-down menu. Enter the filename which you want to save the video then hit a select an area button which will pop-up an Area Chooser window and drag the chooser as per your wish and press apply button to save capturing area. Finally hit Record button to start capturing the video, once you have done stop the recording.
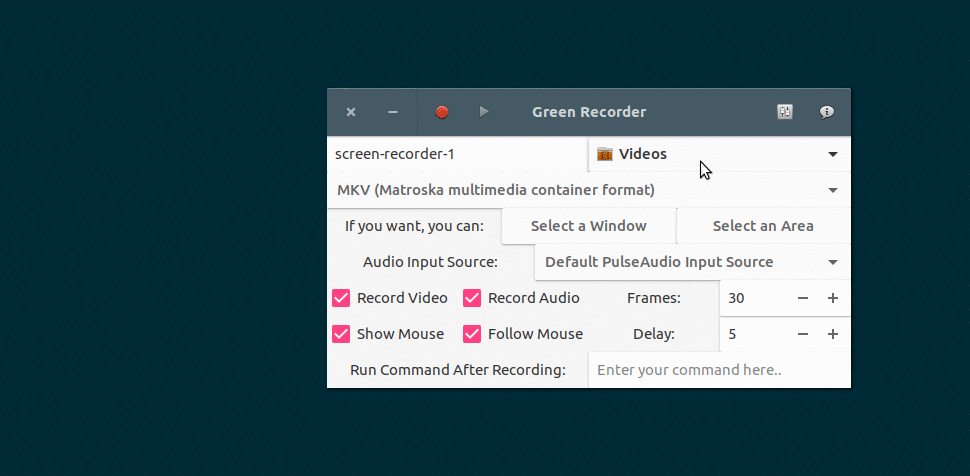
To capture a full window, use select a window button then your mouse pointer will become + symbol, just click on the window, enter the filename which you want to save the video and hit Record button to start capturing the video, once you have done stop the recording.