GPFS stands for General Parallel File System is a cluster file system developed by IBM. It’s named IBM Storage Scale and previously IBM Spectrum Scale. It’s a cluster file system that provides concurrent access to a single file system or set of file systems from multiple nodes. The nodes can be SAN attached, network attached, a mixture of SAN attached and network attached. This enables high performance access to this common set of data to support a scale-out solution or to provide a high availability platform.
It has many features including data replication, policy based storage management, and multi-site operations, etc,. It can share data within a location (LAN) or across wide area network (WAN) connections.
It supports very huge number of nodes (9500+) as per IBM FAQ page and it’s used by many of the world’s largest commercial companies, as well as some of the supercomputers.
Also, a GPFS cluster can be set up with a mix of cross-platforms such as Linux and AIX. It supports Linux (RHEL, Ubuntu and SUSE), AIX and Windows platforms but the number of nodes supported varies based on the operating system.
It supports 2048 disks in a file system, maximum supported GPFS disk size is 2TB, and size of the filesystem is 2^99 bytes.
In this guide, we will demonstrate how to install GPFS cluster File System 5.1.8 on RHEL system.
- Part-1 How to Install and Configure GPFS Cluster on RHEL
- Part-2 How to Create GPFS Filesystem on RHEL
- Part-3 How to Extend a GPFS Filesystem on RHEL
- Part-4 How to Export a GPFS Filesystem in RHEL
- Part-5 How to Upgrade GPFS Cluster on RHEL
Our lab setup:
- Two Node GPFS cluster with RHEL 8.8
- Node1 – 2ggpfsnode01 – 192.168.10.50
- Node2 – 2ggpfsnode01 – 192.168.10.51
- IBM Storage Scale Standard Edition License
Prerequisites for GPFS
- Minimum three nodes required to setup a GPFS cluster with default Node quorum algorithm.
- If you want to run a small GPFS cluster (a two-node GPFS cluster system), you need at least three tiebreaker disks, which is called a Node quorum with tiebreaker disks.
- Two network interfaces are required, one for host communication and another for GPFS cluster intercommunication (Private IP).
- Make sure the ‘/var’ partition has a maximum size of ’10GB’ as GPFS related binaries and packages will be placed there.
- All SAN-attached disks should be mapped in a shared mode between nodes, including tiebreaker disks.
- Download IBM Storage Scale package from Fix Central. It requires active IBM account and license for GPFS.
- Check kernel compatibility before installing/upgrading a specific version of GPFS on a RHEL system. This information can be found IBM Storage Scale QA page.
1) Configuring /etc/hosts
Although DNS name resolution is in place. It’s recommended to configure hosts files on both nodes to allow faster name resolution (On both the Nodes).
cat /etc/hosts

#######Host IPs Configuration Start############
192.168.10.50	2ggpfsnode01.local 2ggpfsnode01
192.168.10.51	2ggpfsnode02.local 2ggpfsnode02
#######Host IPs Configuration  END#############
Similarly configure the hosts file for the private IP (On both the Nodes).
cat /etc/hosts

#######GPFS Private IPs Start###########
192.168.20.100 2ggpfsnode01-gpfs
192.168.20.101 2ggpfsnode02-gpfs
#######GPFS Private IPs END#############
2) Configuring Private IP in Network Interface
GPFS cluster communication goes through private IP between nodes, so configure private IP as another network interface as shown below. (On both the Nodes).
vi /etc/sysconfig/network-scripts/ifcfg-ens256

Name=ens256
DEVICE=ens256
ONBOOT=yes
USERCTL=no
BOOTPROTO=static
NETMASK=255.255.255.0
IPADDR=192.168.20.100
PEERDNS=no
2a) Restarting Network
Once the private IP is configured, restart the network interface using the below command (On both the Nodes).
ifdown ens256
ifup ens256
2b) Checking IP Output
Check if the private IP is configured on another network interface (On both the Nodes).
ip a

1: lo: <LOOPBACK,UP,LOWER_UP> mtu 65536 qdisc noqueue state UNKNOWN group default qlen 1000
    link/loopback 00:00:00:00:00:00 brd 00:00:00:00:00:00
    inet 127.0.0.1/8 scope host lo
       valid_lft forever preferred_lft forever
    inet6 ::1/128 scope host
       valid_lft forever preferred_lft forever
2: ens192: <BROADCAST,MULTICAST,UP,LOWER_UP> mtu 1500 qdisc pfifo_fast state UP group default qlen 1000
    link/ether 08:00:27:97:13:2e brd ff:ff:ff:ff:ff:ff
    inet 192.168.10.50/24 brd 192.168.10.255 scope global dynamic noprefixroute ens192
       valid_lft forever preferred_lft forever
    inet6 fe80::a00:27ff:fe97:132e/64 scope link
       valid_lft forever preferred_lft forever
3: ens256: <BROADCAST,MULTICAST,UP,LOWER_UP> mtu 1500 qdisc pfifo_fast state UP group default qlen 1000
    link/ether 08:00:27:97:13:9d brd ff:ff:ff:ff:ff:ff
    inet 192.168.20.100/24 brd 192.168.20.255 scope global dynamic noprefixroute ens256
       valid_lft forever preferred_lft forever
    inet6 fe80::a00:27ff:fe97:132e/64 scope link
       valid_lft forever preferred_lft forever
2c) Setup password-less authentication
For any cluster setup, password-less authentication between cluster nodes is mandatory for various operations, so we will configure the same. In GPFS, each gpfs cluster node can run ssh & scp commands on all other nodes using root user to allow remote administration of other nodes.
[root@2ggpfsnode01 ~]# ssh-copy-id root@2ggpfsnode01   #For Self on Node-1
[root@2ggpfsnode01 ~]# ssh-copy-id root@2ggpfsnode02   #For Other Node (From Node-1 to Node-2)
[root@2ggpfsnode02 ~]# ssh-copy-id root@2ggpfsnode01   #For Other Node (From Node-2 to Node-1)
[root@2ggpfsnode02 ~]# ssh-copy-id root@2ggpfsnode02   #For Self on Node-2
2d) Validating password-less authentication
Check if password-less authentication is working as expected for self and other nodes.
[root@2ggpfsnode01 ~]# ssh 2ggpfsnode01 date
Sat Nov 18 08:13:20 IST 2023

[root@2ggpfsnode01 ~]# ssh 2ggpfsnode02 date
Sat Nov 18 08:13:21 IST 2023

[root@2ggpfsnode02 ~]# ssh 2ggpfsnode01 date
Sat Nov 18 08:13:25 IST 2023

[root@2ggpfsnode02 ~]# ssh 2ggpfsnode02 date
Sat Nov 18 08:13:27 IST 2023
3) Installing GPFS RPMs
Now the environment is ready, let’s proceed with the GPFS installation. It can be installed in two methods like Manual or installation toolkit, but in this article we will show you the manual method.
Install the following prerequisite packages using the yum package manager.
# yum install kernel-devel cpp gcc gcc-c++ binutils elfutils-libelf-devel make kernel-headers nfs-utils ethtool python3 perl rpm-build
Extracting the archive file:
# tar -xf Scale_std_install_5.1.8.0_x86_64.tar.gz
Verify that the self-extracting program has executable permissions. Otherwise, you can make it executable by issuing the ‘chmod +x’ command.
# ls -lh
-rw-r--r-- 1 root root 2.0K Nov 18 07:00 README
-rw-r----- 1 root root 1.1G Nov 18 07:20 Scale_std_install_5.1.8.0_x86_64.tar.gz
-rw-r--r-- 1 root root 1.6K Nov 18 07:25 SpectrumScale_public_key.pgp
-rwxr-xr-x 1 root root 1.1G Nov 18 07:25 Spectrum_Scale_Standard-5.1.8.0-x86_64-Linux-install
When running the below command. Initially, it extracts License Acceptance Process Tools to /usr/lpp/mmfs/5.1.8.0 and invokes it, which prompts for License Acceptance, input '1' and hit 'Enter' to extract the required product RPMs to /usr/lpp/mmfs/5.1.8.0. It checks if the same dir was previously created during another extraction. If yes, it will be removed to avoid conflicts with the ones being extracted. Also, it removes License Acceptance Process Tools once product RPMs extracted.
Also, it provides an instruction to install and configure IBM Storage Scale through the Toolkit method.
# sh Spectrum_Scale_Standard-5.1.8.0-x86_64-Linux-install
Navigate to the RPM file location in order to install it.
# cd /usr/lpp/mmfs/5.1.8.0/gpfs_rpms
Install the GPFS RPMs now.
# rpm -ivh gpfs.base*.rpm gpfs.gpl*rpm gpfs.license.std*.rpm gpfs.gskit*rpm gpfs.msg*rpm gpfs.docs*rpm
3a) Exporting PATH environment Variable
Export the PATH environment variable for the root user on each node as shown below, this allows a user to execute IBM Storage Scale commands without changing directory to '/usr/lpp/mmfs/bin'.
# echo "export PATH=$PATH:$HOME/bin:/usr/lpp/mmfs/bin" > /root/.bash_profile
# source /root/.bash_profile
3b) Installing GPFS Portability Layer
Run the below command to build the GPFS portability layer. The GPFS portability layer is a loadable kernel module that allows the GPFS daemon to interact with the operating system.
This command must be executed every time a new kernel is installed and can be automated using the 'autoBuildGPL' option, which will be shown to you in this article or the next one.
# mmbuildgpl
3c) Creating GPFS cluster
This is a very small setup (a two-node cluster), so we’ll add both nodes with the role of cluster manager and the quorum manager. To do so, add the GPFS hostname to a text file as shown below.
Syntax:
NodeName:NodeDesignations:AdminNodeName:NodeComment
In the following file we will only add ‘Node Name’ and ‘Node Designations’ and the rest of the parameters can be added as part of GPFS cluster creation command.
# cd /usr/lpp/mmfs

# echo "2ggpfsnode01-gpfs:manager-quorum
2ggpfsnode02-gpfs:manager-quorum" > nodefile.txt
Now everything is ready. Finally, run the mmcrcluster command to create a cluster.
# mmcrcluster -N /usr/lpp/mmfs/nodefile.txt --ccr-enable -r /usr/bin/ssh -R /usr/bin/scp -C 2gtest-cluster -A

mmcrcluster: Performing preliminary node verification ...
mmcrcluster: Processing quorum and other critical nodes ...
mmcrcluster: Finalizing the cluster data structures ...
mmcrcluster: Command successfully completed
mmcrcluster: Warning: Not all nodes have proper GPFS license designations.
    Use the mmchlicense command to designate licenses as needed.
mmcrcluster: [I] The cluster was created with the tscCmdAllowRemoteConnections configuration parameter set to "no". If a remote cluster is established with another cluster whose release level (minReleaseLevel) is less than 5.1.3.0, change the value of tscCmdAllowRemoteConnections in this cluster to "yes".
mmcrcluster: Propagating the cluster configuration data to all
  affected nodes. This is an asynchronous process.
Details:
- /usr/lpp/mmfs/nodefile.txt – This file contains node information’s.
- –ccr-enable – Cluster Configuration Repository (CCR) to maintain cluster configuration information.
- -r – RemoteShellCommand (/usr/bin/ssh)
- -R – RemoteFileCopy (/usr/bin/scp)
- -C – ClusterName (2gtest-cluster)
- -N – Input a Node name and node designations or Path of the file that contains node & designations information.
- -A – Specifies that GPFS daemons are to be automatically started when nodes come up.
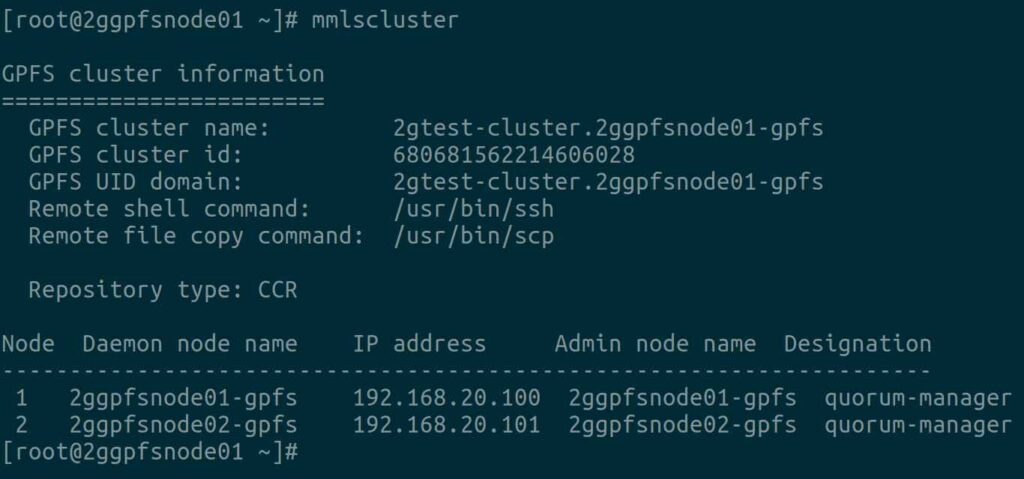
To verify the cluster information created in the above steps, run:
# mmlscluster
3d) Creating Tiebreaker Disks
As discussed in the beginning of the article. When running on small GPFS clusters, you might want to have the cluster remain online with only one surviving node. To achieve this, you need to add a tiebreaker disk to the quorum configuration. Node quorum with tiebreaker disks allows you to run with as little as one quorum node available as long as you have access to a majority of the quorum disks.
It won’t hold any data, so get '3x1 GB' disks from SAN (Storage Area Network) in shared mode for both nodes and follow below steps.
Get a LUN ID’s from the Storage Team and scan the SCSI disks (On both the Nodes).
# for host in `ls /sys/class/scsi_host`; do echo "Scanning $host...Completed"; echo "- - -" > /sys/class/scsi_host/$host/scan; done
After the scan, check if the given LUNs are discovered at the OS level.
# lsscsi --scsi --size | grep -i [Last_Five_Digit_of_LUN]
Create 'NSD' file for Tiebreaker Disks as shown below. Please make sure that you are using the correct block devices.
# echo "/dev/sde:::::tiebreak1
/dev/sdf:::::tiebreak2
/dev/sdg:::::tiebreak3" > /usr/lpp/mmfs/tiebreaker_Disks.nsd
Create Network Shared Disks (NSDs) used by GPFS using the mmcrnsd command as shown below:
# mmcrnsd -F /usr/lpp/mmfs/tiebreaker_Disks.nsd

mmcrnsd: Processing disk sde
mmcrnsd: Processing disk sdf
mmcrnsd: Processing disk sdg
mmcrnsd: Propagating the cluster configuration data to all
  affected nodes. This is an asynchronous process.
If the mmcrnsd command executes successfully, a new line is created and the user inputs are hashed out as shown below.
# cat /usr/lpp/mmfs/tiebreaker_Disks.nsd

# /dev/sde:::::tiebreaker1
tiebreak1:::dataAndMetadata:-1::system
# /dev/sdf:::::tiebreaker2
tiebreak2:::dataAndMetadata:-1::system
# /dev/sdg:::::tiebreaker3
tiebreak3:::dataAndMetadata:-1::system
Run the mmchconfig command to add the tiebreaker disks information in the GPFS cluster configuration.
# mmchconfig tiebreakerDisks="tiebreaker1;tiebreaker2;tiebreaker3"

mmchconfig: Command successfully completed
mmchconfig: Propagating the cluster configuration data to all
  affected nodes. This is an asynchronous process.
3e) Starting Cluster
GPFS cluster can be started using the mmstartup command. Use '-a' switch to start the cluster in all node simultaneously.
mmstartup -a

Thu Nov 18 10:45:22 +04 2023: mmstartup: Starting GPFS ...
The mmgetstate command displays the state of the GPFS daemon on one or more nodes. The nodes have not yet joined and formed the cluster, that’s why it shows as 'arbitrating'.
# mmgetstate -aL

Node number  Node name 		Quorum  Nodes up  Total nodes  GPFS state    Remarks
-----------------------------------------------------------------------------------------
       	  1  2ggpfsnode01-gpfs    			       arbitrating   quorum node
          2  2ggpfsnode02-gpfs    			       arbitrating   quorum node
It’s now joined successfully and GPFS state shows as 'active':
# mmgetstate -aL

Node number  Node name 		Quorum  Nodes up  Total nodes  GPFS state    Remarks
-----------------------------------------------------------------------------------------
       	  1  2ggpfsnode01-gpfs    1*         2          2      active        quorum node
          2  2ggpfsnode02-gpfs    1*         2          2      active        quorum node
3f) Accepting License
Use the mmchlicense command to designate licenses as needed. Also, it controls the type of GPFS license associated with the nodes in the cluster.
# mmchlicense server --accept -N 2ggpfsnode01-gpfs,2ggpfsnode02-gpfs

The following nodes will be designated as possessing server licenses:
	2ggpfsnode01-gpfs
	2ggpfsnode02-gpfs
mmchlicense: Command successfully completed
mmchlicense: Propagating the cluster configuration data to all
  affected nodes. This is an asynchronous process.
Final Thoughts
I hope you learned how to install and configure a GPFS Cluster File System on a RHEL system.
In this article, we covered GPFS Cluster installation and configuration, including Cluster Creation, NSD Creation and Tiebreaker disks addition.
If you have any questions or feedback, feel free to comment below.