Bonding is a Linux kernel feature that allows multiple network interfaces (such as ens192, ens224) to be aggregated into a single virtual network interface called channel bonding (bond0). It increases the throughput and provide redundancy.
Network bonding supports 7 modes and you can configure it based on your requirements. Link Aggregation Control Protocol (LACP – Mode 4 (802.3ad)) mode is widely used because it supports link aggregation and redundancy.
In this article, we will learn how to configure NIC or network bonding in RHEL system.
Prerequisites for LACP Bonding:
- The Network team need to enable LACP (802.3ad) on the Network switch ports to aggregate the links.
- A Linux system should have two interfaces.
- If it’s a physical server, we recommend configuring bonding between the On-Board and PCI interfaces to avoid a single point of failure on the network card on the host side.
Bonding Module
Check if the bonding module is already loaded on your Linux system using the lsmod command.
lsmod | grep -i bonding

bonding               12451  0
It would have loaded by default. Otherwise, load it using the modprobe command.
modprobe bonding
Creating Bond Interface
Create a bond interface file 'ifcfg-bond0' under the directory '/etc/sysconfig/network-scripts/'. You may need to change the following values like IP, MASK and GATEWAY according to your Network.
vi /etc/sysconfig/network-scripts/ifcfg-bond0

TYPE=Bond
DEVICE=bond0
NAME=bond0
BONDING_MASTER=yes
BOOTPROTO=none
ONBOOT=yes
IPADDR=192.168.1.100
NETMASK=255.255.255.0
GATEWAY=192.168.1.1
BONDING_OPTS="mode=4 miimon=100 lacp_rate=1"
| Parameter | Description |
|---|---|
| BONDING_MASTER=yes | It indicates that the device is a bonding master device. |
| mode=4 | Bonding mode – IEEE 802.3ad Dynamic link aggregation (LACP). |
| miimon=100 | It specifies the MII link monitoring frequency in milliseconds, which determines how often the link state of each slave is inspected for link failures. A value of zero disables MII link monitoring. A value of 100 is a good starting point. |
| lacp_rate=1 | An option that specifies the rate in which we’ll ask our link partner to send LACPDUs every 1 second. The default is slow, which is 0 ‘ZERO’. |
Configuring First Slave Interface
Modify the first slave that you want to bring into bonding. Please use the correct interface name as per your environment.
vi /etc/sysconfig/network-scripts/ifcfg-ens192

TYPE=Ethernet
BOOTPROTO=none
DEVICE=ens192
ONBOOT=yes
MASTER=bond0
SLAVE=yes
Configuring Second Slave Interface
Modify the second slave that you want to bring into bonding. Please use the correct interface name as per your environment.
vi /etc/sysconfig/network-scripts/ifcfg-ens224

TYPE=Ethernet
BOOTPROTO=none
DEVICE=ens224
ONBOOT=yes
MASTER=bond0
SLAVE=yes
Restarting network services
Restart the network services to enable the bonding interface.
systemctl restart network
Verify bonding Configuration
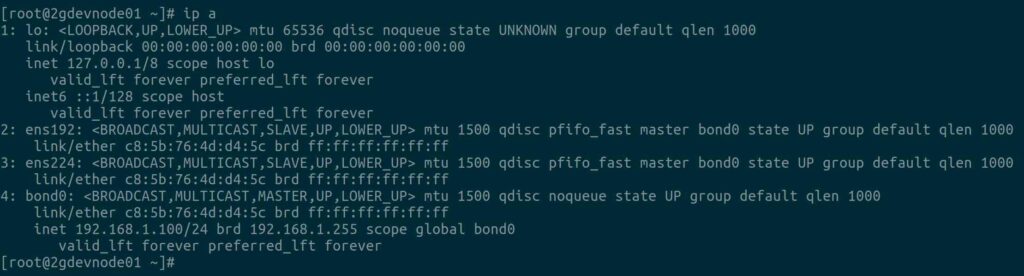
Use the ip command to check the binding interface and its slave interfaces. Yes, Bond0 is up and running now.
Viewing Bonding Interface Status
Check the following file to see detailed information of bonding interface and their slave interfaces. The output looks good and we can see Bonding Mode, MII Status, MII Polling Interval, LACP rate, Number of Ports, etc,.
cat /proc/net/bonding/bond0

Ethernet Channel Bonding Driver: v3.7.1 (April 27, 2011)

Bonding Mode: IEEE 802.3ad Dynamic link aggregation
Transmit Hash Policy: layer (0)
MII Status: up
MII Polling Interval (ms): 100
Up Delay (ms): 0
Down Delay (ms): 0

802.3ad info
LACP rate: fast
Min links: 0
Aggregator selection policy (ad_select): stable
System priority: 65535
System MAC address: c8:5b:76:4d:d4:5c
Active Aggregator Info:
        Aggregator ID: 1
        Number of ports: 2
        Actor Key: 15
        Partner Key: 32773
        Partner Mac Address: e4:a7:a0:32:fc:e9

Slave Interface: ens192
MII Status: up
Speed: 10000 Mbps
Duplex: full
Link Failure Count: 0
Permanent HW addr: c8:5b:76:4d:d4:5c
Slave queue ID: 0
Aggregator ID: 1
Actor Churn State: none
Partner Churn State: none
Actor Churned State: 0
Partner Churned State: 0
details actor lacp pdu:
    system priority: 65535
    system mac address: c8:5b:76:4d:d4:5c
    port key: 15
    port priority: 255
    port number: 1
    port state: 63
details Partner lacp pdu:
    system priority: 32667
    system mac address: e4:a7:a0:32:fc:e9
    oper key: 32773
    port priority: 32768
    port number: 290
    port state: 61

Slave Interface: ens224
MII Status: up
Speed: 10000 Mbps
Duplex: full
Link Failure Count: 0
Permanent HW addr: e4:a7:a0:32:fc:e9
Slave queue ID: 0
Aggregator ID: 1
Actor Churn State: none
Partner Churn State: none
Actor Churned State: 0
Partner Churned State: 0
details actor lacp pdu:
    system priority: 65535
    system mac address: e4:a7:a0:32:fc:e9
    port key: 15
    port priority: 255
    port number: 2
    port state: 63
details Partner lacp pdu:
    system priority: 32667
    system mac address: c8:5b:76:4d:d4:5c
    oper key: 32773
    port priority: 32768
    port number: 16674
    port state: 61
Fault Tolerance/Redundancy Testing
To test fault tolerance and link speed, you can bring down one interface at a time and check whether the server is still reachable or not.
- Test Case-1: To check link speed use the ethtool command when both the Slave Interfaces are up and running.
- Test Case-2: Bring down First Slave interface and try access the system.
- Test Case-3: Bring down Second Slave interface and try access the system.
Test Case-1:
To check the connection speed, run: Yes, I can see 20 Gbps speed on Bond0 as each slave supports 10 Gbps.
ethtool bond0

Settings for bond0:
        Supported ports: [ ]
        Supported link modes:   Not reported
        Supported pause frame use: No
	Supports auto-negotiation: No
	Supported FEC modes: Not reported
	Advertised link modes:  Not reported
	Advertised pause frame use: No
	Advertised auto-negotiation: No
	Advertised FEC modes: Not reported
	Speed: 20000Mb/s
	Duplex: Full
	Port: Other
	PHYAD: 0
	Transceiver: internal
	Auto-negotiation: off
	Link detected: yes
Test Case-2:
Let’s bring down the First Slave interface.
ifdown ens192
Device 'ens192' successfully disconnected.
Try accessing the system via ssh. Yes, it’s accessible now.
ssh root@192.168.1.100
Now you can see only 10 Gbps speed on bond0 as one of the slave interface is already down.
ethtool bond0 | grep -i speed

	      Speed: 10000Mb/s
Now, check bonding interface status again. It shows only one active Slave interface.
cat /proc/net/bonding/bond0
Test Case-3:
Let’s bring down the Second Slave interface and perform the same test as #Test Case-2:
ifdown ens224
Device 'ens224' successfully disconnected.
Final Thoughts
I hope you learned how to configure LACP bonding on RHEL.
In this tutorial, we have shown you one of the easiest ways to configure Network Bonding or NIC Teaming on a RHEL system.
If you have any questions or feedback, feel free to comment below.


As you may know, with RHEL 9 (and its derivatives), the iface config files /etc/sysconfig/network-scripts/ are no longer present. Instead, one uses Netwokr Manage, via either nmcli or nmtui, to create a bond or team.
The writer should have specified that this technique will work for RHEL 7 and 8. For RHEL 9, nmcli or nmtui must be used, as interface configuration files in /etc/sysconfig/network-scripts/ no longer exist.
Yes, we will add notes about it. If possible we will also add the nmcli method.