If a device is no longer needed by LVM, you can use the ‘vgreduce’ command to remove that physical volume from it’s volume group. The vgreduce command shrinks the capacity of a volume group by removing a physical volume.
But make sure that the physical volume is not used by any logical volumes using the ‘pvdisplay’ command.
If the physical volume is still being used, you must transfer the data to another physical volume using the ‘pvmove’ command. Once the data is completely moved, it can be removed from the volume group.
Finally use the ‘pvremove’ command to remove the LVM label and LVM metadata on the empty physical volume.
If you are new to Logical Volume Management (LVM), I recommend reading the LVM series article listed below:
- Part-1: How to Create/Configure LVM (Logical Volume Management) in Linux
- Part-2: How to Extend/Increase LVM’s (Logical Volume Resize) in Linux
- Part-3: How to Reduce/Shrink LVM’s (Logical Volume Resize) in Linux
- Part-4: How to Remove Physical Volume from a Volume Group in LVM
- Part-5: How to Remove LVM (Logical) Volume in Linux
- Part-6: How to recover deleted Logical volume (LV) in LVM
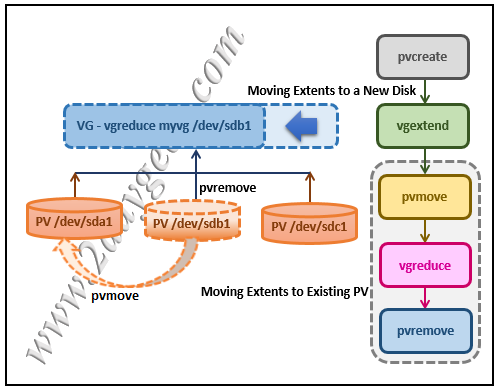
1) Moving Extents to Existing Physical Volumes
Use the ‘pvs’ command to check if the desired physical volume is in use or not (we plan to remove the "/dev/sdb" disk in LVM):
# pvs -o+pv_used

PV VG Fmt Attr PSize PFree Used
/dev/sda myvg lvm2 a- 75.00G 14.00G 61.00G
/dev/sdb myvg lvm2 a- 50.00G 45.00G 5.00G
/dev/sdc myvg lvm2 a- 17.15G 12.15G 5.00G
If the physical volume is being used, check to see if there are enough free extents on other physical volumes in the volume group. If they are, then you can run the ‘pvmove’ command on the device you want to remove. Extents will be distributed to other devices.
# pvmove /dev/sdb

/dev/sdb: Moved: 2.0%
…
/dev/sdb: Moved: 79.2%
…
/dev/sdb: Moved: 100.0%
After executing the pvmove command, again ru the pvs command to check whether the physical volume is free or not. Yes, it’s completely free as per the below output.
# pvs -o+pv_used

PV VG Fmt Attr PSize PFree Used
/dev/sda myvg lvm2 a- 75.00G 9.00G 66.00G
/dev/sdb myvg lvm2 a- 50.00G 50.00G 0
/dev/sdc myvg lvm2 a- 17.15G 12.15G 5.00G
If it’s free and used show as '0', use the ‘vgreduce’ command to remove the physical volume /dev/sdb from the volume group:
Common Syntax of vgreduce
Syntax:
vgreduce [VG_Name] [PV_Name to be removed]
# vgreduce myvg /dev/sdb
Removed "/dev/sdb" from volume group "myvg"
Finally, run the ‘pvremove’ command to remove the disk from the LVM configuration. Now, the disk is completely removed from the LVM and can be used for other purposes.
# pvremove /dev/sdb
Labels on physical volume "/dev/sdb" successfully wiped.
2) Moving Extents to a New Disk
If you don’t have enough free extents on other physical volumes in the volume group. Add new physical volume using the steps below.
Request new LUNs from the storage team. Once that is allocated, run the following commands to discover newly added LUNs or disks in Linux:
for host in `ls /sys/class/scsi_host`; do echo "Scanning $host...Completed"; echo "- - -" > /sys/class/scsi_host/$host/scan; done
Scanning host0...Completed
Scanning host1...Completed
Scanning host2...Completed
Use the lsscsi command to verify if new disks are discovered at OS level.
# lsscsi --scsi --size | grep [Last 5 Digits of LUN]
Once the disk is detected in the OS, use the ‘pvcreate‘ command to create the physical volume:
# pvcreate /dev/sdd
Physical volume "/dev/sdd" successfully created
Use the following command to add the newly created physical volume: “/dev/sdd” to the existing volume group ‘vg01’ :
# vgextend vg01 /dev/sdd
Volume group "vg01" successfully extended
Now, use the ‘pvs’ command to see the new disk "/dev/sdd" that you have just added:
# pvs -o+pv_used

PV VG Fmt Attr PSize PFree Used
/dev/sda myvg lvm2 a- 75.00G 14.00G 61.00G
/dev/sdb myvg lvm2 a- 50.00G 0 50.00G
/dev/sdc myvg lvm2 a- 17.15G 12.15G 5.00G
/dev/sdd myvg lvm2 a- 60.00G 60.00G 0
Use the ‘pvmove‘ command to move the data from ‘/dev/sdb’ to ‘/dev/sdd’:
# pvmove /dev/sdb /dev/sdd

/dev/sdb: Moved: 10.0%
…
/dev/sdb: Moved: 79.7%
…
/dev/sdb: Moved: 100.0%
After the data is moved to the new disk, re-use the ‘pvs’ command to check whether the physical volume is free:
# pvs -o+pv_used

PV VG Fmt Attr PSize PFree Used
/dev/sda myvg lvm2 a- 75.00G 14.00G 61.00G
/dev/sdb myvg lvm2 a- 50.00G 50.00G 0
/dev/sdc myvg lvm2 a- 17.15G 12.15G 5.00G
/dev/sdd myvg lvm2 a- 60.00G 10.00G 50.00G
If it’s free, use the ‘vgreduce‘ command to remove the physical volume /dev/sdb from the volume group:
# vgreduce myvg /dev/sdb
Removed "/dev/sdb" from volume group "myvg"
Finally, run the ‘pvremove’ command to remove the disk from the LVM configuration. Now, the disk is completely removed from the LVM and can be used for other purposes.
# pvremove /dev/sdb
Labels on physical volume "/dev/sdb" successfully wiped.
Wrapping Up
In this guide, we’ve shown you how to Remove a Physical Volume (PV) from a Volume Group in LVM with two different methods.
If you have any questions or feedback, please feel free to comment below and we will get back to you as soon as we can. Happy learning!

One Comment on “How to Remove Physical Volume from a Volume Group”