Extending the LVM partition is extremely easy, it takes very few steps and can be done online without unmounting a logical volume.
The main purpose of LVM is flexible disk management, which allows easy resizing of an LVM partition. Resize here refers to increasing and decreasing the logical volume and file system size when you need.
In this article, we will demonstrate how to Extend a Logical Volume in four simple steps.
If you are a beginner in Logical Volume Management (LVM), I recommend reading the LVM series article listed below to get familiar with it.
- Part-1: How to Create/Configure LVM (Logical Volume Management) in Linux
- Part-2: How to Extend/Increase LVM’s (Logical Volume Resize) in Linux
- Part-3: How to Reduce/Shrink LVM’s (Logical Volume Resize) in Linux
- Part-4: How to Remove Physical Volume from a Volume Group in LVM
- Part-5: How to Remove LVM (Logical) Volume in Linux
- Part-6: How to recover deleted Logical volume (LV) in LVM
Extending the logical volume involves the below steps.
- Check if you have sufficient unallocated disk space in the volume group where the LV was residing.
- If yes, you can use that space to extend the logical volume.
- If not, add a new disks or LUNs to your system.
- Convert a physical disk as a physical volume (PV).
- Extend the Volume Group
- Increase the logical Volume
- Grow the filesystem
- Check the extended filesystem size
1) How to Create a Physical Volume
You can create physical volumes using the pvcreate command.
Once the disk is detected at the OS level, use the pvcreate command to create a PV (Physical Volumes).
# pvcreate /dev/sdc
Physical volume "/dev/sdc" successfully created
Make a note:
- The above command erases any data on the given disk /dev/sdc.
- A physical disk can be added directly as a PV, so you don’t need to create a disk partition.
Use the pvdisplay command to display the PVs you have created.
# pvdisplay /dev/sdc

"/dev/sdc" is a new physical volume of "10.00 GiB"
--- NEW Physical volume ---
PV Name               /dev/sdc
VG Name
PV Size               10.00 GiB
Allocatable           NO
PE Size               0
Total PE              0
Free PE               0
Allocated PE          0
PV UUID               69d9dd18-36be-4631-9ebb-78f05fe3217f
2) How to Extend a Volume Group
Use the vgextend command to add a new physical volume to the existing volume group.
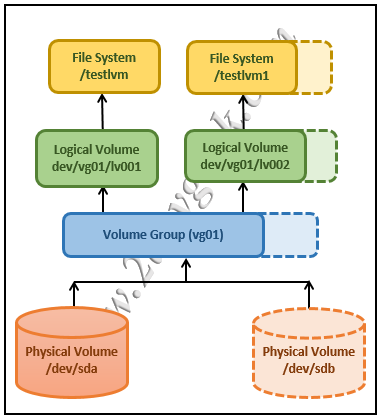
# vgextend vg01 /dev/sdc
Volume group "vg01" successfully extended
Use the vgdisplay command to check the VG details.
# vgdisplay vg01
--- Volume group ---
VG Name              vg01
System ID
Format               lvm2
Metadata Areas       2
Metadata Sequence No 1
VG Access            read/write
VG Status            resizable
MAX LV               0
Cur LV               0
Open LV              0
Max PV               0
Cur PV               2
Act PV               2
VG Size              14.99 GiB
PE Size              4.00 MiB
Total PE             3840
Alloc PE / Size      1280 / 4.99
Free PE / Size       2560 / 9.99 GiB
VG UUID              d17e3c31-e2c9-4f11-809c-94a549bc43b7
3) How to Extend a Logical Volume
Use the lvextend command to increase the existing logical volume.
Common syntax for logical volume extension is.
Syntax:
lvextend +[Additional Space to be Added] [Existing LV_Name]
Use the below lvextend command to increase the existing logical volume additionally to '10GB'.
# lvextend -L +10G /dev/mapper/vg01-lv002

Rounding size to boundary between physical extents: 5.90 GiB
Size of logical volume vg01/lv002 changed from 5.00 GiB (1280 extents) to 15.00 GiB (3840 extents).
Logical volume var successfully resized
To extend a logical volume using PE Size, run.
# lvextend -l +2560 /dev/mapper/vg01-lv002
To extend a logical volume using percentage '%', use the following command.
# lvextend -l +40%FREE /dev/mapper/vg01-lv002
4) How to Increase a File System
Now, the logical volume is extended and you need to resize the file system to extend the space inside the logical volume.
For an ext3 and ext4 based file system, run the following command.
# resize2fs /dev/mapper/vg01-lv002
For the xfs file system, use the following command.
# xfs_growfs /dev/mapper/vg01-lv002
Use the df command to view the Extended file system size.
# df -h /lvmtest1

Filesystem Size Used Avail Use% Mounted on
/dev/mapper/vg01-lv002 15360M 34M 15326M 4% /lvmtest1
Bonus Tips
Alternatively, expanding the logical volume and file system can be done in a single lvextend command by adding '-r' at end of the command as shown below (basically, you can skip step 3 & 4 when using this command).
# lvextend -L +10G /dev/mapper/vg01-lv002 -r
Final Thoughts
I hope you have learned how to Extend the Logical Volume (LVM) in this article, including creation of Physical Volume, Extending Volume Group, Extending Logical Volume and resizing FileSystem.
If you have any questions or feedback, feel free to comment below.