In the previous article, we have demonstrated how to install Veritas Cluster Server 8.0 in RHEL 8.8. This is continuation of the previous article.
Now, we’ll explain how to configure the Veritas Cluster Server (VCS) (aka Veritas InfoScale Enterprise) with a two-node cluster on RHEL 8.8.
- How to Create VxVM Volume and Filesystem in Linux
- How to Create Shared VxFS FileSystem on Linux
- How to Extend/Increase VxFS Filesystem in Linux
Veritas InfoScale Configuration
As the below screen is self-explanatory. Input 'y' for both the questions and press 'Enter' to move to the next screen.
Would you like to configure InfoScale Enterprise on 2gvcsnode1 2gvcsnode2? [y,n,q] (n) y

The Veritas Cloud Receiver (VCR) is a preconfigured, cloud-based edge server deployed by Veritas. Enter telemetry.veritas.com to use the Veritas Cloud Receiver as an edge server for your environment.
Enter the hostname or IP address of the edge server: [q,?] 2gvcsnode1
Enter the edge server's port number: [q,?] 2023

I/O Fencing

It needs to be determined at this time if you plan to configure I/O Fencing in enabled or disabled mode, as well as help in determining the number of network interconnects (NICS) required on your systems. If you configure I/O Fencing in enabled mode, only a single NIC is required, though at least two are recommended.

A split brain can occur if servers within the cluster become unable to communicate for any number of reasons. If I/O Fencing is not enabled, you run the risk of data corruption should a split brain occur. Therefore, to avoid data corruption due to split brain in CFS environments, I/O Fencing has to be enabled.

If you do not enable I/O Fencing, you do so at your own risk

See the Administrator's Guide for more information on I/O Fencing

Do you want to configure I/O Fencing in enabled mode? [y,n,q,?] (y)
Please read the below instructions once (This is for informational purposes only). Simple press 'Enter'.
To configure VCS, answer the set of questions on the next screen.

When [b] is presented after a question, 'b' may be entered to go back to the first question of the configuration set.

When [?] is presented after a question, '?' may be entered for help or additional information about the question.

Following each set of questions, the information you have entered will be presented for confirmation. To repeat the set of questions and correct any previous errors, enter 'n' at the confirmation prompt.

No configuration changes are made to the systems until all configuration questions are completed and confirmed.

Press [Enter] to continue:
Enter a cluster name based on your requirement, it should be unique. As per our setup, we use cluster name as ‘2gcluster01’.
To configure VCS the following information is required:

	A unique cluster name
	One or more NICs per system used for heartbeat links
	A unique cluster ID number between 0-65535

	One or more heartbeat links are configured as private links
	You can configure one heartbeat link as a low-priority link

All systems are being configured to create one cluster.

Enter the unique cluster name: [q,?] 2gcluster01
Configuring private heartbeat links
Use option '5' to auto-configure heartbeat links that LLT uses. It provides the option to use LLT over Ethernet or over UDP. Veritas recommends that you configure heartbeat links that use LLT over Ethernet for high performance. Installer will configure the heartbeat links on each system based on the activated NICs.
    1)  Configure the heartbeat links using LLT over Ethernet
    2)  Configure the heartbeat links using LLT over UDP
    3)  Configure the heartbeat links using LLT over TCP
    4)  Configure the heartbeat links using LLT over RDMA
    5)  Automatically detect configuration for LLT over Ethernet
    b)  Back to previous menu

How would you like to configure heartbeat links? [1-5,b,q,?] (5)

On Linux systems, only activated NICs can be detected and configured automatically.

Press [Enter] to continue:
At this point, the installer checks if both systems have three NICs and network links. If all are detected, and sets link priority. If the installer fails to detect heartbeat links or fails to find any high-priority links, then choose option 1 to manually configure the heartbeat links.
Logs are being written to /var/tmp/installer-202306231445nLK while installer is in progress

    Configuring LLT links: 100%

    Estimated time remaining: (mm:ss) 0:00                                                                 4 of 4

    Checking system NICs on 2gvcsnode1 ............................................................. 3 NICs found
    Checking system NICs on 2gvcsnode2 ............................................................. 3 NICs found
    Checking network links ........................................................................ 3 links found
    Setting link priority .................................................................................. Done
This gives you a unique cluster ID, so use the default one by pressing 'Enter'. The cluster cannot be configured if the cluster ID 45289 is in use by another cluster. Installer performs a check to determine if the cluster ID is duplicate.
Enter a unique cluster ID number between 0-65535: [b,q,?] (45289)

The cluster cannot be configured if the cluster ID 45289 is in use by another cluster. Installer can perform a check to determine
 if the cluster ID is duplicate. The check will take less than a minute to complete.

Would you like to check if the cluster ID is in use by another cluster? [y,n,q] (y)

    Checking cluster ID .................................................................................. Done

Duplicated cluster ID detection passed. The cluster ID 45289 can be used for the cluster.

Press [Enter] to continue:
As per the below output, the private Heartbeat NICs were configured in each system. You can see which interfaces are configured on which link. Verify and confirm the information that the installer summarizes.
Cluster information verification:

	Cluster Name: 2gcluster01
	Cluster ID Number: 45289

	Private Heartbeat NICs for 2gvcsnode1:
		link1=ens224
		link2=ens256
	Low-Priority Heartbeat NIC for 2gvcsnode1:
		link-lowpril=ens192

	Private Heartbeat NICs for 2gvcsnode2:
		link1=ens224
		link2=ens256
	Low-Priority Heartbeat NIC for 2gvcsnode2:
		link-lowpril=ens192

Is this information correct? [y,n,q,?] (y)
Configuring VCS in secure mode ensures that all the communication between the systems is encrypted and users are verified against security credentials. VCS user names and passwords are not used when a cluster is running in secure mode. We don’t require this option now, so select 'n' and press ‘Enter’. For non-secure installation, Input ‘y’ and press ‘Enter’.
We recommend that you run Cluster Server in secure mode.

Would you like to configure the VCS cluster in secure mode? [y,n,q,?] (y) n

Are you sure that you want to proceed with non-secure installation? [y,n,q] (n) y
If you have enabled a secure VCS cluster, you do not need to add VCS users now. Otherwise, use default credentials. Simply press 'Enter' for both questions.
The following information is required to add VCS users:

	A user name
	A password for the user
	User privileges (Administrator, Operator, or Guest)

Do you wish to accept the default cluster credentials of 'admin/password'? [y,n,q] (y)

Do you want to add another user to the cluster? [y,n,q] (n)
VCS user information verification screen. Review the summary of the newly added users and confirm the information.
VCS User verification:

	User: admin	Privilege: Administrator
	Passwords are not displayed

Is this information correct? [y,n,q] (y)
Configuring SMTP email notification
You can configure VCS to send event notifications to SMTP email services. In order to configure this, you need to provide the SMTP server name and Email addresses of people to be notified. This will alert you if any errors are detected in the cluster. Please note that you can also configure the notification after installation.
The following information is required to configure SMTP notification:

	The domain-based hostname of the SMTP server
	The email address of each SMTP recipient
	A minimum severity level of messages to send to each recipient

Do you want to configure SMTP notification? [y,n,q,?] (n) y

Active NIC devices discovered on 2gvcsnode1: ens192

Enter the NIC for the VCS Notifier to use on 2gvcsnode1: [b,q,?] (ens192)
Is ens192 to be the public NIC used by all systems? [y,n,q,b,?] (y)
Enter the domain-based hostname of the SMTP server
(example:smpt.yourcompany.com): [b,q,?] smtp.2daygeek.com
Enter the full email address of the SMTP recipient
(example:[email protected]): [b,q,?] [email protected]
Enter the minimum severity of events for which mail should be sent to [email protected] [I=Information, W=Warning, E=Error, S=ServerError]: [b,q,?] E
Would you like to add another SMTP recipient? [y,n,q,b] (n)
Verify and confirm the SMTP notification information.
SMTP notification verification:

	NIC: ens192
	SMTP Address: smtp.2daygeek.com
	Recipient: [email protected] receives email for Error oh higher events

Is this information correct? [y,n,q] (y)
You can configure VCS to send event notifications to SNMP management consoles. You need to provide the SNMP management console name to be notified and message severity levels. We don’t need this option, so press ‘Enter’.
Do you want to configure SNMP notification? [y,n,q,?] (n)
Global cluster configuration. We don’t need this option too, so press ‘Enter’.
Do you want to configure the Global Cluster Option? [y,n,q,?] (n)
After you enter the VCS configuration information, the installer will ask you to stop the VCS processes to complete the configuration process. The installer continues to create configuration files and copies them to each system. The installer also configures a cluster UUID value for the cluster at the end of the configuration. After the installer successfully configures VCS, it restarts VCS and its related processes.
All InfoScale Enterprise processes that are currently running must be stopped

Do you want to stop InfoScale Enterprise processes now? [y,n,q,?] (y)

Logs are being written to /var/tmp/installer-202306231445nLK while installer is in progress

    Stopping InfoScale Enterprise: 100%

    Estimated time remaining: (mm:ss) 0:00                                                               11 of 11

    Performing InfoScale Enterprise prestop tasks .......................................................... Done
    Stopping vcsmm ......................................................................................... Done
    Stopping vxgms ......................................................................................... Done
    Stopping vxglm ......................................................................................... Done
    Stopping vxcpserv ...................................................................................... Done
    Stopping had ........................................................................................... Done
    Stopping amf ........................................................................................... Done
    Stopping vxfen ......................................................................................... Done
    Stopping gab ........................................................................................... Done
    Stopping llt ........................................................................................... Done
    Performing InfoScale Enterprise poststop tasks ......................................................... Done

Veritas InfoScale Enterprise Shutdown completed successfully
Storage Foundation Cluster File System HA (SFCFSHA) configuration and services start.
Logs are being written to /var/tmp/installer-202306231445nLK while installer is in progress

    Starting SFCFSHA: 100%

    Estimated time remaining: (mm:ss) 0:00                                                                 25 of 25

    Performing SFCFSHA configuration ......................................................................... Done
    Starting CollectorService ................................................................................ Done
    Starting veki ............................................................................................ Done
    Starting vxdmp ........................................................................................... Done
    Starting vxio ............................................................................................ Done
    Starting vxspac .......................................................................................... Done
    Starting vxconfigd ....................................................................................... Done
    Starting vxvm-recover .................................................................................... Done
    Starting vxencryptd ...................................................................................... Done
    Starting vvr ............................................................................................. Done
    Starting vxcloud ......................................................................................... Done
    Starting xprtld .......................................................................................... Done
    Starting vxfs ............................................................................................ Done
    Starting vxportal ........................................................................................ Done
    Starting fdd ............................................................................................. Done
    Starting vxcafs .......................................................................................... Done
    Starting llt ............................................................................................. Done
    Starting gab ............................................................................................. Done
    Starting vxfen ........................................................................................... Done
    Starting amf ............................................................................................. Done
    Starting vxglm ........................................................................................... Done
    Starting had ............................................................................................. Done
    Starting vxgms ........................................................................................... Done
    Starting vxodm ........................................................................................... Done
    Performing SFCFSHA poststart tasks ....................................................................... Done

Storage Foundation Cluster File System HA Startup completed successfully
Fencing Configuration
Use option '2' for disk-based fencing. We have already added three 1GB disks from EMC storage in shared mode on both nodes, which will be used as shown below.
Fencing configuration
     1)  Configure Coordination Point client based fencing
     2)  Configure disk based fencing
     3)  Configure majority based fencing

Select the fencing mechanism to be configured in this Application Cluster: [1-3,q,?] 2

This I/O fencing configuration option requires a restart of VCS. Installer will stop VCS at a later stage in this run. Note hat the service groups will be online only on the systems that are in the 'AutoStartList' after restarting VCS. Do you want to continue? [y,n,q,b,?] y

Do you have SCSI3 PR enabled? [y,n,q,b,?] (y)

Since you have selected to configure disk based fencing, you need to provide the existing disk group to be used a coordinator or create a new disk group for it.

Select one of the options below for fencing disk group:
     1)  Create a new disk group
     2)  Using an existing disk group
     b)  Back to previous menu

Enter the choice for a disk group: [1-2,b,q] 1

List of available disks to create a new disk group
A new disk group cannot be created as the number of available free VxVM CDS disks is 0 which is less than three. If there are disks available which are not under VxVM control, use the command vxdisksetup or use the installer to initialize them as VxVM disks.

Do you want to initialize more disks as VxVM disks? [y,n,q,b] (y)

List of disks which can be initialized as VxVM disks:
     1)  emc0_0cde	1025.62m
     2)  emc0_0cdf	1025.62m
     3)  emc0_0cdg	1025.62m
     b)  Back to previous menu

Enter the disk options, separated by spaces: [1-3,b,q] 1 2 3
    Initializing disk emc0_0cde on 2gvcsnode1 .............................................................. Done
    Initializing disk emc0_0cdf on 2gvcsnode1 .............................................................. Done
    Initializing disk emc0_0cdg on 2gvcsnode1 .............................................................. Done

     1)  emc0_0cde	1025.62m
     2)  emc0_0cdf	1025.62m
     3)  emc0_0cdg	1025.62m
     b)  Back to previous menu

Select odd number of disks and at least three disks to form a disk group. Enter the disk options, separated by spaces: [1-3,b,q] 1 2 3

Enter the new disk group name: [b] fencedg
Created disk group fencedg

Before you continue with configuration, we recommend that you run the vxfentsthdw utility (I/O fencing test hardware utility), in a separate console, to test whether the shared storage supports I/O fencing. You can access the utility at '/opt/VRTSvcs/vxfen/bin/vxfentsthdw'.
As per the 'vxfentsthdw' run you performed, do you want to continue with this disk group? [y,n,q] (y)

Using disk group fencedg
Fencing configuration verification. In this section, simply hit 'Enter' for all questions as the default answer is appropriate.
After the installer successfully configures VCS, note the location of the summary, log, and response files that the installer creates. The files provide useful information that can help you with the configuration and can also assist future configurations.
- Summary file – Describes the cluster and its configured resources.
- Log file – Details the entire configuration.
- Response file – Contains the configuration information that can be used to perform secure or unattended installations on other systems.
I/O fencing configuration verification
 	Disk Group: fencedg
	Fencing disk policy: dmp

Is this information correct? [y,n,q] (y)

Installer will stop VCS before applying fencing configuration. To make sure VCS shuts down successfully, unfreeze any frozen service group and unmount the mounted file systems in the cluster.

HAD and all the applications will be stopped. Do you want to stop VCS and all its applications and apply fencing configuration on all nodes at this point? [y,n,q] (y)

    Stopping VCS on 2gvcsnode1 ........................................................................ Done
    Stopping VCS on 2gvcsnode2 ........................................................................ Done
    Starting vxfen on 2gvcsnode1 ...................................................................... Done
    Starting vxfen on 2gvcsnode2 ...................................................................... Done
    Updating main.cf with fencing ..................................................................... Done
    Starting VCS on 2gvcsnode1 ........................................................................ Done
    Starting VCS on 2gvcsnode2 ........................................................................ Done

The coordination Point Agent monitors the registrations on the coordination points.
Do you want to configure Coordination Point Agent on the client cluster? [y,n,q] (y)
Enter a non-existing name for the service group for Coordination Point Agent: [b] (vxfen)

Additionally the Coordination Point Agent can also monitor changes to the Coordinator Disk Group constitution such as a disk being accidentally deleted from the Coordinator Disk Group. The frequency of this detailed monitoring can be tuned with the LevelTwoMonitorFreq attribute. For example, if you set this attribute to 5, the agent will monitor the Coordinator Disk Group constitution every fine monitor cycles. If LevelTwoMonitorFreq attribute is not set, the agent will not monitor changes to the Coordinator Disk Group.

Do you want to set LevelTwoMonitorFreq? [y,n,q] (y)
Enter the value of the LevelTwoMonitorFreq attribute(0 to 65535): [b,q,?] (5)
Do you want to enable auto refresh of coordination points if registration keys are missing on any of them? [y,n,q,b,?] (n)

    Adding Coordination Point Agent via 2gvcsnode1 ............................................................... Done

    I/O Fencing configuration .................................................................................... Done

I/O Fencing configuration completed successfully

installer log files, summary file, and response file are saved at:

	/opt/VRTS/install/logs/installer-202306231932NcR

Would you like to view the summary  file? [y,n,q] (n)
We have successfully installed and configured Veritas Cluster Server 8.0. This is a third party software that doesn’t place binaries in a global location, so you need to add the path to the '/etc/profile' file to access the VCS commands.
echo "export PATH=$PATH:/opt/VRTS/bin" >> /etc/profile
source /etc/profile
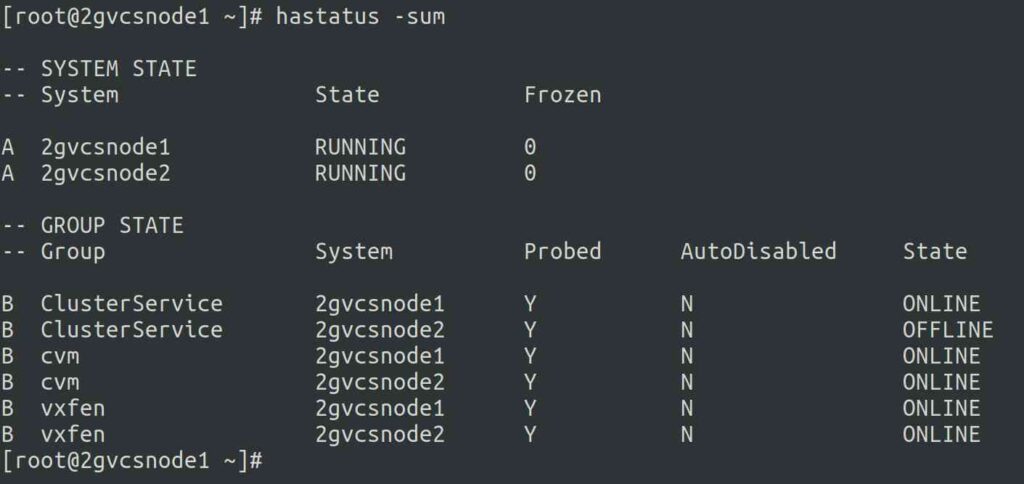
Use the below command to check the Veritas Cluster (VCS) status.
Wrapping Up
In this tutorial, we’ve shown you how to configure Veritas Cluster Server (VCS) on Linux (RHEL 8.8).
In the next post, we’ll show you how to add service group, resources, etc,.
If you have any questions or feedback, feel free to comment below.