Veritas Cluster Server, commonly known as VCS, is used by organizations around the world to host their mission-critical applications and ensure always-on high availability for their hosted applications.
This ensure when a node or application fails, other nodes can take predefined actions to take over and bring up services elsewhere in the cluster.
- How to Create VxVM Volume and Filesystem in Linux
- How to Create Shared VxFS FileSystem on Linux
- How to Extend/Increase VxFS Filesystem in Linux
VCS setup can be done in two ways based on the application requirement.
- VCS Cluster Active-Active (AA) Setup – It has CVM, and the file system is available across the node simultaneously.
- VCS Cluster Active-Passive (AP) Setup -FS can only be mounted on an active system, not on a passive system.
In this article, we’ll demonstrate how to install Veritas Cluster Server (VCS) Active-Active (AA) 8.0 on Linux (RHEL 8.8).
Our lab setup:
- Two node Active-Active VCS cluster with RHEL 8.8
- Node1 – 2gvcsnode1 – 192.168.10.110
- Node2 – 2gvcsnode2 – 192.168.10.111
- Storage Foundation Cluster File System HA (SFCFSHA)
Prerequisites
- Each node must have three interfaces (One used as public interface for Heartbeat & Two private interfaces used for VCS cluster inter communication to share the resources across both the nodes)
- Three 1GB disks should mapped to both the node in shared mode for fencing setup.
- Setup password-less login between the system.
- DNS configuration and local host entries
- Disable selinux
- Disable firewalld, if it’s mandatory allow required ports.
- Configure NTP/Chrony
Adding Local Host entry
Even if you have DNS entry it’s safe to add a localhost entry in all nodes. Run the below command in both the node.
cp -p /etc/hosts /etc/hosts_bkp-$(date +%d-%m-%Y)

echo "
192.168.10.110 vcs1.2gvcsnode1.local       vcs1
192.168.10.111 vcs2.2gvcsnode2.local       vcs2" >> /etc/hosts
Downloading Veritas InfoScale
Veritas InfoScale can be downloaded from the portal if you have an active account with Veritas support. If not, trial version (free for 60 Days) can be downloaded.
Also, visit sort.veritas url and perform the compatibility check for supported kernels. As on today (24-June-2023) Veritas InfoScale 8.0.2 only support 4.18.0-372.32.1 kernel, which is not possible to install on RHEL 8.8, so we are going with Veritas InfoScale 8.0.
As part of this installation you must include a list of patches (CPI, Hotfixes and/or Cumulative), because the base package doesn’t support the latest kernel for some modules.
We have verified the Veritas site and found that the below three patches must be included in the base package for successful installation of Veritas InfoScale 8.0 on RHEL 8.8, So download below four packages and upload to the target server.
Veritas_InfoScale_8.0_RHEL.tar.gz			#Base Package
cpi-Patch-8.0.0.1400.tar.gz				#CPI Patch
infoscale-rhel8_x86_64-Patch-8.0.0.1800.tar.gz		#Cumulative Patch
infoscale-rhel8.7_x86_64-Patch-8.0.0.2600.tar.gz	#Common Updates Patch
infoscale-rhel8.8_x86_64-Patch-8.0.0.2700.tar.gz	#RHEL8.8 Patch
Creating directory structure
Create a proper directory structure and move the files to respective directory to avoid confusion. I have created the following directories as per my convenient.
/backup/vcs8			#Base Package Path
/backup/vcs8_cpi_patch_1400	#CPI_Patch Path
/backup/vcs8_patch_1800		#Patch_1 Path
/backup/vcs8_patch_2600		#Patch_2 Path
/backup/vcs8_patch_2700		#Patch_3 Path
Extracting the Packages
Extract the packages to respective location as created above.
tar -xf Veritas_InfoScale_8.0_RHEL.tar.gz -C /backup/vcs8
tar -xf cpi-Patch-8.0.0.1400.tar.gz -C /backup/vcs8_cpi_patch_1400
tar -xf infoscale-rhel8_x86_64-Patch-8.0.0.1800.tar.gz -C /backup/vcs8_patch_1800
tar -xf infoscale-rhel8.7_x86_64-Patch-8.0.0.2600.tar.gz -C /backup/vcs8_patch_2600
tar -xf infoscale-rhel8.8_x86_64-Patch-8.0.0.2700.tar.gz -C /backup/vcs8_patch_2700
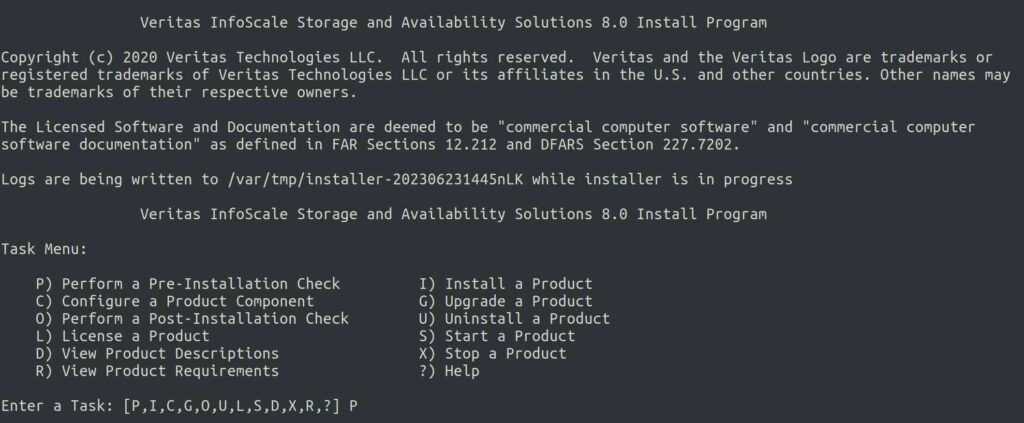
Performing Pre-Installation Check
It’s always recommend to run pre-installation check, which will ensure all required RPMs are already installed on the given systems. If it’s found missing RPMs that can be installed on the fly.
Syntax:

./installer -require [Path_to_the_CPI_Script] -patch_path [Path_to_the_patch 1] -patch2_path [Path_to_the_patch 2] -patch3_path [Path_to_the_patch 3]
Navigate to VCS 8.0 base directory and run installer as shown below (Please use your package location instead of ours).
cd /backup/vcs8/dvd1-redhatlinux/rhel8_x86_64

./installer -require /backup/vcs8_cpi_patch_1400/CPI_8.0.0_P14.pl -patch_path /backup/vcs8_patch_1800 -patch2_path /backup/vcs8_patch_2600 -patch3_path /backup/vcs8_patch_2700
When you run, it will prompt with many options as shown below. Input 'P' and hit 'Enter' to perform pre-installation check.
Now, select which product you want to check. In our case, it’s Veritas InfoScale Enterprise, so input '4' and hit 'Enter'.
		Veritas InfoScale Storage and Availability Solutions 8.0 Precheck Program

    1) Veritas InfoScale Foundation
    2) Veritas InfoScale Availability
    3) Veritas InfoScale Storage
    4) Veritas InfoScale Enterprise
    b) Back to previous menu

Select a product to perform pre-installation check for: [1-4,b,q] 4
As we are planning to install Storage Foundation Cluster File System HA (SFCFSHA) component, so input '4' and hit 'Enter'. Also, you need to enter a list of systems you want to perform pre-checks on.
		Veritas InfoScale Storage and Availability Solutions 8.0 Precheck Program

    1) Cluster Server (VCS)
    2) Storage Foundation (SF)
    3) Storage Foundation and High Availability (SFHA)
    4) Storage Foundation Cluster File System HA (SFCFSHA)
    5) Storage Foundation for Oracle RAC (SF Oracle RAC)

Select a component to perform pre-installation check for: [1-5,q] 4
Enter the system name that you want to pre-check. This is a two-node cluster setup, so enter both hostname and press 'Enter'.
Enter the system names separated by spaces: [q,?] 2gvcsnode1 2gvcsnode2
Now, installer perform following checks and report if anything fails. Sometime it may report you as failed due to missing RPMs and it will give you an another option to install via yum or manually. If you find missing RPMs, enter '1' and press 'Enter' to install those RPMs.
			Veritas InfoScale Enterprise 8.0 Precheck Program
				      2gvcsnode1 2gvcsnode2

Logs are being written to /var/tmp/installer-202306231445nLK while installer is in progress

Verifying systems: 100%

Estimated time remaining: (mm:ss) 0:00                                                                     8 of 8

    Checking system communication .......................................................................... Done
    Checking release compatibility ......................................................................... Done
    Checking installed product ............................................................................. Done
    Checking platform version .............................................................................. Done
    Checking prerequisite patches and rpms ....................................................... Partially Done
    Checking file system free space ........................................................................ Done
    Checking configured component .......................................................................... Done
    Performing product prechecks ........................................................................... Done

The following required OS rpms were not found on vcsnode1:
	net-tools.x86_64 bc.x86_64 ksh.x86_64

The following required OS rpms were not found on vcsnode2:
	net-tools.x86_64 bc.x86_64 ksh.x86_64

The installer provides some guidance about how to install OS rpms using native methods, like yum, or how to manually install the required OS rpms.

    1)  Install the missing required OS rpms with yes, if yes is configured on the systems
    2)  Install the missing required OS rpms manually, (detailed steps are provided)
    3)  Do not install the missing required OS rpms

How would you like to install the missing required OS rpms? [1-3,q,?] (1)

The installation may take a few minutes, be patient.

    Install the missing OS rpms with yum on vcsnode1 ................................................. Done
    Install the missing OS rpms with yum on vcsnode2 ................................................. Done

Press [Enter] to continue:
Once RPMs installation done, at this point, Precheck will be re-run and you will get the output similar to the below one.
			Veritas InfoScale Enterprise 8.0 Precheck Program
				      2gvcsnode1 2gvcsnode2

Logs are being written to /var/tmp/installer-202306231445nLK while installer is in progress

Verifying systems: 100%

Estimated time remaining: (mm:ss) 0:00                                                                     8 of 8

    Checking system communication .......................................................................... Done
    Checking release compatibility ......................................................................... Done
    Checking installed product ............................................................................. Done
    Checking platform version .............................................................................. Done
    Checking prerequisite patches and rpms ................................................................. Done
    Checking file system free space ........................................................................ Done
    Checking configured component .......................................................................... Done
    Performing product prechecks ........................................................................... Done

Precheck report completed

System verification checks completed successfully

The following notes were discovered on the systems:

CPI NOTE V-9-30-1021: he system information on 2gvcsnode1:
	Operating system: Linux RHEL 8.8 86_64
	CPU number: 4
	CPU speed: 2693 MHz
	Memory size: 7963 MB
	Swap size: 9207 MB

CPI NOTE V-9-30-1021: he system information on 2gvcsnode1:
	Operating system: Linux RHEL 8.8 86_64
	CPU number: 4
	CPU speed: 2693 MHz
	Memory size: 7963 MB
	Swap size: 9207 MB

The following warnings were discovered on the systems:

CPI WARNING V-9-40-1400 vmware-tools is not running on vcsnode1, installer attempted to start it but failed.
Please start the tool before installing Veritas InfoScale Enterprise

CPI WARNING V-9-40-1418 Kernel Release 4.18.0-477.13.1.el8_8.x86_64 is detected on vcsnode1, which is not
recognizable by the installer. It is strongly recommended to check it on SORT (https://sort.veritas.com) before
continue.

CPI WARNING V-9-40-1401 vmware-tools is not running on vcsnode2, installer attempted to start it but failed.
Please start the tool before installing Veritas InfoScale Enterprise

CPI WARNING V-9-40-1418 Kernel Release 4.18.0-477.13.1.el8_8.x86_64 is detected on vcsnode2, which is not
recognizable by the installer. It is strongly recommended to check it on SORT (https://sort.veritas.com) before
continue.
Installing Veritas InfoScale Enterprise
As pre-installation checks were completed successfully, it’s time to install Veritas InfoScale Enterprise. Enter 'y' for the below questions to begin the installation.
Would you like to install InfoScale Enterprise on 2gvcsnode1 2gvcsnode2? [y,n,q] (n) y

This product may contain open source and other third party materials that are subject to a separate license. See the
applicable Third-Party Notice at https://www.veritas.com/about/legal/license-agreements

Do you agree with the terms of the End User License Agreement as specified in the EULA/en/EULA.pdf file present on media? [y,n,q,?] y
Veritas InfoScale Enterprise installation is in progress.
			Veritas InfoScale Enterprise 8.0 Install Program
				      2gvcsnode1 2gvcsnode2

Logs are being written to /var/tmp/installer-202306231445nLK while installer is in progress

    Installing InfoScale Enterprise: 100%

    Estimated time remaining: (mm:ss) 0:00                                                               31 of 31

    Performing InfoScale Enterprise preinstall tasks ....................................................... Done
    Installing VRTSperl rpm ................................................................................ Done
    Installing VRTSpython rpm .............................................................................. Done
    Installing VRTSvlic rpm ................................................................................ Done
    Installing VRTSspt rpm ................................................................................. Done
    Installing VRTSveki rpm ................................................................................ Done
    Installing VRTSvxvm rpm ................................................................................ Done
    Installing VRTSaslapm rpm .............................................................................. Done
    Installing VRTSvxfs rpm ................................................................................ Done
    Installing VRTSfsadv rpm ............................................................................... Done
    Installing VRTSllt rpm ................................................................................. Done
    Installing VRTSgab rpm ................................................................................. Done
    Installing VRTSvxfen rpm ............................................................................... Done
    Installing VRTSamf rpm ................................................................................. Done
    Installing VRTSvcs rpm ................................................................................. Done
    Installing VRTScps rpm ................................................................................. Done
    Installing VRTSvcsag rpm ............................................................................... Done
    Installing VRTSvcsea rpm ............................................................................... Done
    Installing VRTSrest rpm ................................................................................ Done
    Installing VRTScsi rpm ................................................................................. Done
    Installing VRTSdbed rpm ................................................................................ Done
    Installing VRTSglm rpm ................................................................................. Done
    Installing VRTScavf rpm ................................................................................ Done
    Installing VRTSgms rpm ................................................................................. Done
    Installing VRTSodm rpm ................................................................................. Done
    Installing VRTSdbac rpm ................................................................................ Done
    Installing VRTSsfmh rpm ................................................................................ Done
    Installing VRTSvbs rpm ................................................................................. Done
    Installing VRTSsfcpi rpm ............................................................................... Done
    Installing VRTSvcswiz rpm .............................................................................. Done
    Performing InfoScale Enterprise postinstall tasks ...................................................... Done

Veritas InfoScale Enterprise Install completed successfully
Veritas License Activation
VCS installation is completed, so activate the license as shown below.
To comply with the terms of our End User License Agreement, you have 60 days to either:

 * Enter a valid license key matching the functionality in use on the systems
 * Enable keyless licensing and manage the systems with a Management Server. For more details visit
http://www.veritas.com/community/blogs/introducing-keyless-feature-enablement-storage-foundation-ha-51. The product is fully functional during these 60 days.

    1)  Enter a valid license key(Key file path needed)
    2)  Enable keyless licensing and complete system licensing later

How would you like to license the systems? [1-2,q] (2)

    1) Veritas Infoscale Foundation
    2) Veritas Infoscale Availability
    3) Veritas Infoscale Storage
    4) Veritas Infoscale Enterprise
    b) Back to previous menu

Which product would you like to register? [1-4,b,q] (4)

Registering keyless key ENTERPRISE on Veritas InfoScale Enterprise
Successfully registered ENTERPRISE keyless key on 2gvcsnode1
Successfully registered ENTERPRISE keyless key on 2gvcsnode2
Veritas InfoScale Enterprise VCS installation has been completed.
Wrapping Up
In this tutorial, we’ve shown you how to install Veritas Cluster Server (VCS) on Linux (RHEL 8.8).
In the next post, we’ll show you how to configure the Veritas Cluster Server 8.0 on RHEL8.8.
If you have any questions or feedback, feel free to comment below.