We have already covered in our previous article, Nagios installation on RPM based systems such as CentOS & RHEL and Nagios installation on DEB based systems such as Debian, Ubuntu & Mint, also refer Adding Nagios Remote Linux Host. For Monitoring Windows hosts in Nagios Server, you need to install NSClient++ on your remote Windows systems.
NSClient++ or nscp is powerful and flexible monitoring daemon. It was built for Nagios/Icinga/Neamon. nscp allows nagios to remotely execute on windows machines. This allows you to monitor remote machine metrics (disk usage, CPU load, webserver usage, database server usage, etc…,). NSClient++ Allow remote checks, Monitor system in realtime & Resolve your problems.
Part-1 : Remote Host system configuration.
1) Download and Install NSClient++
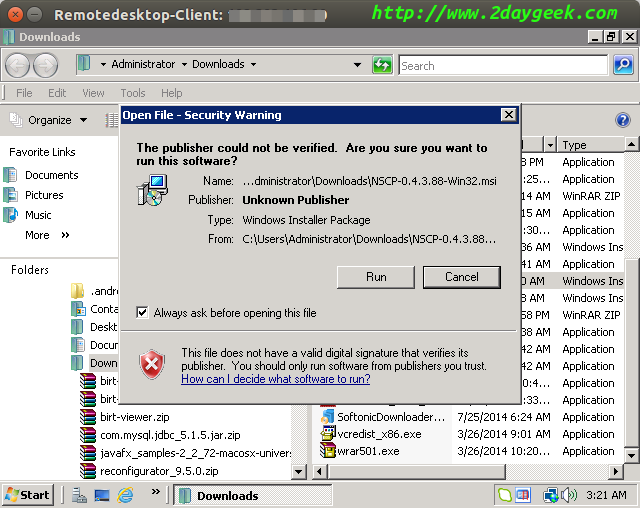
Visit NSClient official website and download the package based on your architecture. Then Double click the (.msi) file to initiate the Installation, then hit Run.
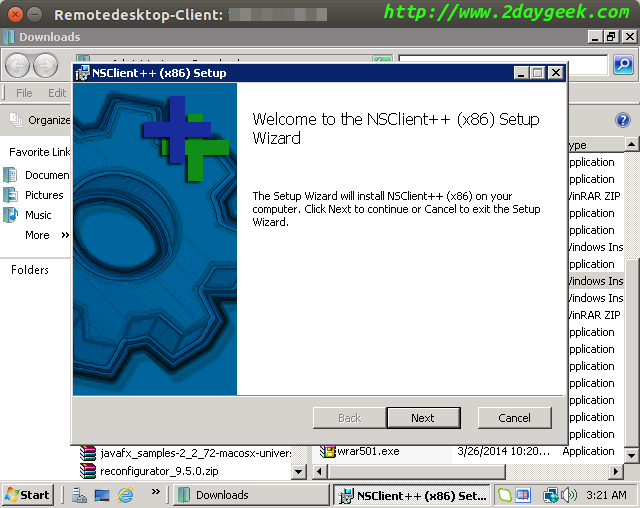
Wecome screen, then hit Next.
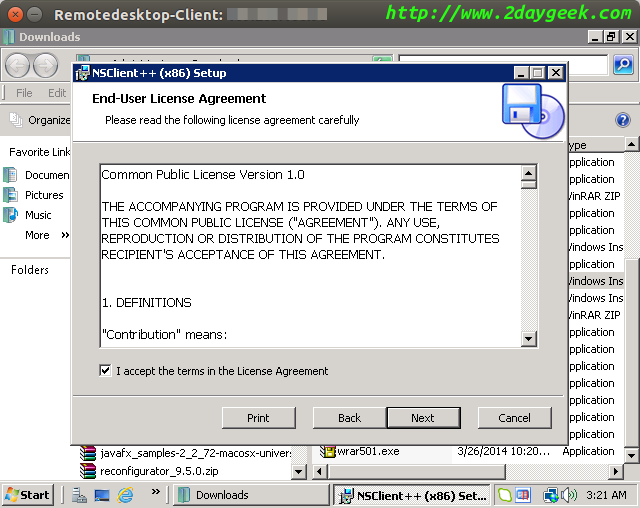
Accept License Agreement, then hit Next.
Choose installation type “Typical”, then hit Next.

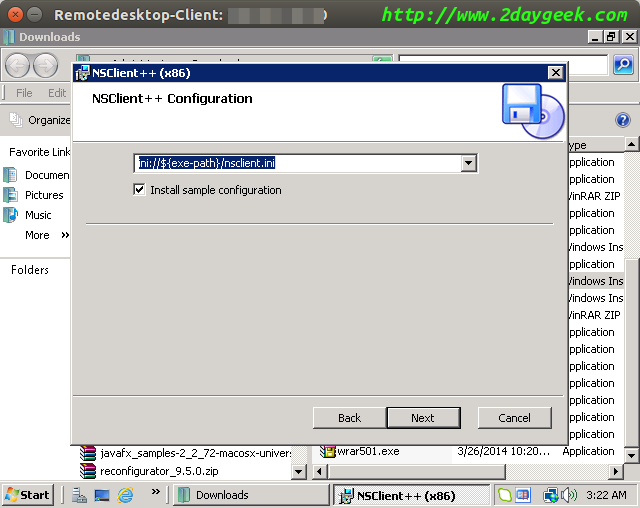
To install sample configuration file, then hit Next.
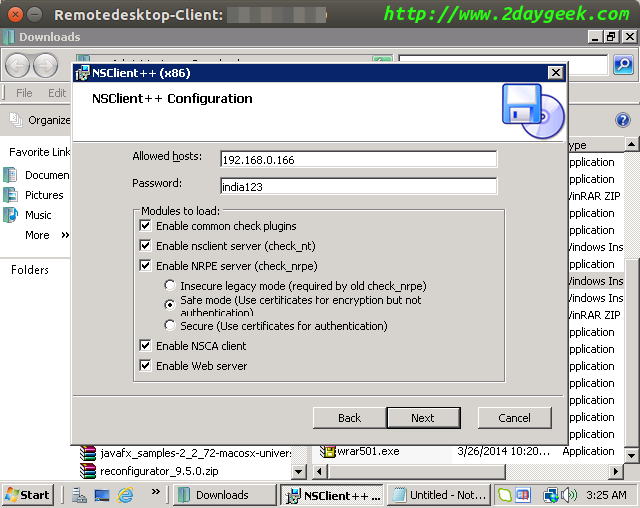
Enter the required details (Nagios server IP and password for communication), then hit Next.
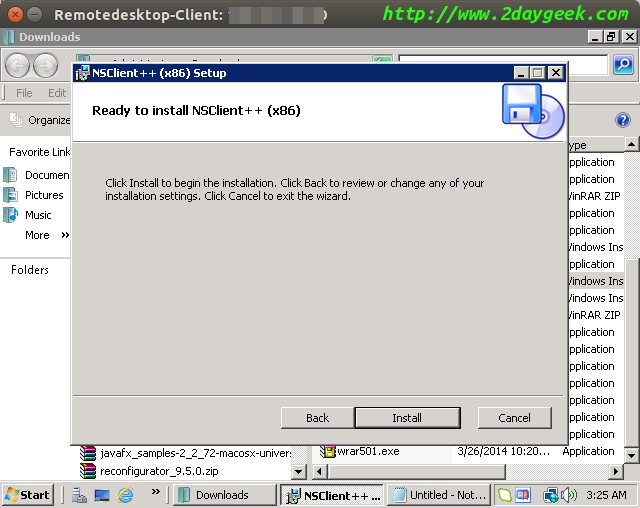
Hit Install button.
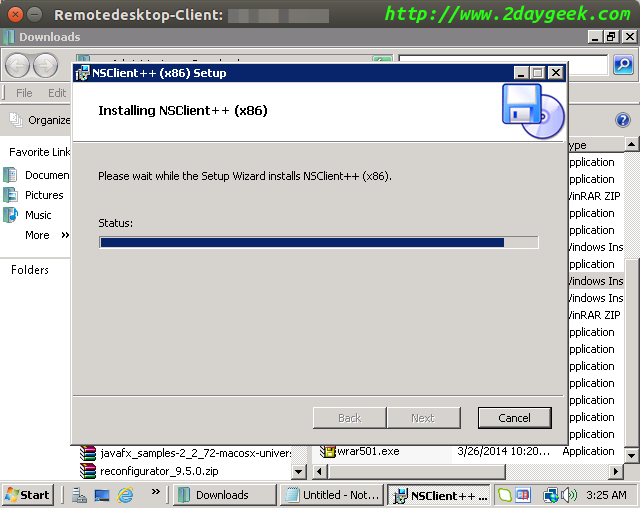
Installation under process.
Installation completed, then hit Finish.

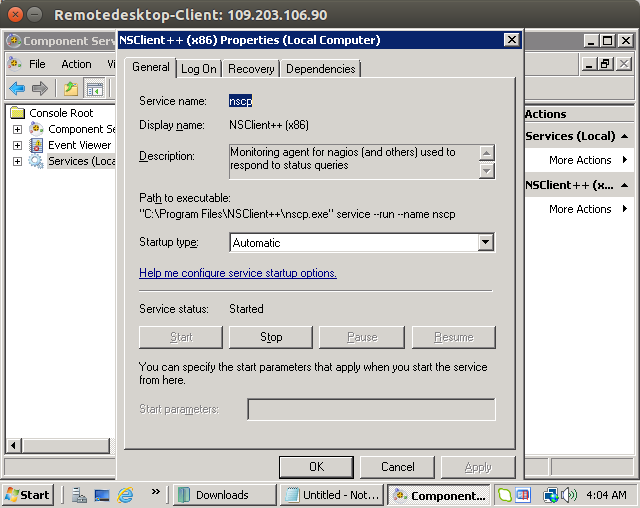
Start >> search “services” >> NSClient++ >> properties >> LogOn “tick” allow service to interact with desktop.
Part-2 : Nagois Server configuration.
1) Adding Windows host to Nagios server for monitoring
Create two files inside “/usr/local/nagios/etc/“ to define host and services.
# Navigate to directory #
# cd /usr/local/nagios/etc/

# Create host file, I'm creating linux-hosts.cfg for clarification #
# touch windows-hosts.cfg

# Create service file #
# touch windows-services.cfg

# Add both files to end of the nagios.cfg file with below format #
# nano /usr/local/nagios/etc/nagios.cfg

cfg_file=/usr/local/nagios/etc/windows-hosts.cfg
cfg_file=/usr/local/nagios/etc/windows-services.cfg
2) Add/Define new windows host
We don’t know how to define and configure hosts. So, don’t worry because default templates will be available at /usr/local/nagios/etc/objects/ just copy and past it into your host file based on your OS (windows or linux).
# Adding contents to windows-hosts.cfg file from (windows.cfg & templates.cfg) file #
# nano /usr/local/nagios/etc/windows-hosts.cfg
# HOST DEFINITIONS

# Define a host for the Windows machine we'll be monitoring
# Change the host_name, alias, and address to fit your situation

define host{
        use             windows-servers  	; Inherit default values from a template
        host_name       windows.2daygeek.com    ; The name we're giving to this host
        alias           windows.2daygeek.com    ; A longer name associated with the host
        address         192.168.0.155     	; IP address of the host
        }


# Windows host definition template - This is NOT a real host, just a template!

define host{
        name                    windows-servers  ; The name of this host template
        use                     generic-host    ; Inherit default values from the generic-host template
        check_period            24x7            ; By default, Windows servers are monitored round the clock
        check_interval          5               ; Actively check the server every 5 minutes
        retry_interval          1               ; Schedule host check retries at 1 minute intervals
        max_check_attempts      10              ; Check each server 10 times (max)
        check_command           check-host-alive        ; Default command to check if servers are "alive"
        notification_period     24x7            ; Send notification out at any time - day or night
        notification_interval   30              ; Resend notifications every 30 minutes
        notification_options    d,r             ; Only send notifications for specific host states
        contact_groups          admins          ; Notifications get sent to the admins by default
        hostgroups              windows-servers ; Host groups that Windows servers should be a member of
        register                0               ; DONT REGISTER THIS - ITS JUST A TEMPLATE
        }
3) Add/Define service for windows host
We don’t know how to define and configure service for linux hosts. So, don’t worry because default templates will be available at /usr/local/nagios/etc/objects/ just copy and paste it into your service file.
# Adding contents to linux-service.cfg file from (windows.cfg) file #
# nano /usr/local/nagios/etc/windows-service.cfg
# SERVICE DEFINITIONS

# Create a service for monitoring the version of NSCLient++ that is installed
# Change the host_name to match the name of the host you defined above

define service{
        use                     generic-service
        host_name               windows.2daygeek.com
        service_description     NSClient++ Version
        check_command           check_nt!CLIENTVERSION
        }

# Create a service for monitoring the uptime of the server
# Change the host_name to match the name of the host you defined above

define service{
        use                     generic-service
        host_name               2indows.2daygeek.com
        service_description     Uptime
        check_command           check_nt!UPTIME
        }

# Create a service for monitoring CPU load
# Change the host_name to match the name of the host you defined above

define service{
        use                     generic-service
        host_name               windows.2daygeek.com
        service_description     CPU Load
        check_command           check_nt!CPULOAD!-l 5,80,90
        }

# Create a service for monitoring memory usage
# Change the host_name to match the name of the host you defined above

define service{
        use                     generic-service
        host_name               windows.2daygeek.com
        service_description     Memory Usage
        check_command           check_nt!MEMUSE!-w 80 -c 90
}

# Create a service for monitoring C:\ disk usage
# Change the host_name to match the name of the host you defined above

define service{
        use                     generic-service
        host_name               windows.2daygeek.com
        service_description     C:\ Drive Space
        check_command           check_nt!USEDDISKSPACE!-l c -w 80 -c 90
        }

# Create a service for monitoring the W3SVC service
# Change the host_name to match the name of the host you defined above

define service{
        use                     generic-service
        host_name               windows.2daygeek.com
        service_description     W3SVC
        check_command           check_nt!SERVICESTATE!-d SHOWALL -l W3SVC
        }

# Create a service for monitoring the Explorer.exe process
# Change the host_name to match the name of the host you defined above

define service{
        use                     generic-service
        host_name               windows.2daygeek.com
        service_description     Explorer
        check_command           check_nt!PROCSTATE!-d SHOWALL -l Explorer.exe
        }
4) Add/Define check_nt commands for windows host
We don’t know how to define and configure check_nt commands to communicate with remote server. So, don’t worry because default templates will be available at /usr/local/nagios/etc/objects/ just copy and paste it at the end of your commands.cfg file. Just find “check_nt” and change the password which you gave while installation of NSClient++ on remote windows host.
# Modifying check_nt commands to commands.cfg file from (commands.cfg) file #
# nano /usr/local/nagios/etc/commands.cfg
define command{
command_name	check_nt
command_line	$USER1$/check_nt -H $HOSTADDRESS$ -p india123 -s My2Secure$Password -v $ARG1$ $ARG2$
}
5) Verifying Nagios.cfg file
After making all the above changes, verify the Nagios.cfg file whether it throws any errors.
# /usr/local/nagios/bin/nagios -v /usr/local/nagios/etc/nagios.cfg
6) Restart Nagios service
Finally restart the Nagios service to take effect.
# service nagios restart                    # [For SysVinit Systems]
# systemctl restart nagios.service          # [For systemd Systems]
7) Access Nagios Web Interface
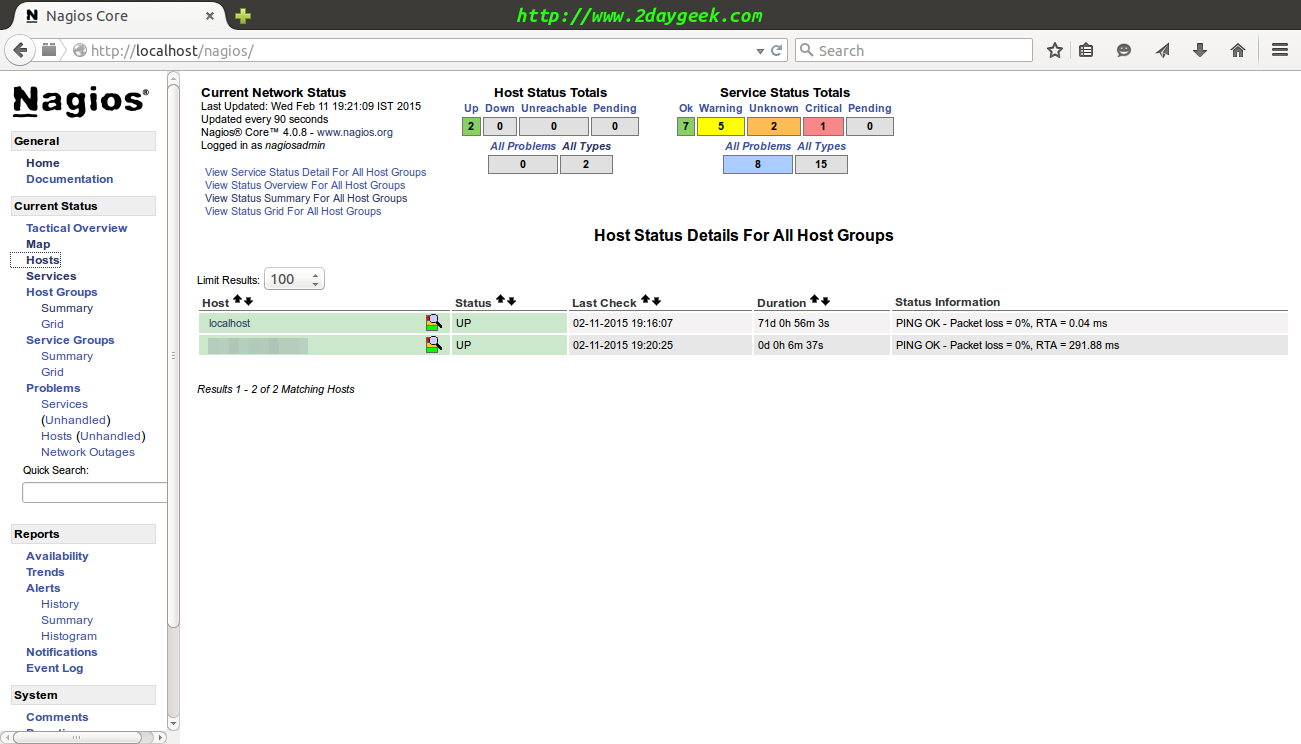
Navigate your browser to http://localhost/nagios or http://IP-Address/nagios or http://Domain-Name/nagios and enter the Username and Password then click “Hosts”, Here you can see the new windows host which has been added by you.
Stay tune with us. Will come with new set of articles.


May I know how to configure and monitor JBOSS in Nagios ?
We haven’t tried till now, will give a try and prepare the article too.
Hi All,
I have installed NSClient++ and the Windows-Host machine was added to my Nagios Server.But When i add the service to monitor my Windows-Host , the services are showing as UNKNOWN.I have tried all the possibilities but i don’t know why it is showing.Please reply asap
Thanks in Advance:)))
@Vijay,
It seem’s that you didn’t mention the password @ command.cfg file under ‘check_nt’.
Thanks for your reply.I have mentioned the password in command.cfg file.That’s also not working.
I have followed the techadmin forum and install it and configure it on our CentOS…
Hi Vijay,
Cross check once again with our guide and update me. After that if you face any issues, please give the screenshot of error message to move forward.
Thanks for your reply Ramya.I have cross checked the guide and the same thing is happening.
I am not able to attach the screenshot with this.Sorry for the inconvenience.If you have email , kindly let me know.I will send the screenshots to you.
Thanks in advance:)
Hi Vijay,
Send the screenshot to 2daygeek@gmail.com.
Thanks MAgesh.I will send it now.
waste site. not working !
@boom,
Can i have the error message, so the i can help further.
Hello,
Could you please help me how to add multiple windows hosts in nagios server?
Vikram
@Vikram,
First you have to install NSClient++ to all windows remote host (the same which we clearly explained in PART-1). Then define the new windows host separately and include the hostname into all service by comma.
2) Add/Define new windows host
define host{
use windows-servers ; Inherit default values from a template
host_name windows.2daygeek.com ; The name we’re giving to this host
alias windows.2daygeek.com ; A longer name associated with the host
address 192.168.0.155 ; IP address of the host
}
define host{
use windows-servers ; Inherit default values from a template
host_name support.2daygeek.com ; The name we’re giving to this host
alias windows.2daygeek.com ; A longer name associated with the host
address 192.168.0.156 ; IP address of the host
}
.
.
.
define host{
use windows-servers ; Inherit default values from a template
host_name sales.2daygeek.com ; The name we’re giving to this host
alias windows.2daygeek.com ; A longer name associated with the host
address 192.168.0.156 ; IP address of the host
}
then
3) Add/Define service for windows host
define service{
use generic-service
host_name windows.2daygeek.com, support.2daygeek.com, sales.2daygeek.com
service_description NSClient++ Version
check_command check_nt!CLIENTVERSION
}
define service{
use generic-service
host_name 2indows.2daygeek.com, support.2daygeek.com, sales.2daygeek.com
service_description Uptime
check_command check_nt!UPTIME
}
.
.
.
define service{
use generic-service
host_name windows.2daygeek.com, support.2daygeek.com, sales.2daygeek.com
service_description Explorer
check_command check_nt!PROCSTATE!-d SHOWALL -l Explorer.exe
}
Hope you can understand now.