Sometimes the Linux system crashes due to corruption of the root filesystem, in which case you need to boot the system into recovery mode and then repair your file system.
The panic screen will show that the root file system is corrupted and suggests manually running fsck to repair it.
Metadata CRC error detected at xfs_agi_read_verify+0xcb/0xf0 [xfs], xfs_agi block 0x2
XFS (loop0): Unmount and run xfs_repair
File system corruption can occur for various reasons and some of the reasons are listed below:
- The file system becomes read-only due to inconsistencies
- A file on the file system is inaccessible due to filesystem corruption
- System fails to boot
- Hardware faults
In this guide, we’ll show you how to repair corrupted xfs filesystem of root partition in RHEL 8. This same procedure can be used for other system partitions that can’t be unmounted while the system is running.
Step-1 : Boot a System into rescue mode from Installation DVD/ISO
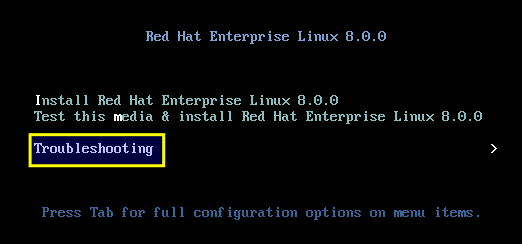
To repair corrupted xfs filesystem, boot your system with the installation DVD/ISO image. On boot screen of Red Hat 8, Select the ‘Troubleshooting’ option and press enter.
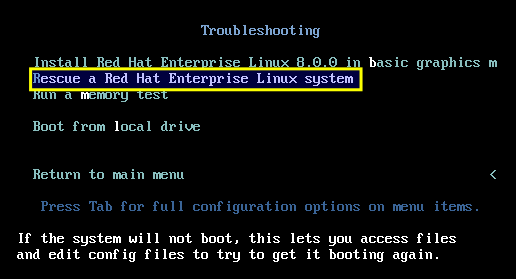
In the next screen, select the ‘Rescue a Red Hat Enterprise Linux system’ option and press enter.
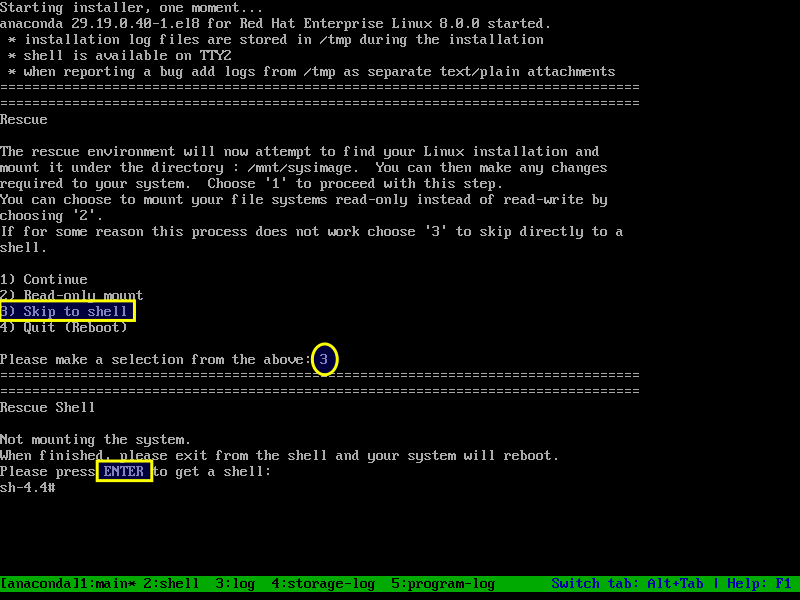
On the next screen, select option ‘3 (Skip to shell)’ and hit ‘ENTER’.
Step-2 : Activate Partitions
If you are using Software RAID, Initialize the RAID array first by running the below command:
mdadm --assemble --scan
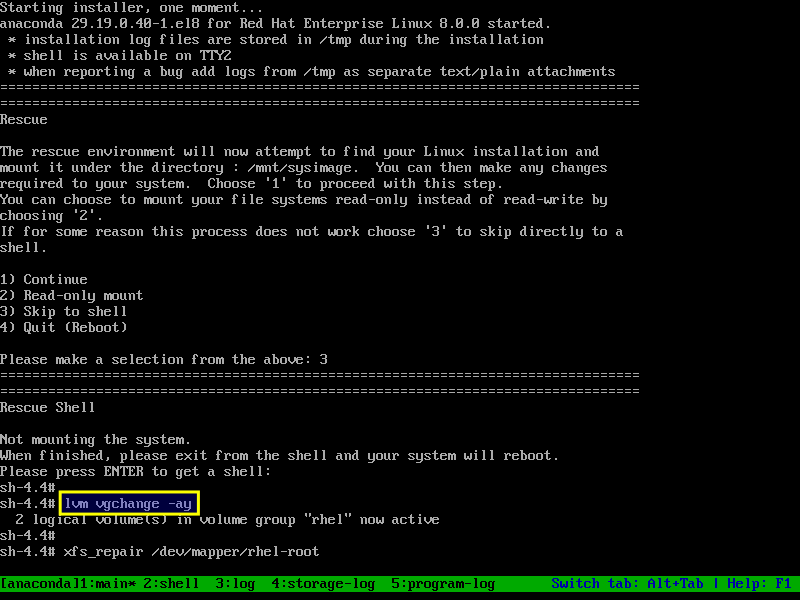
If your using LVM, activate the volumes in order to scan them.
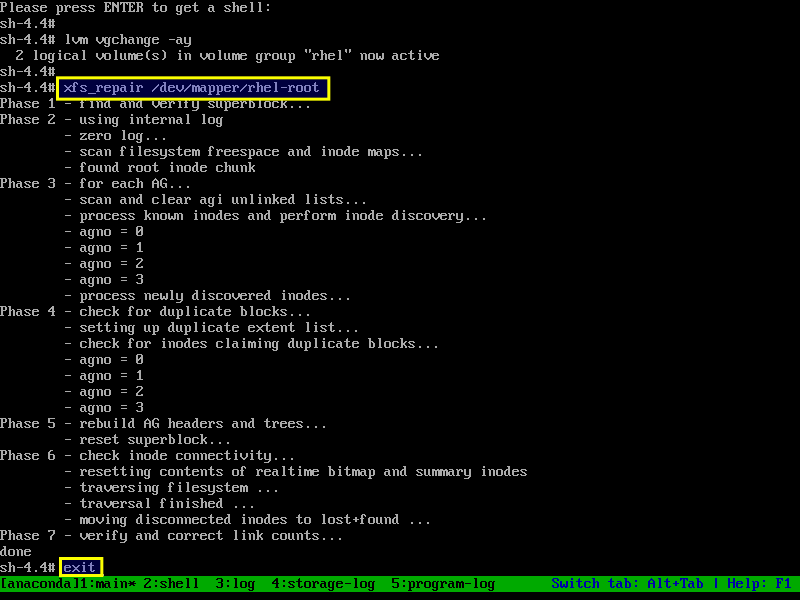
lvm vgchange -ay
Make a Note: If you only have partitions such as ‘/dev/sda1’ and ‘/dev/sdb1’, you can skip this step and directly execute the filesystem repair command.
Step-3 : Repairing an XFS file system with xfs_repair in rescue mode
File system checkers utilities such as ‘xfs_repair’ and ‘e2fsck’ guarantee only the metadata consistency across the file system, they doesn’t no about actual data stored within the file system and are not data recovery tools. These applications are expected to detect and repair at least some inconsistencies.
For LVM Volume:
xfs_repair /dev/mapper/[vg]-[lv]
xfs_repair /dev/mapper/rhel-root
For RAID Volume:
xfs_repair /dev/[md device]
xfs_repair /dev/md0
For Normal Volume:
xfs_repair /dev/[sd device]
xfs_repair /dev/sda1
Step-3a : Repairing an ext4 file system with e2fsck in rescue mode
For LVM Volume:
e2fsck -fvy /dev/mapper/[vg]-[lv]
e2fsck -fvy /dev/mapper/rhel-root
- -f : Force checking even if the file system seems clean.
- -y : Assume an answer of `yes’ to all questions; allows e2fsck to be used non-interactively.
- -v : Verbose mode
For Normal Volume:
e2fsck -fvy /dev/[sd device]
e2fsck -fvy /dev/sda1
For RAID Volume:
e2fsck -fvy /dev/[md device]
e2fsck -fvy /dev/md0
Exit the rescue mode and boot the system normally.
exit
Final Thoughts
In this guide, we have described how to repair corrupted xfs filesystem of root partition in RHEL 8 system using the Anaconda Rescue Mode from installation DVD/ISO. This same procedure works on other RHEL 8 clones such as CentOS 8, Rocky Linux 8 and AlmaLinux 8.
If you have any questions or feedback, feel free to comment below.


Hi,
very nice and useful article
Thanks a lot