Docker is a cutting-edge software used for containerization, that is used in most of IT companies to reduce infrastructure cost.
By default docker comes without any GUI, which is easy for Linux administrator to manage it and it’s very difficult for developers to manage. When it’s come to production then it’s very difficult for Linux admin too. So, what would be the best solution to manage the docker without any trouble.
The only way is GUI. The Docker API has allowed third party applications to interfacing with Docker. There are many docker GUI applications available in the market. We already wrote an article about Portainer application. Today we are going to discuss about Rancher.
Containers make software development easier, enabling you to write code faster and run it better. However, running containers in production can be hard.
Suggested Read : Portainer – A Simple Docker Management GUI
What is Rancher
Rancher is a complete container management platform that makes it easy to deploy and run containers in production on any infrastructure. It provides infrastructure services such as multi-host networking, global and local load balancing, and volume snapshots. It integrates native Docker management capabilities such as Docker Machine and Docker Swarm. It offers a rich user experience that enables devops admins to operate Docker in production at large scale.
Navigate to following articles for docker installation on Linux.
Suggested Read :
(#) How to install Docker in Linux
(#) How to play with Docker images on Linux
(#) How to play with Docker containers on Linux
(#) How to Install, Run Applications inside Docker Containers
Rancher Features
- Set up Kubernetes in two minutes
- Launch apps with single click (90 popular Docker applications)
- Deploy and manage Docker easily
- complete container management platform for production environment
- Quickly deploy containers in production
- Automate container deployment and operations with a robust technology
- Modular infrastructure services
- Rich set of orchestration tools
- Rancher supports multiple authentication mechanisms
How to install Rancher
Rancher installation is very simple since it’s runs as a lightweight Docker containers. Rancher is deployed as a set of Docker containers. Running Rancher is as simple as launching two containers. One container as the management server and another container on a node as an agent. Simple run the following command to deploy rancher on Linux.
Rancher server offers two different package tags like stable & latest. The below commands will pull appropriate build rancher image and install on your system. It will only take a couple of minutes for Rancher server to start up.
stable: This tag will be their latest development builds. These builds will have been validated through rancher CI automation framework which is not advisable for deployment in production.latest: It’s a latest stable release version which is recommend for production environment.
Rancher installation comes with many varieties. In this tutorial we are going to discuss about two variants.
- Install rancher server in a single container (Inbuilt Rancher Database)
- Install rancher server in a single container (External Database)
Method-1
Run the following commands to install rancher server in a single container (Inbuilt Rancher Database).
$ sudo docker run -d --restart=unless-stopped -p 8080:8080 rancher/server:stable

$ sudo docker run -d --restart=unless-stopped -p 8080:8080 rancher/server:latest
Method-2
Instead of using the internal database that comes with Rancher server, you can start Rancher server pointing to an external database. First create required database, database user for the same.
> CREATE DATABASE IF NOT EXISTS cattle COLLATE = 'utf8_general_ci' CHARACTER SET = 'utf8';
> GRANT ALL ON cattle.* TO 'cattle'@'%' IDENTIFIED BY 'cattle';
> GRANT ALL ON cattle.* TO 'cattle'@'localhost' IDENTIFIED BY 'cattle';
Run the following command to start Rancher connecting to an external database.
$ sudo docker run -d --restart=unless-stopped -p 8080:8080 rancher/server \
    --db-host myhost.example.com --db-port 3306 --db-user username --db-pass password --db-name cattle
If you want to test Rancher 2.0 use the following command to start.
$ sudo docker run -d --restart=unless-stopped -p 80:80 -p 443:443 rancher/server:preview
Access & Setup Rancher through GUI
Navigate to the following URL http://hostname:8080 or http://server_ip:8080 to access rancher GUI.

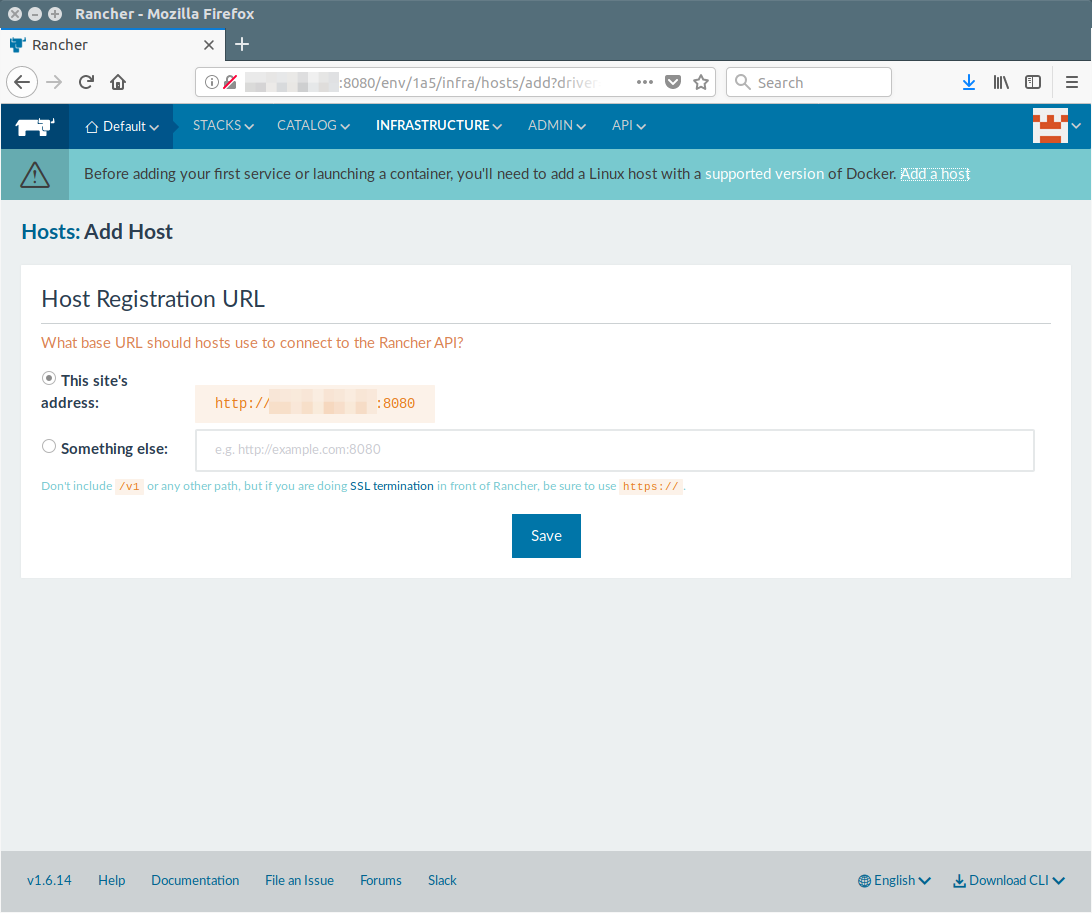
How to register the Host
Register your host URL which allow hosts to connect to the Rancher API. It’s one time setup.
To do so, Click “Add a Host” link under the main menu or Go to >> Infrastructure >> Add Hosts then hit save button.
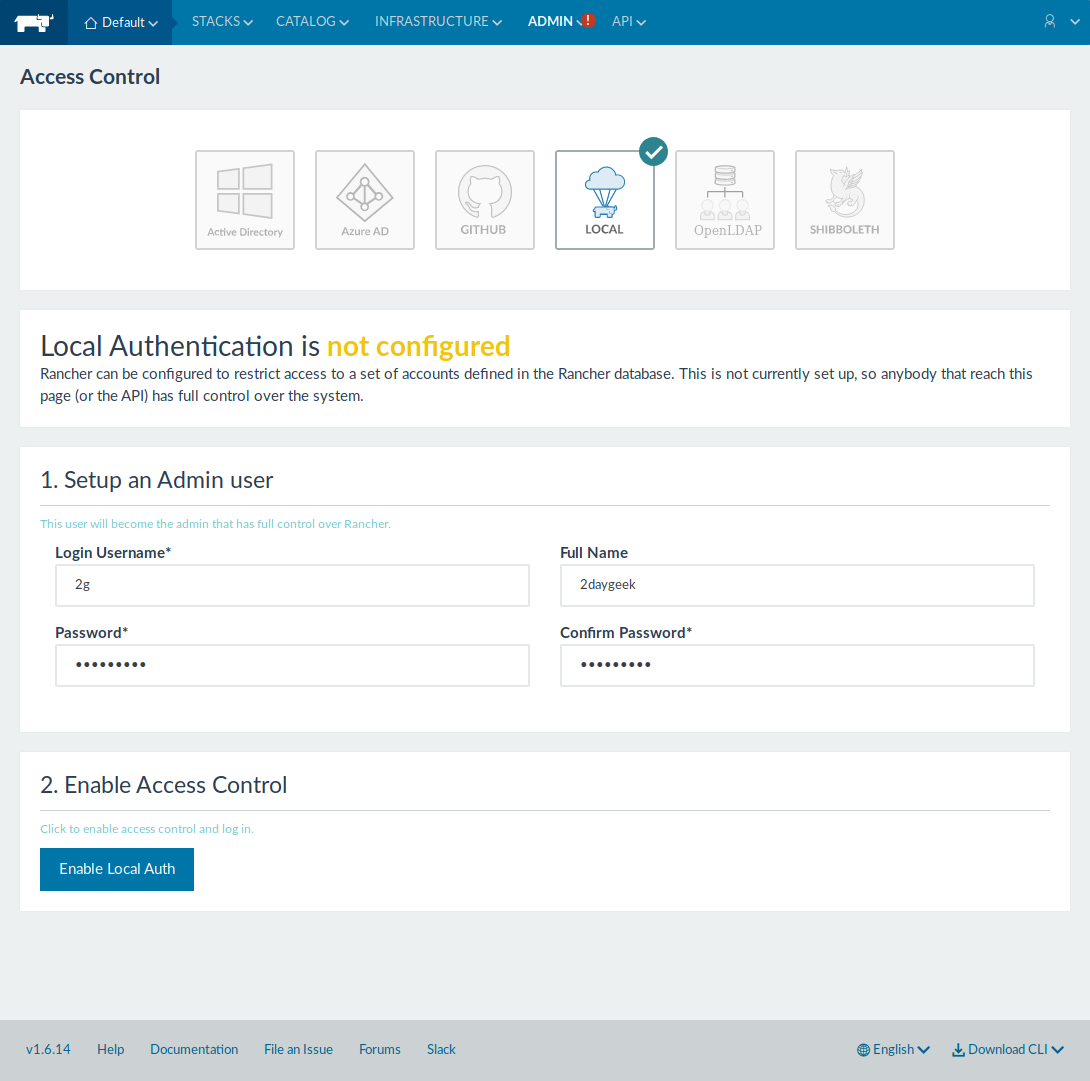
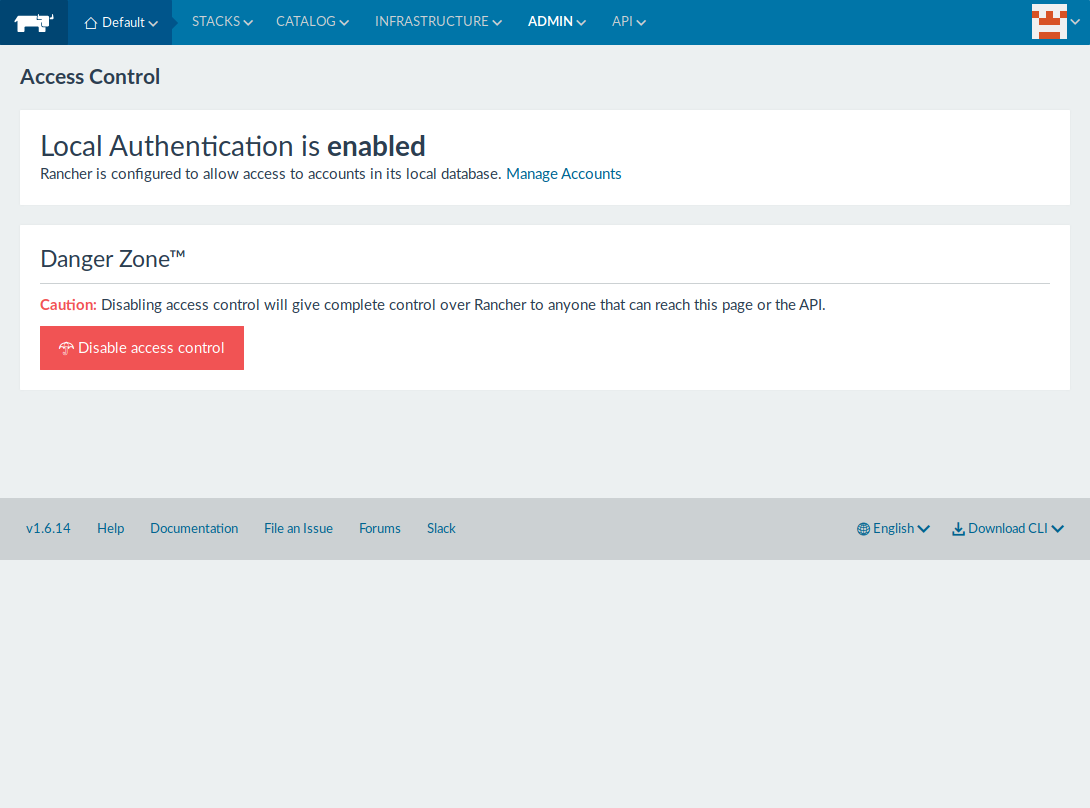
By default access control authentication is disabled in rancher so first we have to enable the access control authentication through available method, otherwise anyone can access the GUI.
Go to >> Admin >> Access Control and input the following values and finally hit Enable Authentication button to enable it. In my case i’m enabling via local authentication
Login UserNameInput your descried login usernameFull NameInput your full namePasswordInput your descried passwordConfirm PasswordConfirm the password once again
Logout and login back with your new login credential.
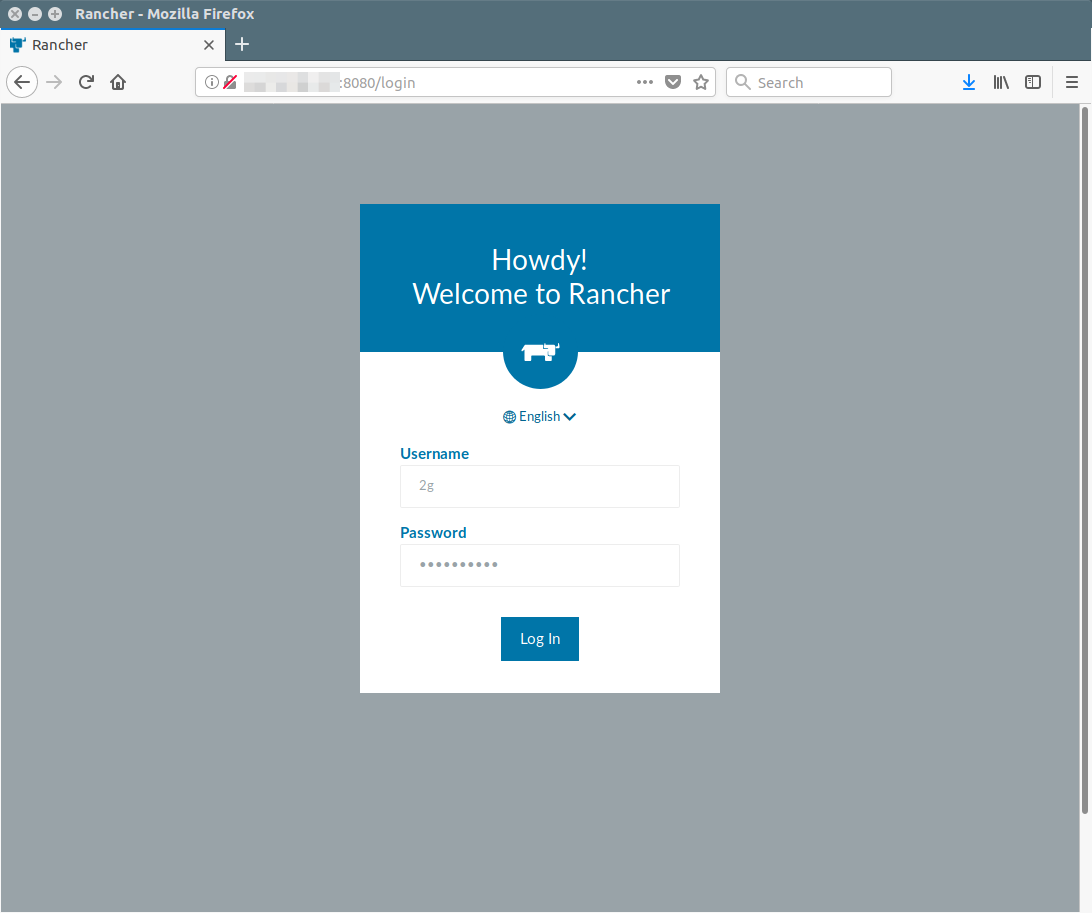
Now, I can see the local authentication is enabled.
How to add Hosts
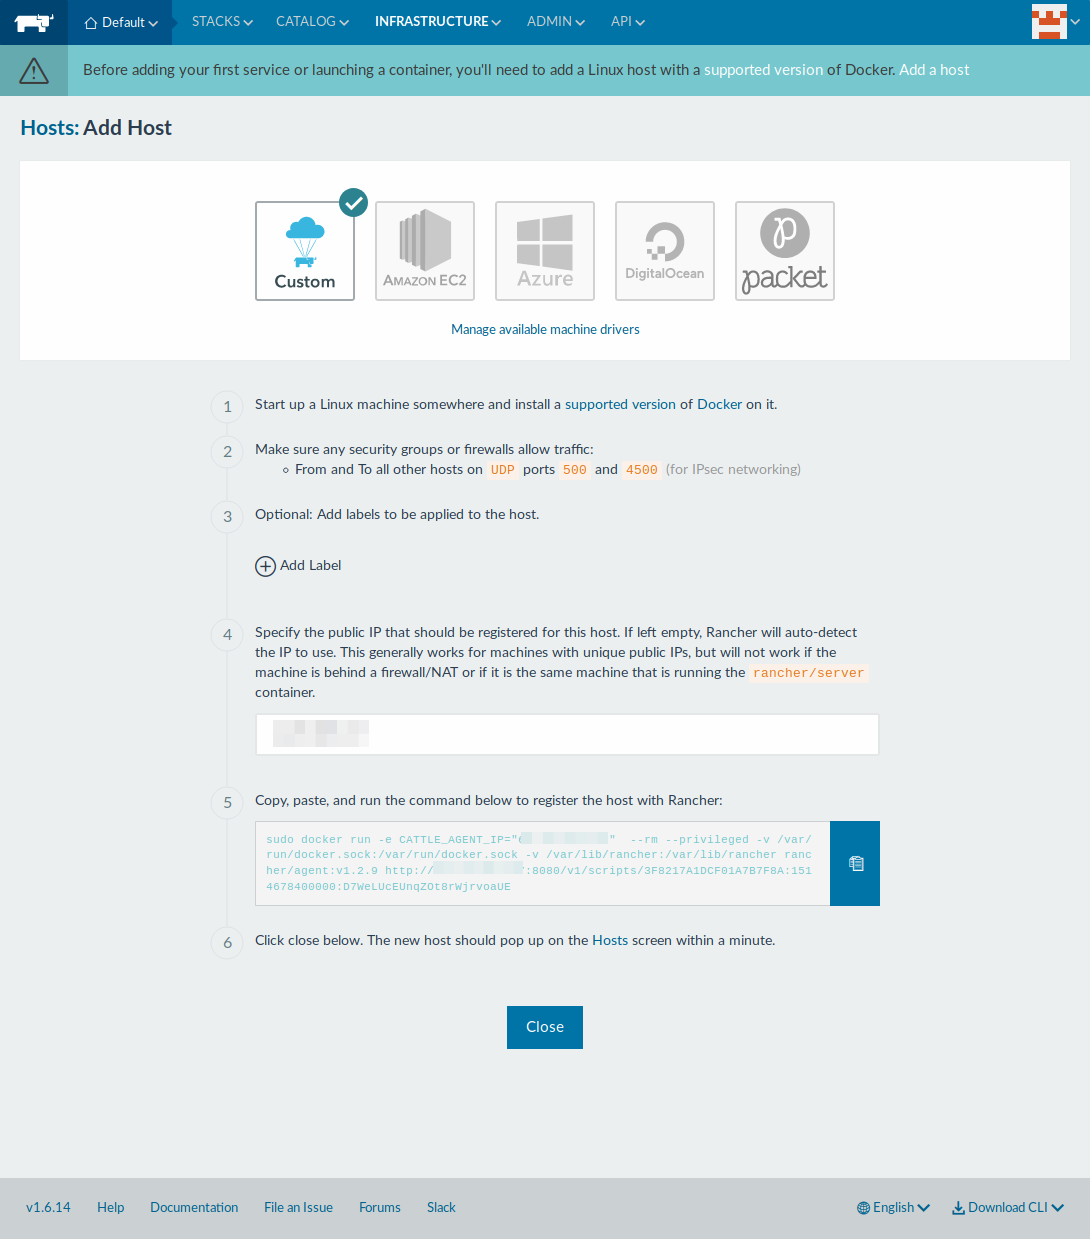
After register your host, it will take you to next page where you can choose Linux machines from varies cloud providers. We are going to add the host that is running Rancher server, so select the custom option and input the required information.
Enter your server public IP address in the 4th step and run the command which is displaying in the 5th step into your terminal then finally hit close button.
$ sudo docker run -e CATTLE_AGENT_IP="192.168.1.112"  --rm --privileged -v /var/run/docker.sock:/var/run/docker.sock -v /var/lib/rancher:/var/lib/rancher rancher/agent:v1.2.9 http://192.168.1.112:8080/v1/scripts/3F8217A1DCF01A7B7F8A:1514678400000:D7WeLUcEUnqZOt8rWjrvoaUE

INFO: Running Agent Registration Process, CATTLE_URL=http://192.168.1.112:8080/v1
INFO: Attempting to connect to: http://192.168.1.112:8080/v1
INFO: http://192.168.1.112:8080/v1 is accessible
INFO: Inspecting host capabilities
INFO: Boot2Docker: false
INFO: Host writable: true
INFO: Token: xxxxxxxx
INFO: Running registration
INFO: Printing Environment
INFO: ENV: CATTLE_ACCESS_KEY=A35151AB87C15633DFB4
INFO: ENV: CATTLE_AGENT_IP=192.168.1.112
INFO: ENV: CATTLE_HOME=/var/lib/cattle
INFO: ENV: CATTLE_REGISTRATION_ACCESS_KEY=registrationToken
INFO: ENV: CATTLE_REGISTRATION_SECRET_KEY=xxxxxxx
INFO: ENV: CATTLE_SECRET_KEY=xxxxxxx
INFO: ENV: CATTLE_URL=http://192.168.1.112:8080/v1
INFO: ENV: DETECTED_CATTLE_AGENT_IP=172.17.0.1
INFO: ENV: RANCHER_AGENT_IMAGE=rancher/agent:v1.2.9
INFO: Deleting container rancher-agent
INFO: Launched Rancher Agent: 3415a1fd101f3c57d9cff6aef373c0ce66a3e20772122d2ca832039dcefd92fd
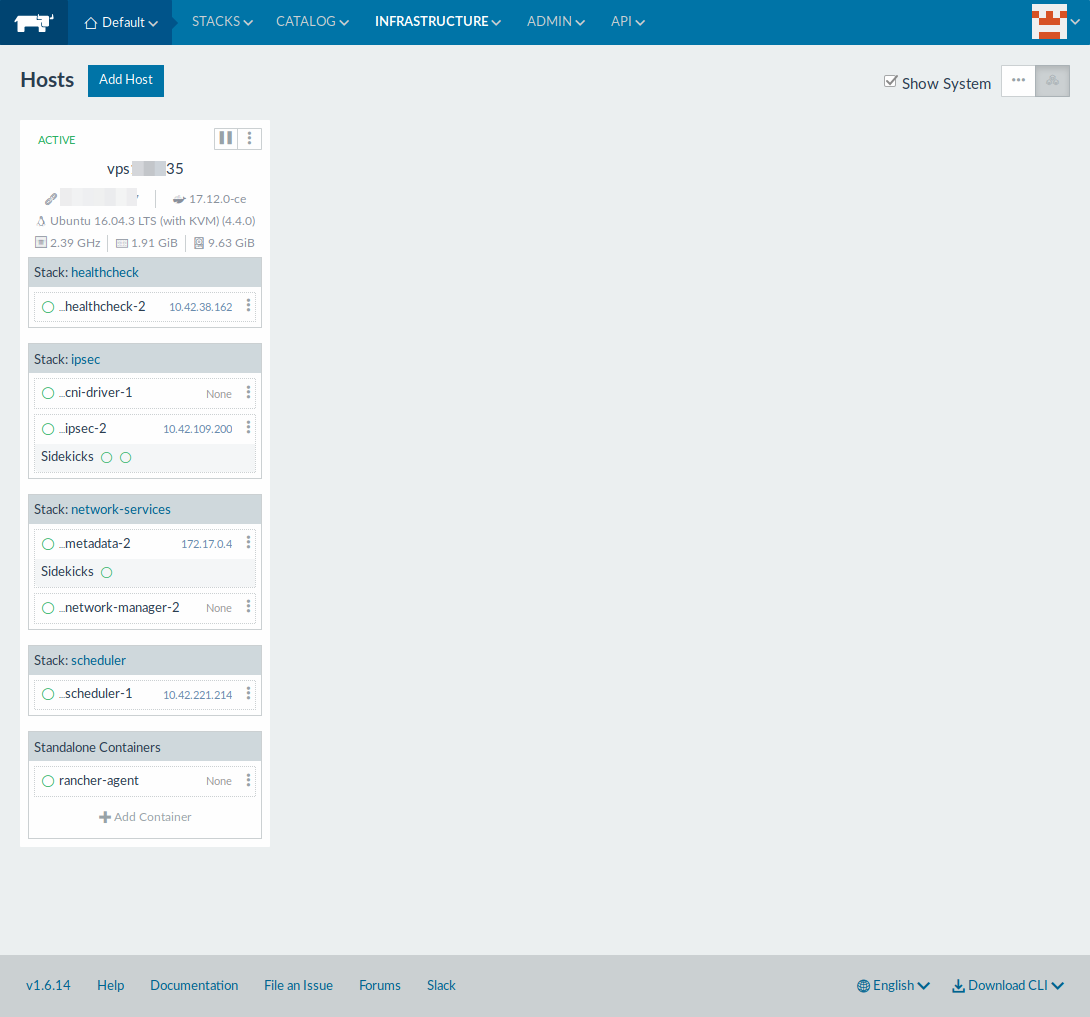
Wait few seconds then the newly added host will be visible. To bring this Go to Infrastructure >> Hosts page.
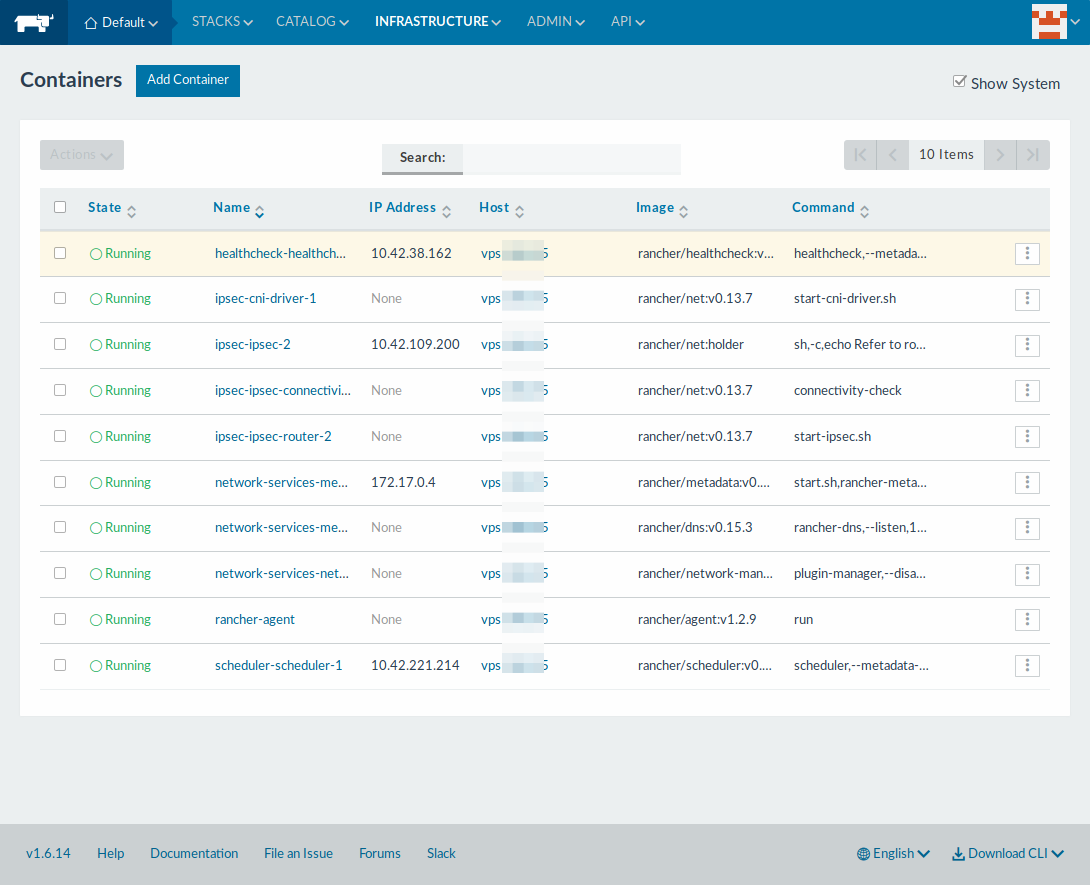
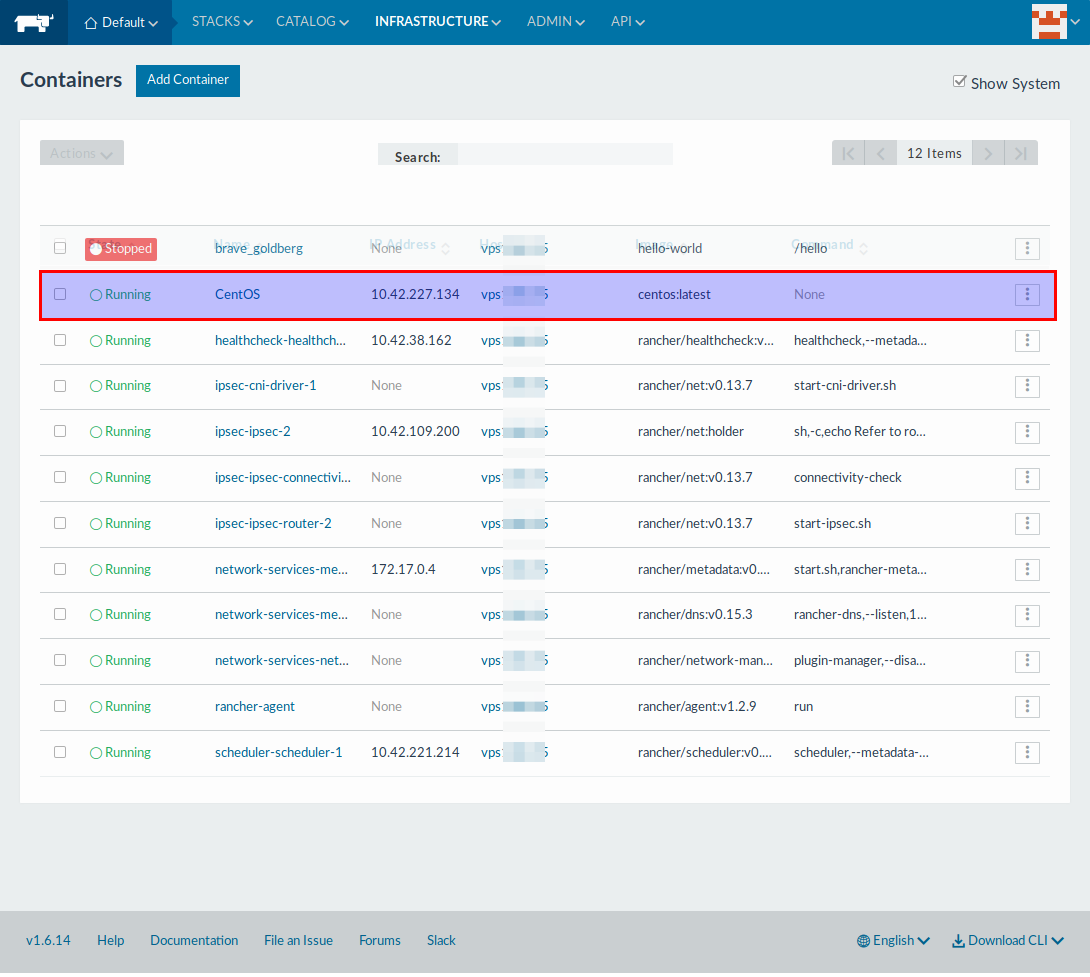
How to view containers
Just navigate the following location to view a list of running containers. Go to >> Infrastructure >> Containers.
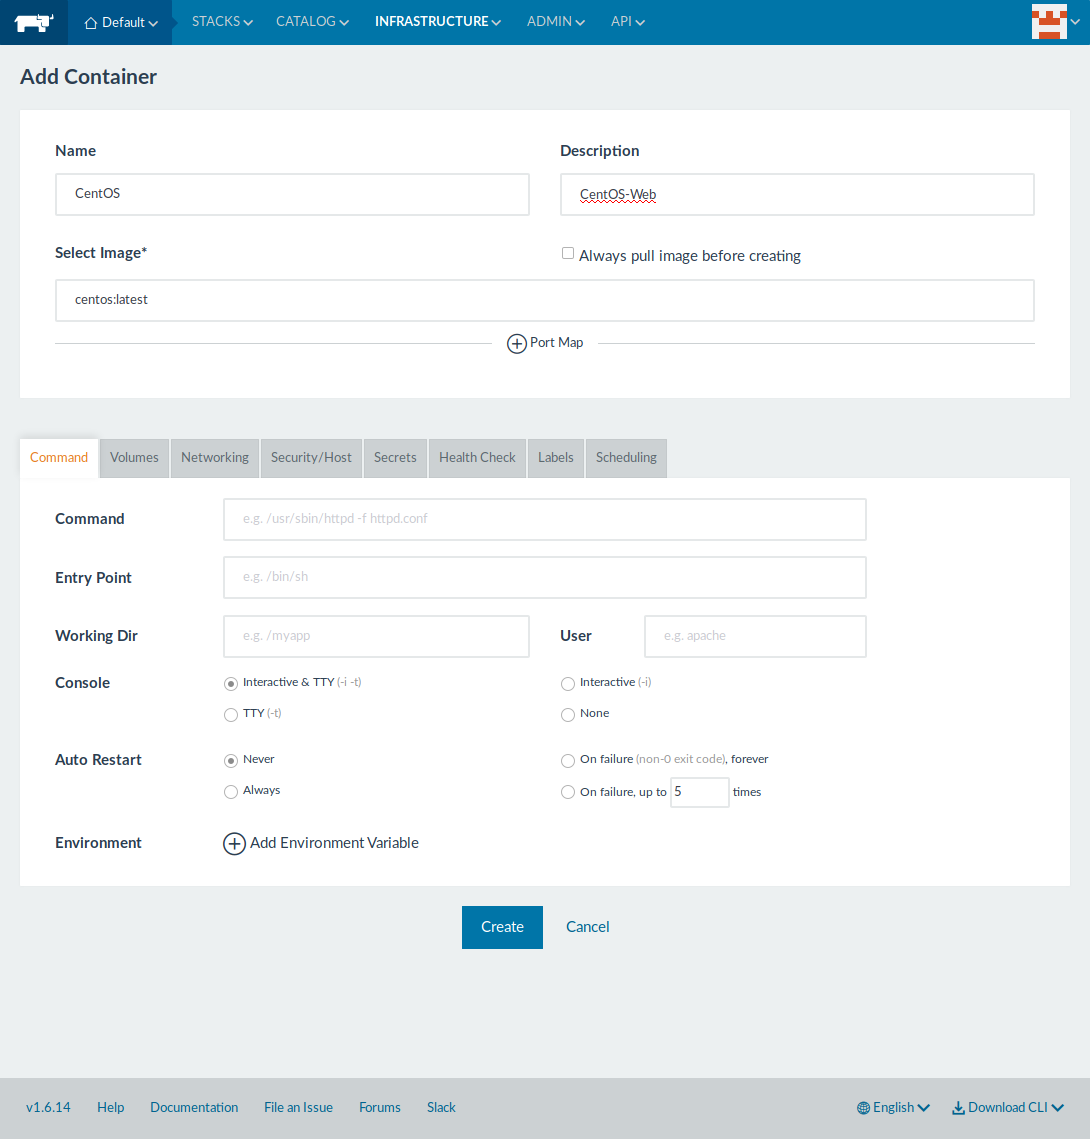
How to create container
It’s very simple, just navigate the following location to create a container.
Go to >> Infrastructure >> Containers >> “Add Container” and input the required information as per your requirement. To test this, I’m going to create Centos container with latest OS.
The same has been listed here. Infrastructure >> Containers
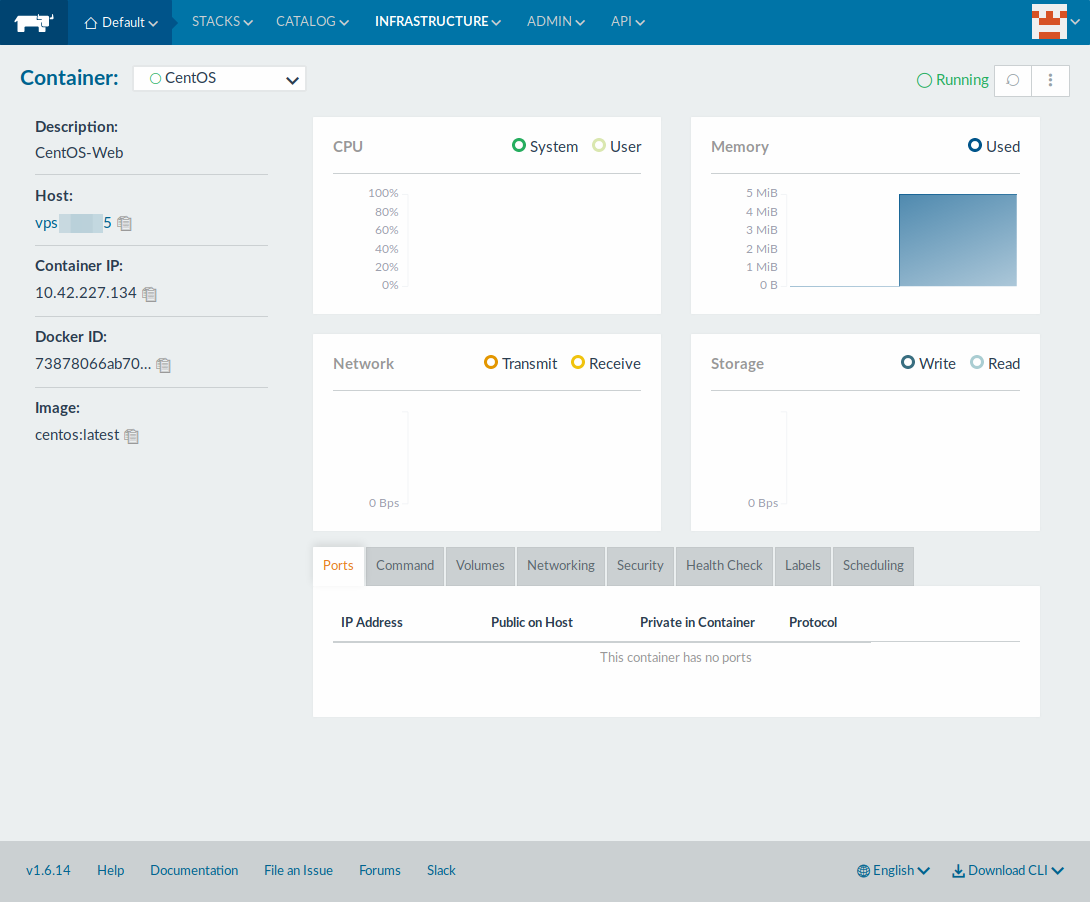
Hit on the Container name to view the container performances information like CPU, memory, network and storage.
To manage the container such as stop, start, clone, restart, etc. Choose the particular container then hit Three dot's button in the left side of the container or Actions button to perform.
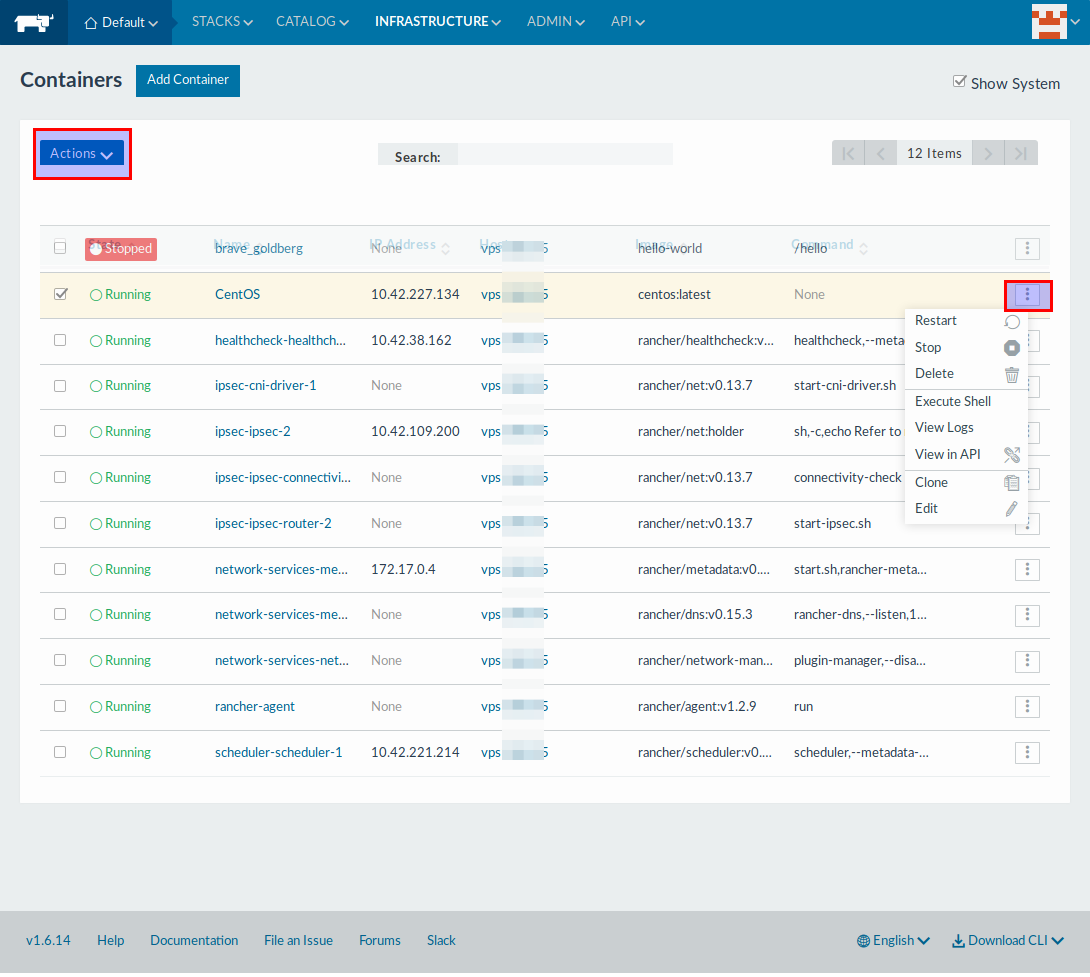
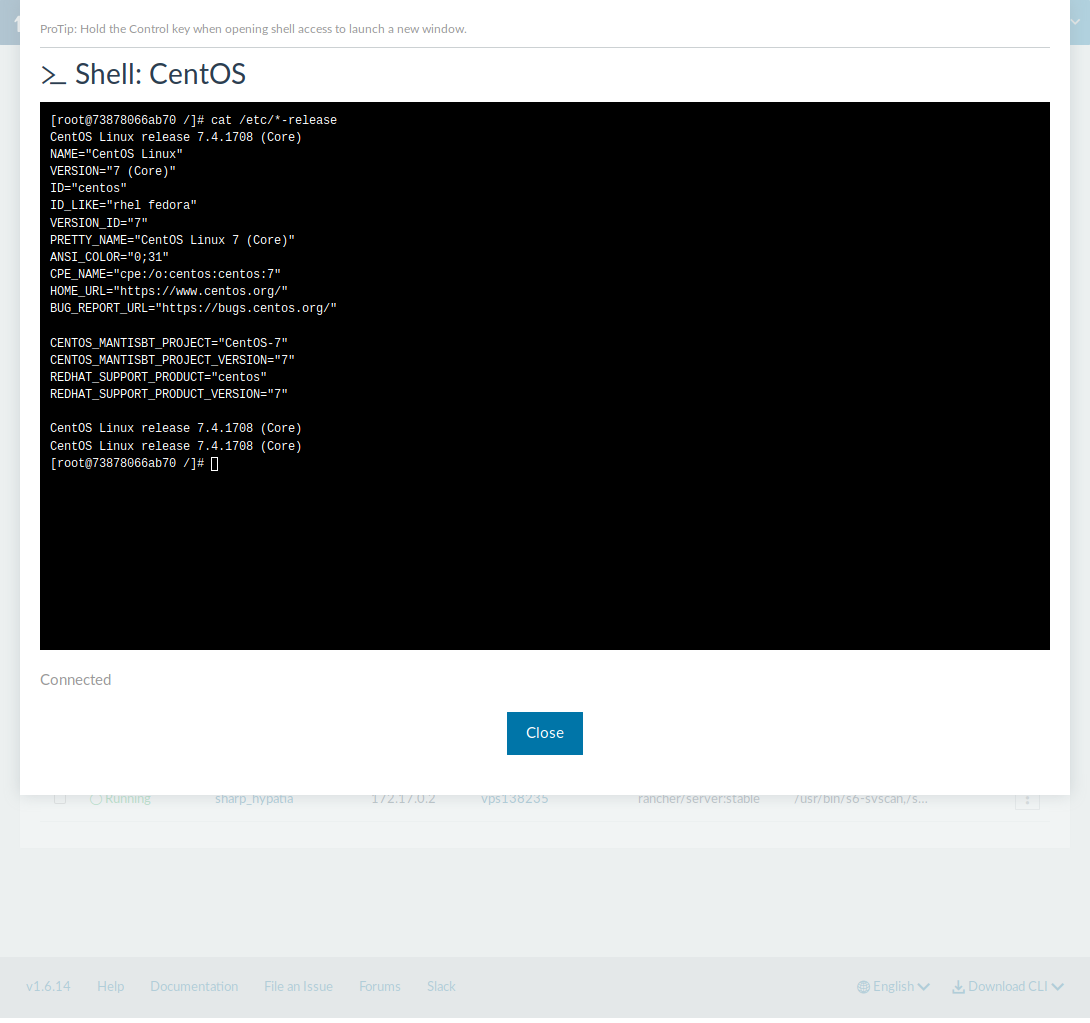
If you want console access of the container, just hit Execute Shell option in the action button.
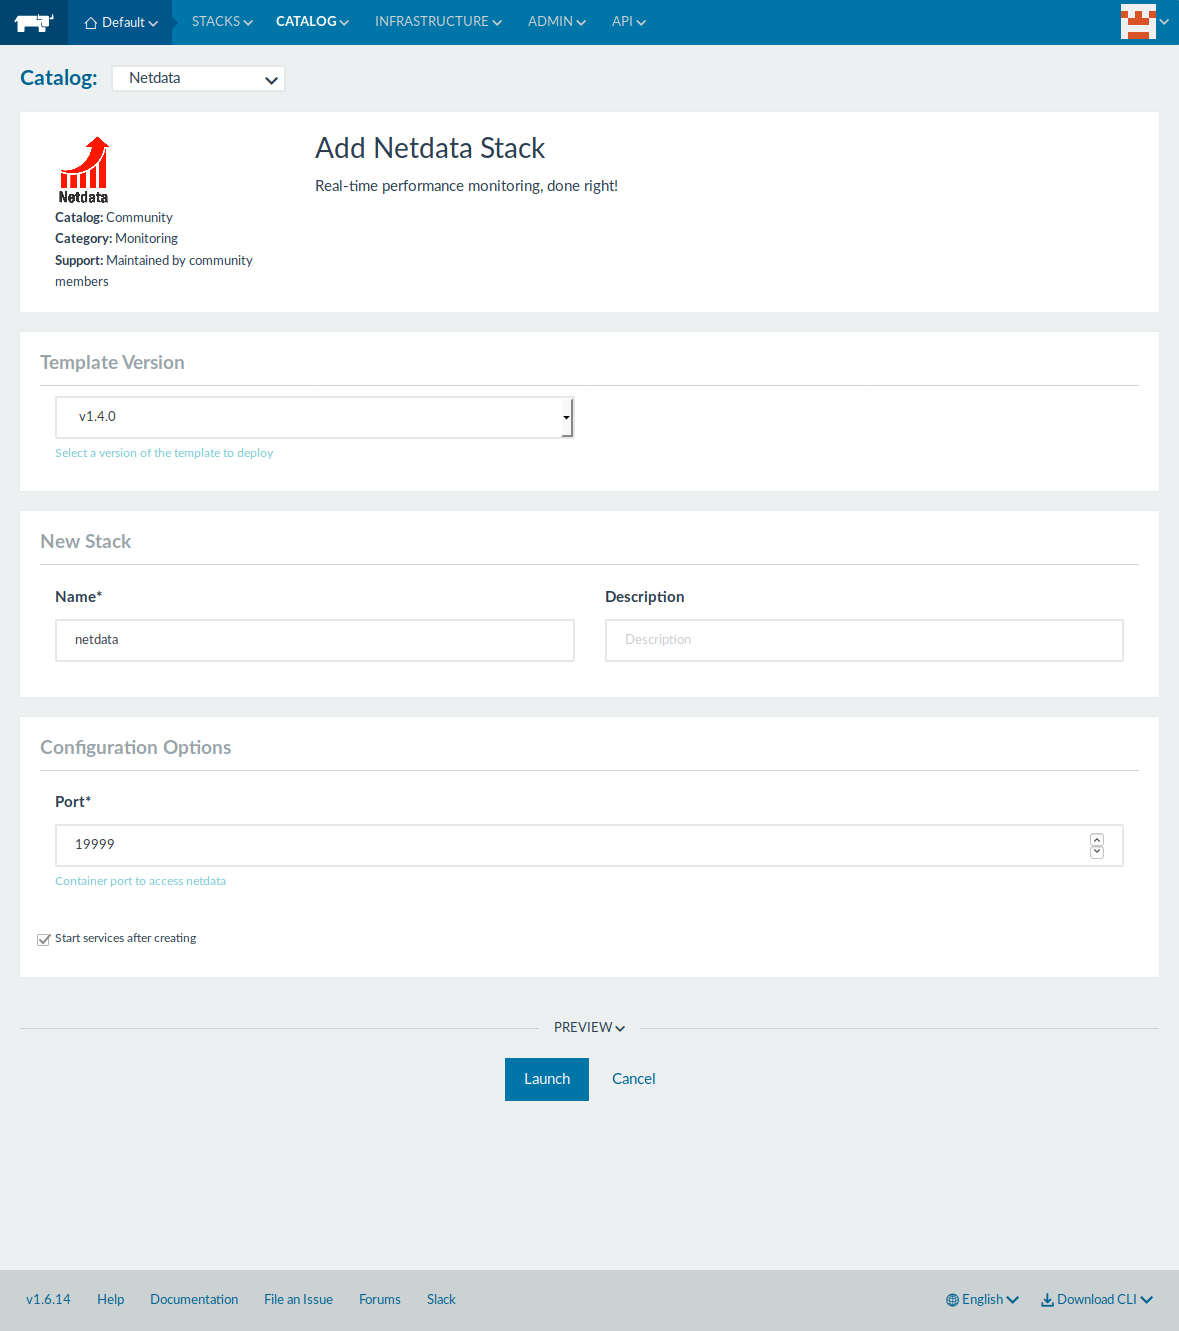
How to deploy container from application catalog
Rancher provides a catalog of application templates that make it easy to deploy in single click. It’s maintain popular applications (nearly 90) contributed by the Rancher community.
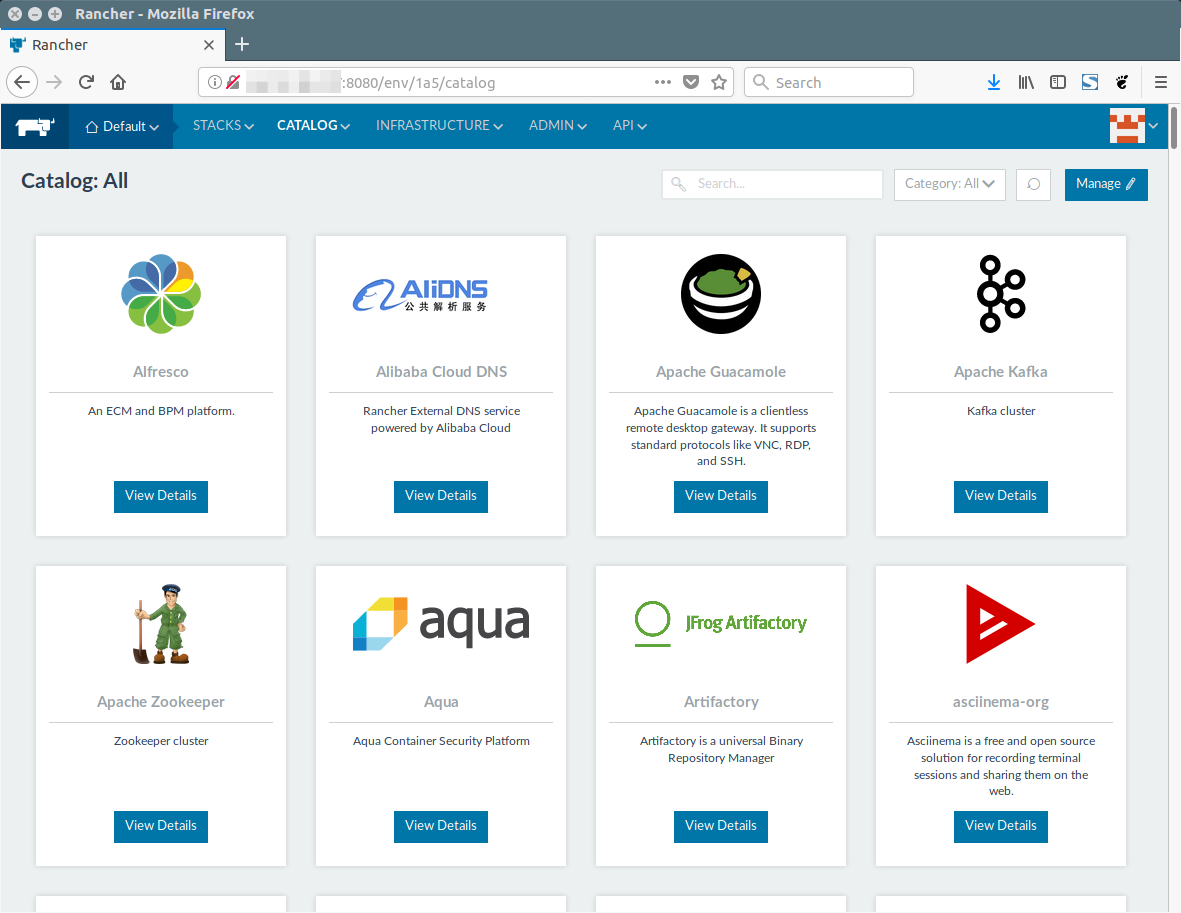
Go to >> Catalog >> All >> Choose the required application >> Finally hit “Launch” button to deploy.