Before we get to know about Fish Shell, let us have an overview of Shell & Kernel.
Shell is a program that provides an interface between user and the kernel.
Kernel is the heart of the Linux Operating system that manage everything between an user and Operating system (OS).
Shell is available for all users while launching the terminal which in turn allows them to run the available commands. Once the command execution completes, it’s output will be viewed in the terminal window.
Bash Shell stands for Bourne Again Shell which is the default login shell used among the Linux distributions.
In Linux, there are different types of shells available for users, and we will discuss one of the most popular shell called “Fish shell” in this tutorial.
What is Fish shell?
Fish Shell stands for friendly interactive shell which is fully-equipped, smart and user-friendly command-line shell that supports a lot of handy features unlike any other shell.
Features are Autosuggestion, Sane Scripting, Man Page Completions, Web-Based configuration and Glorious VGA Color.
Fish shell makes your command line more productive, useful & fun without remembering a bunch of Linux commands because of their handy features.
Are you curious to test it? If yes, go ahead and install it by following the below steps.
Installing Fish shell in Linux
Fish shell can be installed easily since it is available in the default repositories of most Linux distributions. In case, if it is not available in your distro, please add Fish shell official repository to install it.
$ sudo yum install fish
$ sudo dnf install fish
$ sudo apt install fish
$ sudo zypper install fish
For Arch Linux based systems, use pacman command to install fish shell.
$ sudo pacman -S fish
1.1) Installing Fish shell using Official repository
For Ubuntu and their derivatives, use apt command to install fish shell.
$ sudo apt-add-repository ppa:fish-shell/release-3
$ sudo apt update
$ sudo apt install fish
For Fedora 31, use DNF command to install fish shell.
$ sudo dnf config-manager --add-repo https://download.opensuse.org/repositories/shells:/fish:/release:/3/Fedora_31/shells:fish:release:3.repo
$ sudo dnf install fish
For Debian 10:
$ sudo wget -nv https://download.opensuse.org/repositories/shells:fish:release:3/Debian_10/Release.key -O Release.key
$ sudo apt-key add - < Release.key $ sudo echo 'deb http://download.opensuse.org/repositories/shells:/fish:/release:/3/Debian_10/ /' > /etc/apt/sources.list.d/shells:fish:release:3.list
$ sudo apt-get update
$ sudo apt-get install fish
For RHEL/CentOS systems, use YUM command to install fish shell.
On RHEL 7:
$ sudo yum-config-manager --add-repo https://download.opensuse.org/repositories/shells:/fish:/release:/3/RHEL_7/shells:fish:release:3.repo
$ sudo yum install fish
On CentOS 8:
$ sudo dnf config-manager --add-repo https://download.opensuse.org/repositories/shells:/fish:/release:/3/CentOS_8/shells:fish:release:3.repo
$ sudo dnf install fish
For CentOS 7:
$ sudo yum-config-manager --add-repo https://download.opensuse.org/repositories/shells:fish:release:2/CentOS_7/shells:fish:release:2.repo
$ sudo yum install fish
For openSUSE Leap 15.2 system, use zypper command to install fish shell.
$ sudo zypper addrepo https://download.opensuse.org/repositories/shells:/fish:/release:/3/openSUSE_Leap_15.2/shells:fish:release:3.repo
$ suod zypper refresh
$ sudo zypper install fish
Fish shell Usage
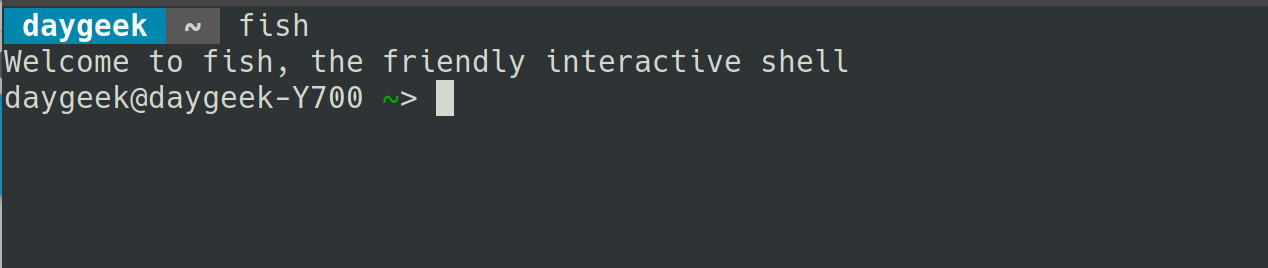
Once the fish shell is installed successfully, just type fish in your terminal, which will automatically switch to the fish shell from the default bash shell.
$ fish
Below screenshot shows that the Fish shell is loaded and ready to use. “fish” default prompts the username, hostname, and working directory which can be even customized, based on your requirement by executing the fish_prompt function.
Auto Suggestion
When you type few letters of commands in the fish shell, it will auto suggest a command in a light grey color which were recently used.
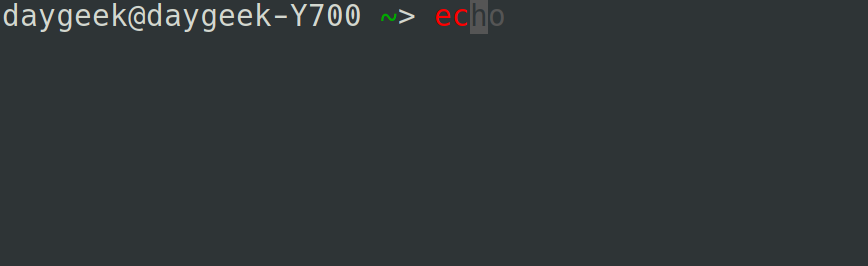
Once auto suggestion provides the desired command, go ahead and hit the Left Arrow Key to populate the command, instead of typing the full command.
Instantly, Previous history of the matching string can be accessed by pressing Up Arrow Key after typing few letters of the desired command. It is similar to that of bash shell CTRL+r option.
Tab Completion
After typing the desired command, press Tab button to discover any relevant commands.
Refer screenshot below:
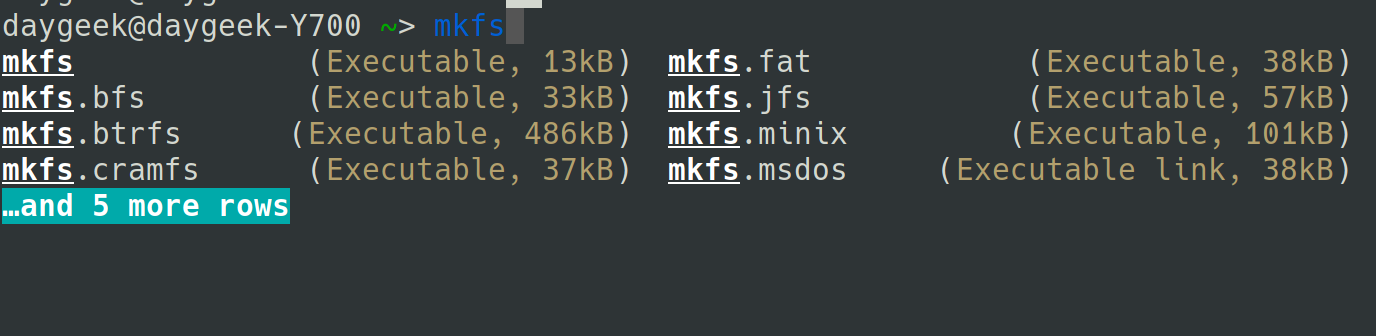
Press the Tab button one more time to see the full list.
Syntax highlighting
Fish performs syntax highlighting, while typing any commands in the terminal. Invalid commands will be highlighted in RED color.
Fish Shell will underline the valid file paths wherein the invalid paths will appear in Red color without underline.

Web based configuration
Fish shell has a cool feature, that allow us to set colors, prompt, functions, variables, history and bindings via web browser.
Run the following command in the terminal, to launch the Web configuration interface.
Once executed, press Ctrl+c to exit .
$ fish_config
Web config started at 'file:///home/daygeek/.cache/fish/web_config-86ZF5P.html'. Hit enter to stop.
qt5ct: using qt5ct plugin
^C
Shutting down.

Man Page Completions
Other shells support programmable completions, but only fish generates them automatically by parsing your installed man pages.
To perform, run the below command.
$ fish_update_completions
Parsing man pages and writing completions to /home/daygeek/.local/share/fish/generated_completions/
  3466 / 3466 : zramctl.8.gz
Setting up Fish, as Default shell
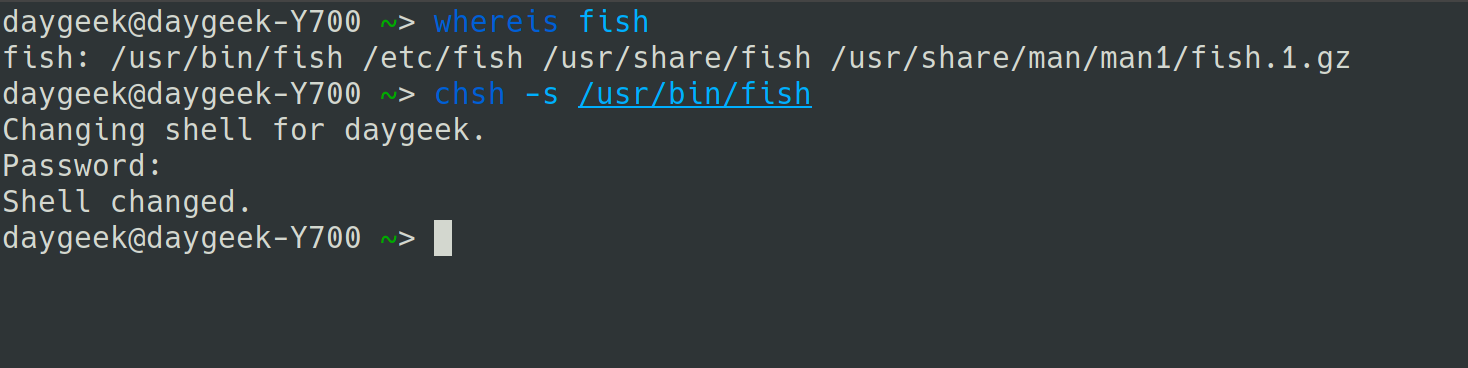
To familiarize with fish shell, suggested to set the fish shell as your default shell instead of switching over every time. To make use of it, figure out the fish shell location by using the below command.
$ whereis fish
fish: /usr/bin/fish /etc/fish /usr/share/fish /usr/share/man/man1/fish.1.gz
Default shell can be changed as “fish shell” by running the following command.
$ chsh -s /usr/bin/fish
Note: Check if the fish shell binaries has been added to the /etc/shells file or not? If not added, run the following command to append it.
$ echo /usr/bin/fish | sudo tee -a /etc/shells
Once accustomed to fish shell and would like to use bash shell again, then execute the following commands.
To switch over “bash” temporarily.
$ bash
To revert “bash” permanently.
$ chsh -s /bin/bash
Conclusion
Tutorial has been precisely prepared to discuss about various features of Fish Shell.
Kindly support us by sharing the article!!!
