Logical Volume Manager (LVM) plays an important role in the Linux operating system by improving the availability, disk I/O, performance and capability of disk management. LVM is a widely used technique that is extremely flexible for disk management.
This adds an extra layer between the physical disks and the file system, allowing you to create a logical volume instead of using physical disk directly.
LVM allows you to easily resize, extend and decrease the logical volume when you need it.
If you are a beginner in LVM, I recommend reading the LVM series article listed below to get familiar with it.
- Part-1: How to Create/Configure LVM (Logical Volume Management) in Linux
- Part-2: How to Extend/Increase LVM’s (Logical Volume Resize) in Linux
- Part-3: How to Reduce/Shrink LVM’s (Logical Volume Resize) in Linux
- Part-4: How to Remove Physical Volume from a Volume Group in LVM
- Part-5: How to Remove LVM (Logical) Volume in Linux
- Part-6: How to recover deleted Logical volume (LV) in LVM
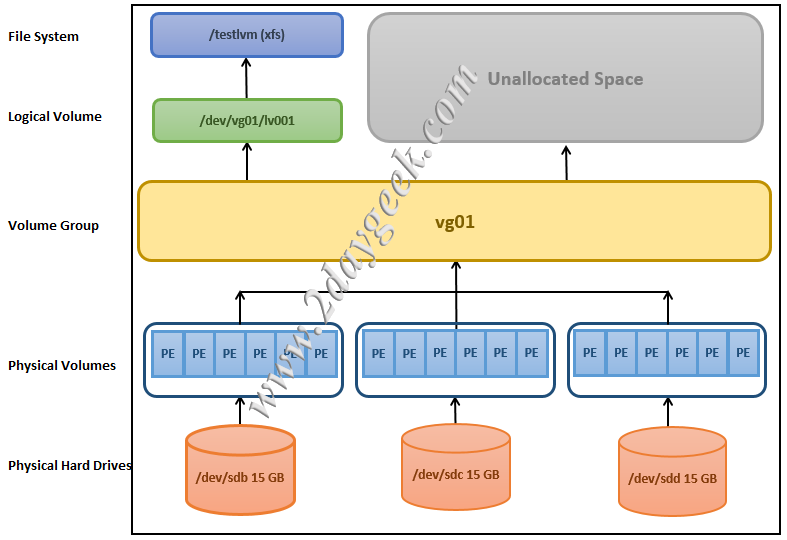
1) How to Create Physical Volumes
You can use any disk as a Physical Volume like RAID array, SAN disk, or a partition. Let’s imagine that you have already added three disks, and these disks are /dev/sdb, and /dev/sdc, /dev/sdd.
To discover the new disks mapped to Linux system, run:
for host in `ls /sys/class/scsi_host`; do echo "Scanning $host...Completed"; echo "- - -" > /sys/class/scsi_host/$host/scan; done
Scanning host0...Completed
Scanning host1...Completed
Scanning host2...Completed
Use the lsscsi command to verify if new disks are discovered at OS level.
# lsscsi --scsi --size | grep [Last 5 Digits of LUN]
General syntax to create physical volume.
Syntax:
pvcreate [Block_Device]
Once the disks are detected at OS level, use the pvcreate command to create a Physical Volumes (PV).
# pvcreate /dev/sdb /dev/sdc /dev/sdd
Physical volume "/dev/sdb" successfully created
Physical volume "/dev/sdc" successfully created
Physical volume "/dev/sdd" successfully created
Make a note:
- The above command erases any data on the given disks /dev/sdb, /dev/sdc and /dev/sdd.
- Physical disk can be added directly into the LVM PV instead of the disk partition.
Use the pvdisplay or pvs commands to display the PVs you have created. The pvs command displays summary output of PVs, whereas the pvdisplay command shows detailed output.
# pvs
PV VG Fmt Attr PSize PFree
/dev/sdb lvm2 a-- 15.00g 15.00g
/dev/sdc lvm2 a-- 15.00g 15.00g
/dev/sdd lvm2 a-- 15.00g 15.00g
# pvdisplay

"/dev/sdb" is a new physical volume of "15.00 GiB"
--- NEW Physical volume ---
PV Name               /dev/sdb
VG Name
PV Size               15.00 GiB
Allocatable           NO
PE Size               0
Total PE              0
Free PE               0
Allocated PE          0
PV UUID               69d9dd18-36be-4631-9ebb-78f05fe3217f

"/dev/sdc" is a new physical volume of "15.00 GiB"
--- NEW Physical volume ---
PV Name               /dev/sdc
VG Name
PV Size               15.00 GiB
Allocatable           NO
PE Size               0
Total PE              0
Free PE               0
Allocated PE          0
PV UUID               a2092b92-af29-4760-8e68-7a201922573b

"/dev/sdd" is a new physical volume of "15.00 GiB"
--- NEW Physical volume ---
PV Name               /dev/sdd
VG Name
PV Size               15.00 GiB
Allocatable           NO
PE Size               0
Total PE              0
Free PE               0
Allocated PE          0
PV UUID               d92fa769-e00f-4fd7-b6ed-ecf7224af7faS
2) How to Create a Volume Group
A volume group is another layer in the LVM structure that contains a list of physical volumes. You can add a physical volume to an existing volume group or create a new volume group for a physical volume as needed.
General syntax to create a Volume Group.
Syntax:
vgcreate [Volume_Group_Name] [Physical_Volume]
Use the vgcreate command to create a VG named 'vg01' and map the sdb, sdc and sdd physical volumes to it.
# vgcreate vg01 /dev/sdb /dev/sdc /dev/sdd
Volume group "vg01" successfully created
Make a Note: By default, VG uses '4MB' for Physical Extent (PE Size), but you can change this value based on your need. For instance, to create a volume group with 32MB of PE Size (Physical Extent), run:
# vgcreate -s 32M vg01 /dev/sdb /dev/sdc /dev/sdd
Volume group "vg01" successfully created
Use the vgs and vgdisplay commands to display information about the VGs you have created. The vgs command displays summary output of VGs, whereas the vgdisplay command shows detailed output.
# vgs vg01
VG #PV #LV #SN Attr VSize VFree
vg01 3 0 0 wz--n- 44.99g 44.99g
By default, vgcreate command uses 4MB of PE Size. However, you can double check the PE size of the VG using the vgdisplay command as shown below:
# vgdisplay vg01
--- Volume group ---
VG Name              vg01
System ID
Format               lvm2
Metadata Areas       3
Metadata Sequence No 1
VG Access            read/write
VG Status            resizable
MAX LV               0
Cur LV               0
Open LV              0
Max PV               0
Cur PV               3
Act PV               3
VG Size              44.99 GiB
PE Size              4.00 MiB
Total PE             11511
Alloc PE / Size      0 / 0
Free PE / Size       11511 / 44.99 GiB
VG UUID              d17e3c31-e2c9-4f11-809c-94a549bc43b7
2a) How to Extent Volume Group
If you do not have space in the VG, Use the vgextend command to add a new physical volume to the existing volume group.
Common syntax to Extend Volume Group.
Syntax:
vgextend [Existing_Volume_Group_Name] [Physical_Volume]
# vgextend vg01 /dev/sde
    Volume group "vg01" successfully extended
3) How to Create a Logical Volume Using GB
Logical Volume is the top layer in LVM structure. Logical volumes are block devices created from the volume group. It acts as a virtual disk partition and can be easily managed using LVM commands.
You can use the lvcreate command to create a logical volume.
General syntax to create Logical Volume (LV)
Syntax:
lvcreate –n [Logical_Volume_Name] –L [LV_Size in (M|G|T)] [Name of the Volume Group where the LV to be created]
Use the lvcreate command to create a logical volume named 'lv001' with a size of '10 GB'.
# lvcreate -n lv001 -L 10G vg01
Logical volume "lv001" created
Use the lvs and lvdisplay commands to display information about the LVs you have created.
# lvs /dev/vg01/lvol01
LV VG Attr LSize Pool Origin Data% Move Log Cpy%Sync Convert
lv001 vg01 mwi-a-m-- 10.00g lv001_mlog 100.00
# lvdisplay /dev/vg01/lv001
--- Logical volume ---
LV Path                /dev/vg01/lv001
LV Name                lv001
VG Name                vg01
LV UUID                ca307aa4-0866-49b1-8184-004025789e63
LV Write Access        read/write
LV Creation host, time localhost.localdomain, 2020-09-10 11:43:05 -0700
LV Status              available
# open                 0
LV Size                10.00 GiB
Current LE             2560
Segments               1
Allocation             inherit
Read ahead sectors     auto
- currently set to     256
Block device           253:4
3a) How to Create Logical Volume Using PE Size
Alternatively, you can create Logical Volumes Using Physical Extends (PE) size.
3b) How to Calculate PE Value?
It’s very simple to calculate the PE Size of the Volume. For example, if you want to create a LV for 10GB then the PE size would be '2560'. Let’s see the formula to calculate the PE Size.
By default, it uses 4MB for the physical extent, but check the correct PE size by running the vgdisplay command, as it may have been created with a different size.
10GB = 10240MB / 4MB (PE Size) = 2560 PEs
Common syntax to create a Logical Volume with PE Size.
Syntax:
lvcreate –n [LV_Name] –l [PE_Size] [Name of the Volume Group where the LV to be created]
To create 10GB of logical volume using the PE size the command would be:
# lvcreate -n lv001 -l 2560 vg01
4) How to Create File system
You can’t use a logical volume to store data until you create a valid file system.
General syntax to create a file system.
Syntax:
mkfs –t [FS_Type] /dev/[Name of the Volume Group where LV resides]/[LV name]
or
mkfs -t [FS_Type] /dev/mapper/VGname-LVname
Use the below command to format the logical volume ‘lv001’ with the 'ext4' file system.
# mkfs -t ext4 /dev/vg01/lv001
For xfs file system.
# mkfs -t xfs /dev/vg01/lv001
5) Mounting Logical Volume
Finally, you need to mount the logical volume to use it. Make sure to add an entry to /etc/fstab file so that it loads automatically when the system boots.
Create a directory to mount the logical volume.
# mkdir /lvmtest
Use the mount command to mount the logical volume.
# mount /dev/vg01/lv001 /lvmtest
Add new logical volume details to the /etc/fstab file to mount it automatically when the system boots.
# vi /etc/fstab
/dev/vg01/lv001 /lvmtest xfs defaults 0 0
Check the newly mounted FileSystem using the df command.
# df -h /lvmtest
Filesystem Size Used Avail Use% Mounted on
/dev/mapper/vg01-lv001 15360M 34M 15326M 4% /lvmtest
Final Thoughts
I hope you have learned about Logical Volume Manager (LVM) in this article, including creation of Physical Volume, Volume Group, Logical Volume, File System and Extending Volume Group. Also showed you two different methods to create logical volume using GB and PE Size.
If you have any questions or feedback, feel free to comment below.


very good procedure. the examples are very suggestive
Thank you so much, this helped a ton!!!
Welcome Greg
Dear Magesh,
Please mark the disks as /dev/sdb , /dev/sdc and /dev/sdd. Presently all the three are depicted, INCORRECTLY as /dev/sdb.
Best Wishes,
Prabhat
@Prabhat, Thanks, it’s update now.