Owncloud is an cloud based storage which was designed especially for privacy & security, How ? We can install in our organization and maintain ourself so, nobody can read ours. Say for example if you stored your content to third party such as (free cloud storage) we don’t know its safe and secure. owncloud allow user’s to sync and share the files like dropbox and google drive. Its a open-source software, you can install and create your own owncloud storage system using owncloud software and manage all your company data in cloud and access anywhere. Its nice user interface and everybody love owncloud. The latest version of ownCloud 9.0 released on March 08, 2016 With Improved Scalability, Federation and Collaboration Tools
1) Prerequisites for owncloud
LAMP should be installed in our server/system before proceeding owncloud installation.
2) Add owncloud Repository
Do visit on owncloud Repository website for adding owncloud repository to Linux distro. We can easily install ownCloud on Ubuntu, CentOS, RHEL, Fedora, Mint, openSUSE & Debian systems by adding ownCloud repo.
For Debian 8
$ sudo wget -nv https://download.owncloud.org/download/repositories/stable/Debian_8.0/Release.key -O Release.key
$ sudo apt-key add - < Release.key
$ sudo sh -c "echo 'deb http://download.owncloud.org/download/repositories/stable/Debian_8.0/ /' >> /etc/apt/sources.list.d/owncloud.list"
$ sudo apt-get update
$ sudo apt-get install owncloud
For Ubuntu
# Change the [Version-No] to 14.04 & 15.10 #
$ sudo wget -nv https://download.owncloud.org/download/repositories/stable/xUbuntu_[Version-No]/Release.key -O Release.key
$ sudo apt-key add - < Release.key
$ sudo sh -c "echo 'deb http://download.owncloud.org/download/repositories/stable/xUbuntu_[Version-No]/ /' >> /etc/apt/sources.list.d/owncloud.list"
$ sudo apt-get update
$ sudo apt-get install owncloud
For LinuxMint 17.1, 17.2, 17.3
$ sudo wget -nv https://download.owncloud.org/download/repositories/stable/xUbuntu_14.04/Release.key -O Release.key
$ sudo apt-key add - < Release.key
$ sudo sh -c "echo 'deb http://download.owncloud.org/download/repositories/stable/xUbuntu_14.04/ /' >> /etc/apt/sources.list.d/owncloud.list"
$ sudo apt-get update
$ sudo apt-get install owncloud
For CentOS 7
# rpm --import https://download.owncloud.org/download/repositories/stable/CentOS_7/repodata/repomd.xml.key
# yum-config-manager --add-repo=http://download.owncloud.org/download/repositories/stable/CentOS_7/ce:stable.repo -O /etc/yum.repos.d/ce:stable.repo
# yum clean expire-cache
# yum install owncloud
For RHEL 7
# rpm --import https://download.owncloud.org/download/repositories/stable/RHEL_7/repodata/repomd.xml.key
# yum-config-manager --add-repo=http://download.owncloud.org/download/repositories/stable/RHEL_7/ce:stable.repo -O /etc/yum.repos.d/ce:stable.repo
# yum clean expire-cache
# yum install owncloud-client
For openSUSE
# Change the [Version-No] to 13.2 & Leap_42.1 #
# rpm --import https://download.owncloud.org/download/repositories/stable/openSUSE_[Version-No]/repodata/repomd.xml.key
zypper addrepo http://download.owncloud.org/download/repositories/stable/openSUSE_[Version-No]/ce:stable.repo
zypper refresh
zypper install owncloud
It will install under /var/www/html/owncloud and drop the apache config file under /etc/httpd/conf.d/owncloud.conf
3) MySQL/MariaDB Details Setup
For Production environment, i would strongly advise you to go with MySQL/MariaDB. Follow the below steps to create the MariaDB Database with required details such as (DB Name, DB User Name, DB password).
# mysql -u root -p
Enter password:
Welcome to the MariaDB monitor.  Commands end with ; or \g.
Your MariaDB connection id is 287
Server version: 5.5.44-MariaDB MariaDB Server

Copyright (c) 2000, 2015, Oracle, MariaDB Corporation Ab and others.

Type 'help;' or '\h' for help. Type '\c' to clear the current input statement.

MariaDB [(none)]> create database cloud;
Query OK, 1 row affected (0.01 sec)

MariaDB [(none)]> CREATE USER 'cloud'@'localhost' IDENTIFIED BY 'cloud';
Query OK, 0 rows affected (0.04 sec)

MariaDB [(none)]> GRANT ALL PRIVILEGES ON cloud.* TO 'cloud'@'localhost';
Query OK, 0 rows affected (0.01 sec)

MariaDB [(none)]> FLUSH PRIVILEGES;
Query OK, 0 rows affected (0.00 sec)

MariaDB [(none)]> exit
Bye
3) Setup Owncoud
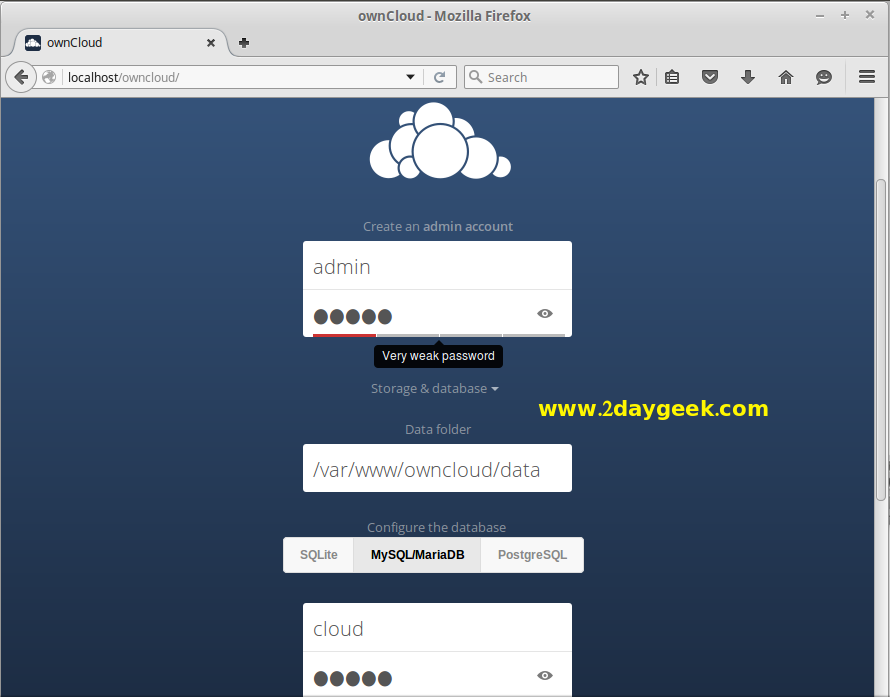
Navigate your browser to http://Your-IP/owncloud, Enter the username, password & MariaDB details, then hit Finish Setup button. It will take a while to complete the setup and you will be redirected to admin page.
Close the pop-up window then start play with your owncloud server.
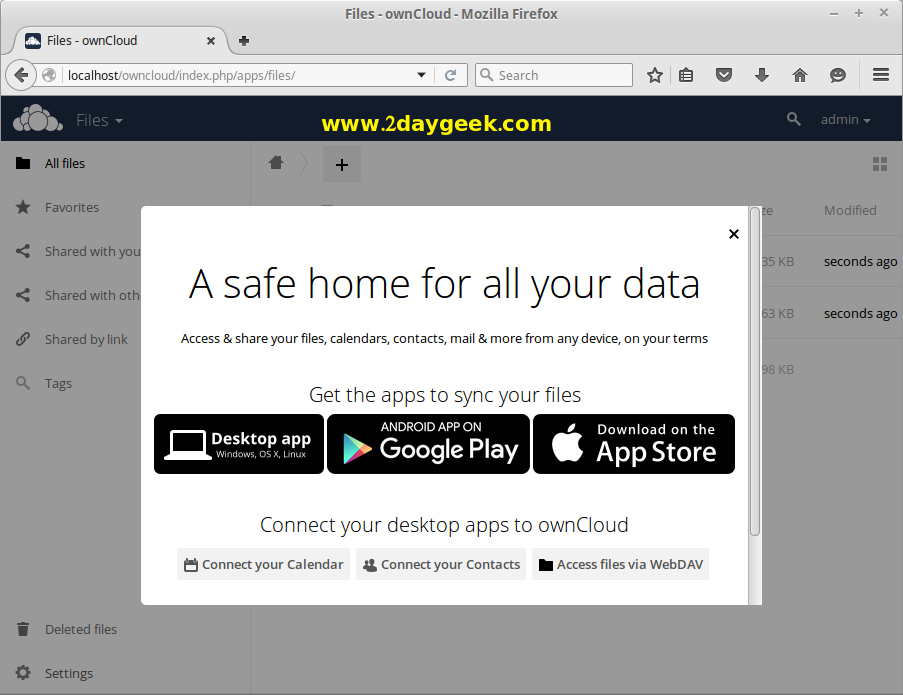
See the below screenshot, we are running latest version of owncloud 9.0.

We are preparing all articles in-depth to understand by all level/stage Linux administrators. If the article is useful for you, then please spend less than a minute to share your valuable comments in our commenting section.
Please stay tune with us…Good Luck.
Excellent tutorial, thank you. I’ve moved to Linux Mint from openSUSE so a bit behind the Debian knowledge curve. This was excellent.
Just one note, for the SQL “INcongniscenti” :-):
IDENTIFIED BY is specifying the *password* (not the username) for user *cloud*, which is different from the password used by root to enter MariaDB and set up the account…
Excellent, thank you again.