4) PHP-FPM & PHP modules installation
Use the below command to install PHP-FPM & PHP modules. PHP initially called Personal Home Page, now it is called asHypertext Preprocessor. PHP is a open source software which was designed/developed for web development purpose. It is used for server-side scripting language as well as general-purpose programming language.
[Install php5 old systems]
$ sudo apt-get install php5 php5-fpm php5-mysql php5-cli php5-curl php5-gd php5-mcrypt php5-gettext php5-mbstring php5-common php5-xml

[Install php7]
$ sudo apt-get install php7.0 php7.0-fpm php7.0-mysql php7.0-mbstring php7.0-common php7.0-gd php7.0-mcrypt php-gettext php7.0-curl php7.0-cli php7.0-xml
Configure PHP
We need to make few changes in php.ini file to work php-fpm properly. open php.ini file in your favorite text editor, and find cgi.fix_pathinfo= then uncomment, finally change the value from 1 to 0.
[For php5]
$ sudo nano /etc/php5/fpm/php.ini

[For php7]
$ sudo nano /etc/php/7.0/fpm/php.ini

cgi.fix_pathinfo=0
By default PHP-FPM listens the socket on fpm.sock and its not effective one. So we need to change the settings in /etc/php5/fpm/pool.d/www.conf & /etc/php/7.0/fpm/pool.d/www.conf, from listen = /var/run/php5-fpm.sock & listen = /run/php/php7.0-fpm.sock to listen = 127.0.0.1:9000 to listen TCP. Just open the file www.conf and do it.
[For php5]
$ sudo nano /etc/php5/fpm/pool.d/www.conf
;listen = /var/run/php5-fpm.sock

[For php7]
$ sudo nano /etc/php/7.0/fpm/pool.d/www.conf
;listen = /run/php/php7.0-fpm.sock

listen = 127.0.0.1:9000
5) Nginx Configuration
Need to make lots of changes in Nginx default config file to make Nginx work properly.
Open /etc/nginx/nginx.conf file in your favorite text editor and change worker_processes values according to your CPU count. To identify CPU count use lscpu command. I have added 4 CPU’s because my system has 4 CPU. Make sure Nginx User should be www-data
$ nano /etc/nginx/nginx.conf

user www-data;
worker_processes 4;
[ac-box color=”lred” icon=”fa-exclamation-triangle”]
1) When you are installing Nginx from Ubuntu Repository, it will create default conf file under /etc/nginx/sites-available/default
2) When you are installing Nginx from Nginx Repository, it will create default conf file under /etc/nginx/conf.d/default. So, don’t get confuse
3) Nginx Default Document Root : /usr/share/nginx/html but when you installing Nginx from distribution repository, web root location will be /var/www/html. It’s your wish to keep or change the location.
[/ac-box]
Open default Virtual host configuration file /etc/nginx/sites-available/default (I have installed Nginx from Ubuntu repository, that’s why my nginx file located in below location) in your favorite text editor and uncomment below lines. Also add/modify below colored lines.
I have removed all the unwanted lines from this file for clear explanation. Add your FQDN server.2daygeek.com instead of us.
$ sudo nano /etc/nginx/sites-available/default

[Web root location & port listening]
	server
	{
        listen 80 default_server;
        listen [::]:80 default_server ipv6only=on;
        root /usr/share/nginx/html;
        index index.php index.html index.htm;
        server_name server.2daygeek.com;

[Redirect server error pages to the static page]
        location /
	{
	try_files $uri $uri/ /index.php;
        }
        error_page 404 /404.html;
        error_page 500 502 503 504 /50x.html;
        location = /50x.html
	{
        root /usr/share/nginx/html;
        }

[Pass the PHP scripts to FastCGI server]
	location ~ \.php$
	{
        fastcgi_split_path_info ^(.+\.php)(/.+)$;
        try_files $uri =404;
        fastcgi_pass 127.0.0.1:9000;
	fastcgi_param SCRIPT_FILENAME $document_root$fastcgi_script_name;
        fastcgi_index index.php;
        include fastcgi_params;
        }
	}
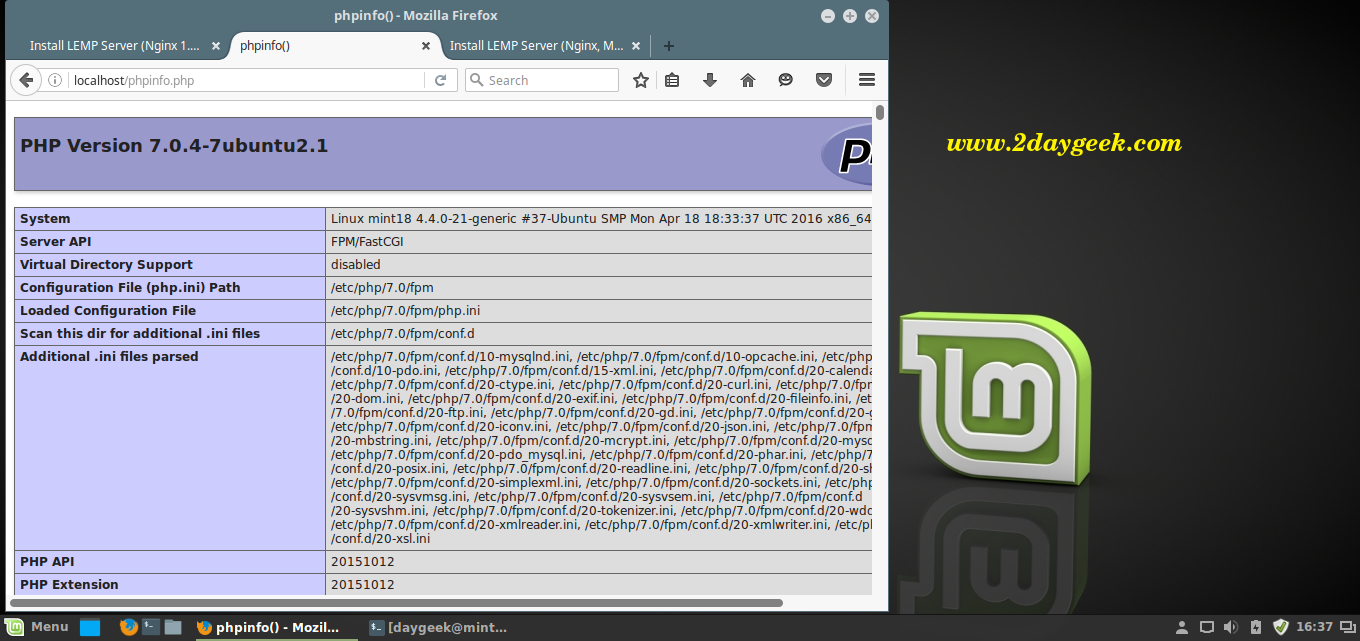
6) Test PHP Configuration
Finally create a phpinfo.php file in web server root directory to test whether the php configuration is working or not.
$ sudo nano /usr/share/nginx/html/phpinfo.php

<?php
 phpinfo();
?>
Run nginx configuration test
$ sudo nginx -t
nginx: the configuration file /etc/nginx/nginx.conf syntax is ok
nginx: configuration file /etc/nginx/nginx.conf test is successful
Restart & Reload Necessary Services to take effect.
[Restart Nginx & php-fpm service on systemd Systems]
$ sudo systemctl reload nginx.service
$ sudo systemctl restart nginx.service

[php5 System]
$ sudo systemctl restart php5-fpm.service

[php7 system]
$ sudo systemctl restart php7.0-fpm.service

[Restart Nginx & php-fpm service on SysVinit Systems]
$ sudo service nginx reload
$ sudo service nginx restart
$ sudo service php5-fpm restart
Open your web browser and navigate to http://localhost/phpinfo.php or http://your-server-ip-address/phpinfo.php or http://127.0.0.1/phpinfo.php
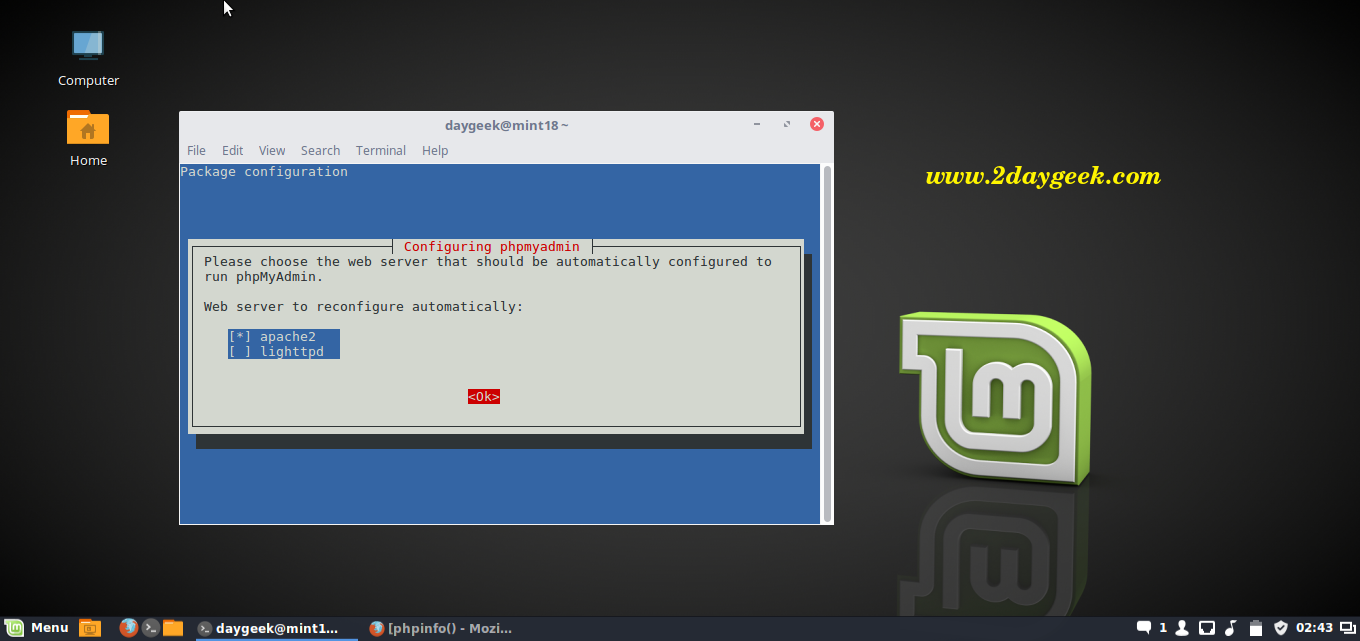
7) Install phpMyAdmin
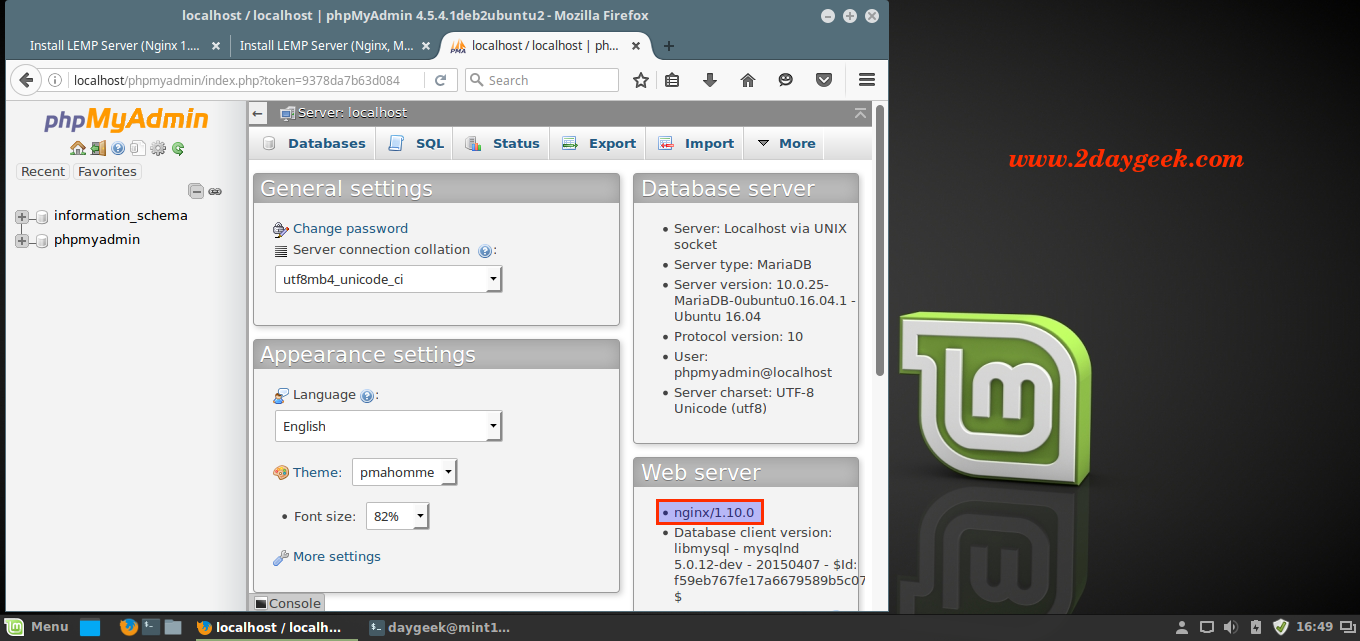
phpMyAdmin is a free, open-source web-based administration tool for managing the MySQL, MariaDB servers which will help us to manage the database easily.
$ sudo apt-get -y install phpmyadmin
Select the webserver to configure phpMyAdmin automatically. Nginx is not listed here, so don’t choose anything and simple press tab then hit ok.
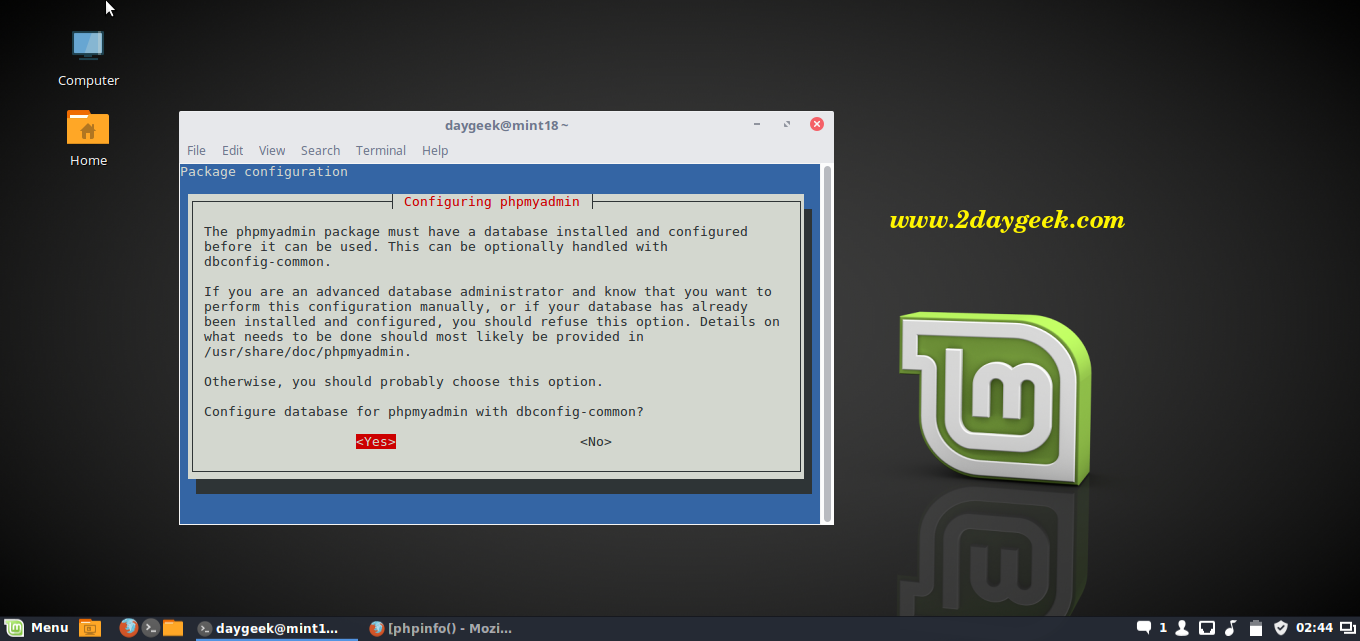
Make sure your system should have database installed (MySQL, MariaDB, etc) before proceeding phpMyAdmin installation. Here choose Yes to configure database for phpmyadmin with dbconfig-common.
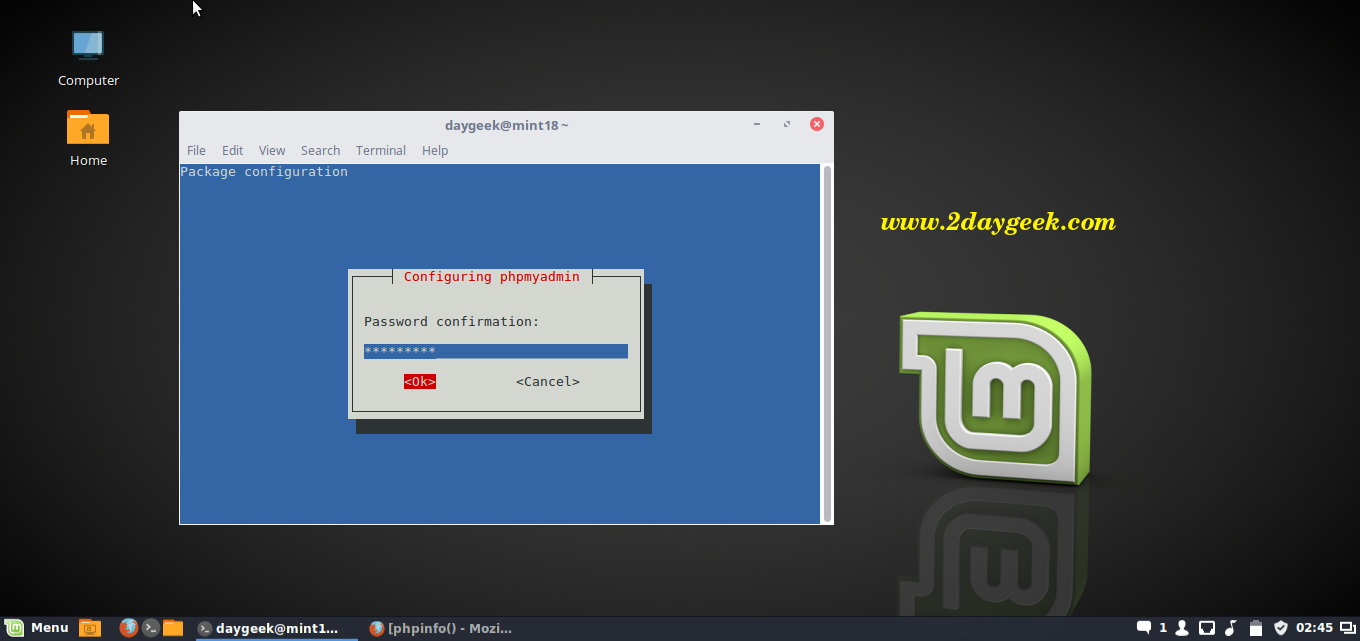
Enter the password for phpmyadmin database.
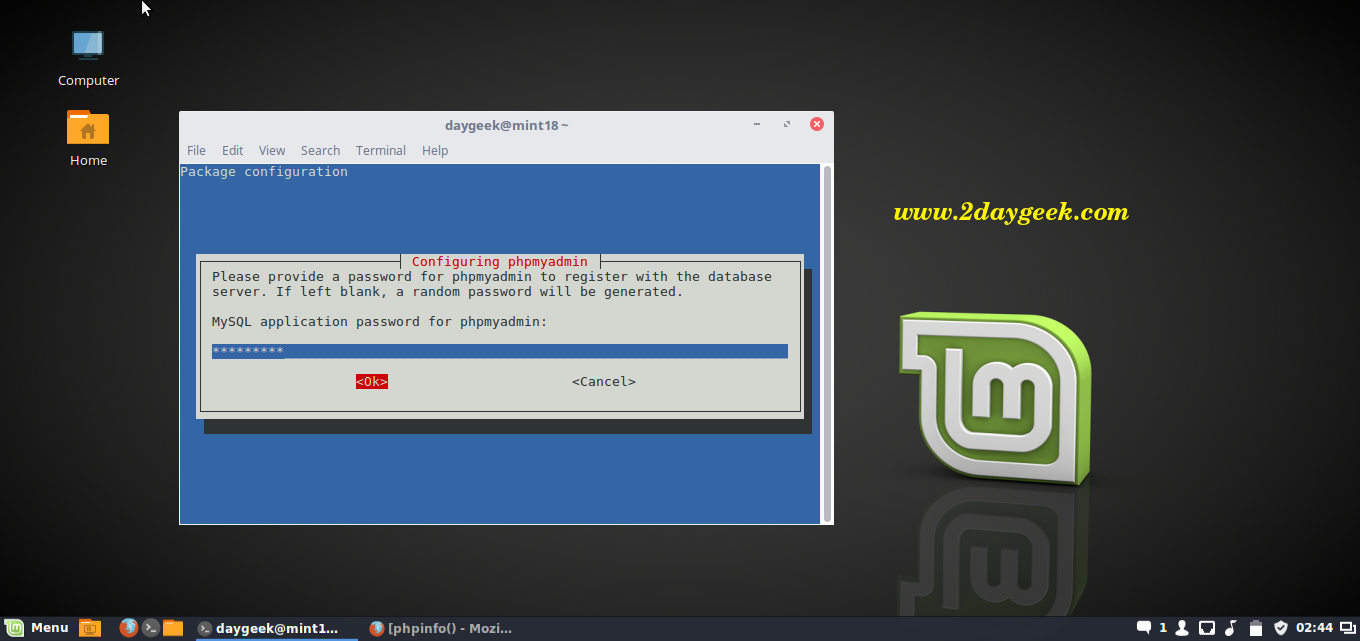
Re-enter the password for phpmyadmin database.
Just create symlink from /usr/share/phpmyadmin to /usr/share/nginx/html this will do the trick
[Create Symlink]
ln -s /usr/share/phpmyadmin /usr/share/nginx/html

[Restart Nginx service]
$ sudo systemctl restart nginx.service    [For Systemd Systems]
$ sudo service nginx restart    	  [For Systemd Systems]
Open your web browser and navigate to http://localhost/phpmyadmin or http://your-server-ip-address/phpmyadmin or http://127.0.0.1/phpmyadmin
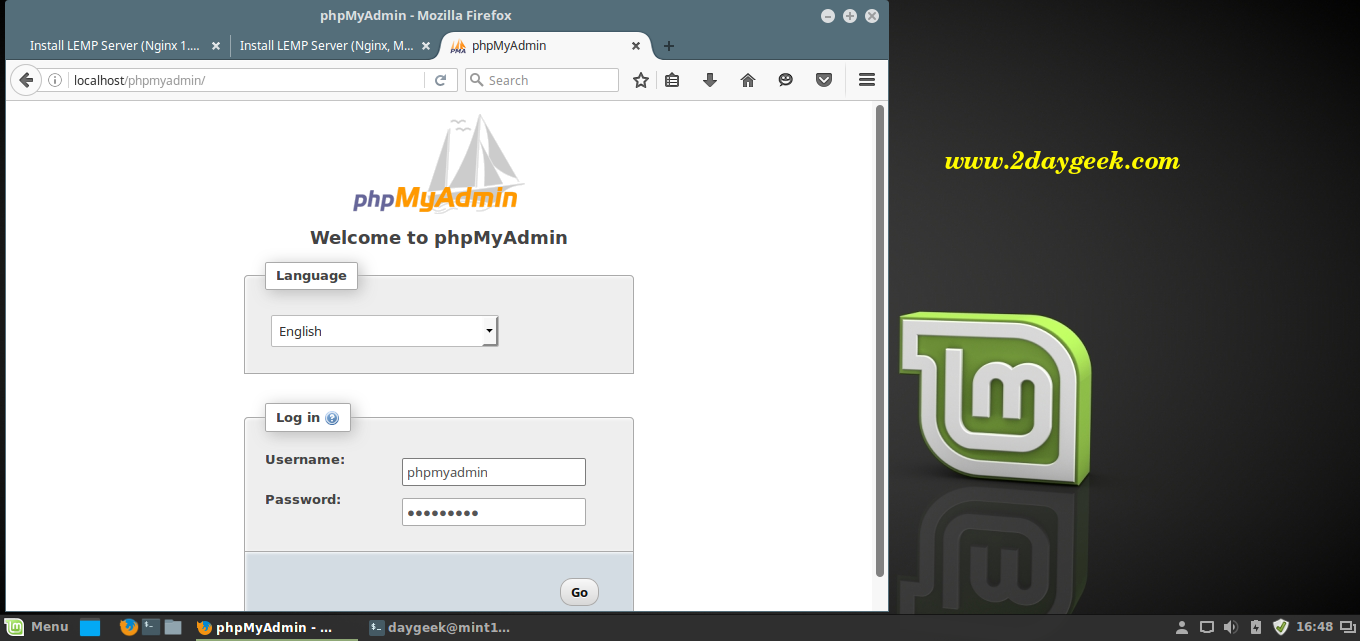
Enter the UserName phpmyadmin and password which you set.
We are preparing all articles in-depth to understand by all level/stage Linux administrators. If the article is useful for you, then please spend less than a minute to share your valuable comments in our commenting section.
Please stay tune with us…Good Luck.


Hello, thanks for the article! How can I use php 5.6 version with this guide?
hi, I’m stuck at the last step: ‘installing phpmyadmin’. I did as you taught me, I’ve create the symlink etc, but when I tried to open localhost/phpmyadmin, it start download a BIN file instead of opening the page. Can you guys help me?
Hello,
Thanks for the great article.
Thanks again
The poor grammar and the writer’s misinformation and erros led to a failure of the entire LEMP stack. 1. the file to be modified after nginx installation in /etc was not nginx.conf but the default file in sites-available. 2. The ubuntu os does not like to use mariadb and mysqyl without the proper dependencies available. That was due to the fact that the mariadb (whatever version the writer intends is not specified) cannot be installeed before mysql (again, the mariadb install only works with an unspecified version of mysql that is installed prior to installing mariadb. Thank you for your attention.
Really useful It’s a long time since I have done a “hands on” installation.
Apart from a few typos of my own which needed a bit of debugging it went very smoothly.
I use Linux 18.1 Cinnamon. Your instructions are really good. I did notice that sudo was omitted a couple of times, for instance with the softlink creation, but no problems for me. I had tried to set this up before on my own and failed miserably. Thank you very much.
Glade to hear, you got a solution.
Now I have to find out how to make WordPress work.
After installation MYSQL open:
sudo nano /etc/mysql/mariadb.conf.d/50-server.cnf
and edit:
bind-address = 127.0.0.1
on
bind-address = / your ip address /
to avoid the 404 error
Well written and easy to follow. No problems with Linux Mint 18 (Sarah) 64bit Cinnamon distro.
Thank you.
I’m running Linux Mint 18 and I’ve made about 3 times the whole process (2 with distro repositories and one with nginx ones), but i can’t make it work with php…
I’m also having some problems with step 2), file doesn’t contains /var/www/html, i tested it and that’s the root folder, but i couldn’t change it
It doesn’t matter what i do, the php files always give 404 error
@d3s7r0y3r:disqus ,
Article updated as per your input.
“Select the webserver to configure phpMyAdmin automatically. We knows, we are using apache.”
But we are not using apache. We need to press tab and proceed without selecting neither of the servers.
@disqus_OnjdFboXsR:disqus,
1 & 2) I missed to update, it’s only for Mint 18 users. Updated on article too.
Also modified the phpmyadmin url link
I am using Linux Mint 17.3 but after following this guide I get a 404 when opening http://localhost/phpMyAdmin. Some problems I had when following this guide was:
1. On step 2) /etc/nginx/nginx.conf didn’t contain /var/www/html anywhere, so I could not replace it with /usr/share/nginx/html.
2. systemctl didn’t work for me, so I used sudo service nginx restart instead of sudo systemctl restart nginx.service. Is this a problem?
3. When phpmyadmin was installing I got an error saying “address already in use” over and over. I assume it is because port 80 is already being used somehow? Maybe by nginx? If port 80 is already being used by nginx then how is phpmyadmin supposed to use apache to install with port 80 as well?
Thanks for the guide but unfortunately it did not work perfectly for me.
Welcome
Goood!!!
run service nginx reload here is what i got
nginx: [emerg] invalid variable name in /etc/nginx/nginx.conf:63
nginx: configuration file /etc/nginx/nginx.conf test failed
It seem’s line 63 showing error, have a look into that.
Thanks. I started over and do clean install. It works now.
Can you make video how to use ssl on nginx and I would like to add owncloud with ssl too.
I know it is simple for you but i snot for I am still confused with the concept
I know where the files are but still dont get it
Follow the below link for SSL installation and configuration on Nginx.
https://www.2daygeek.com/install-ssl-certificate-on-nginx-web-server/
Thank you very much ! It really helpful !
@Nick,
You are most welcome.
Thanks for the nice article. Really helpful. next time I ran to a problem, I’ll run to you instead of stack
@Alex,
Nice to hear, We are ready to help you…Welcome.
@bruna,
Nice to hear, you are most welcome
Hello, now worked for me, I forgot to close the block with ” }” to see the php working I had to replace the include fastcgi_params; with include fastcgi.conf;
For me didn’t work, my sites-available/default file doesn’t have the commented fastcgi_split_path_info ^(.+\.php)(/.+)$;
I’ve tried like yours but the nginx didn’t start