Ansible is an excellent configuration management and orchestration tool.
It is designed to easily automate the entire infrastructure.
We have written three articles in the past about Ansible.
If you are new to Ansible, I advise you to read the articles below, which will help you understand the basics of Ansible.
- Part-1: Ansible Automation Tool Installation, Configuration and Quick Start Guide
- Part-2: Ansible Ad-hoc Command Quick Start Guide with Examples
- Part-3: Ansible Playbooks Quick Start Guide with Examples
What’s Ansible Roles?
Ansible Roles provides the framework for automatically loading certain tasks, files, vars, templates, and handlers from a known file structure into the playbook.
The primary mechanism of role is to break a playbook into multiple pieces (files).
This makes it easier for you to write complex playbooks and makes them easier to reuse.
Also, it reduces the syntax error by breaking it into multiple files.
Ansible Playbook is a set of roles, and each role essentially performs a specific function.
The Ansible roles are reusable (you can import the roles into other paybooks as well) because the roles are independent of each other and do not depend on others while executing.
Ansible offers a two-example directory structure that helps you organize your ansible playbook content, and its use.
It is not limited to using the same data structure, and you can create your own directory structure based on your needs.
Each directory is have a “main.yml” file, which contains the basic content:
Ansible Roles Default Directory Structure
Ansible Best Practices provides the following two directory structures. The first is very simple and well suited for a small environment with simple production and inventory files.
production                # inventory file for production servers
staging                   # inventory file for staging environment

group_vars/
   group1.yml             # here we assign variables to particular groups
   group2.yml
host_vars/
   hostname1.yml          # here we assign variables to particular systems
   hostname2.yml

library/                  # if any custom modules, put them here (optional)
module_utils/             # if any custom module_utils to support modules, put them here (optional)
filter_plugins/           # if any custom filter plugins, put them here (optional)

site.yml                  # master playbook
webservers.yml            # playbook for webserver tier
dbservers.yml             # playbook for dbserver tier

roles/
    common/               # this hierarchy represents a "role"
        tasks/            #
            main.yml      #  <-- tasks file can include smaller files if warranted
        handlers/         #
            main.yml      #  <-- handlers file
        templates/        #  <-- files for use with the template resource
            ntp.conf.j2   #  <------- templates end in .j2
        files/            #
            bar.txt       #  <-- files for use with the copy resource
            foo.sh        #  <-- script files for use with the script resource
        vars/             #
            main.yml      #  <-- variables associated with this role
        defaults/         #
            main.yml      #  <-- default lower priority variables for this role
        meta/             #
            main.yml      #  <-- role dependencies
        library/          # roles can also include custom modules
        module_utils/     # roles can also include custom module_utils
        lookup_plugins/   # or other types of plugins, like lookup in this case

    webtier/              # same kind of structure as "common" was above, done for the webtier role
    monitoring/           # ""
    fooapp/               # ""
If you want to use this directory structure run the command below.
$ sudo mkdir -p group_vars host_vars library module_utils filter_plugins
$ sudo mkdir -p roles/common/{tasks,handlers,templates,files,vars,defaults,meta,library,module_utils,lookup_plugins}
$ sudo touch production staging site.yml roles/common/{tasks,handlers,templates,files,vars,defaults,meta}/main.yml
The second one is appropriate when you have a very complex inventory environment.
inventories/
   production/
      hosts               # inventory file for production servers
      group_vars/
         group1.yml       # here we assign variables to particular groups
         group2.yml
      host_vars/
         hostname1.yml    # here we assign variables to particular systems
         hostname2.yml
staging/
      hosts               # inventory file for staging environment
      group_vars/
         group1.yml       # here we assign variables to particular groups
         group2.yml
      host_vars/
         stagehost1.yml   # here we assign variables to particular systems
         stagehost2.yml
library/
module_utils/
filter_plugins/
site.yml
webservers.yml
dbservers.yml
roles/
    common/
    webtier/
    monitoring/
    fooapp/
If you want to use this directory structure run the command below.
$ sudo mkdir -p inventories/{production,staging}/{group_vars,host_vars}
$ sudo touch inventories/{production,staging}/hosts
$ sudo mkdir -p group_vars host_vars library module_utils filter_plugins
$ sudo mkdir -p roles/common/{tasks,handlers,templates,files,vars,defaults,meta,library,module_utils,lookup_plugins}
$ sudo touch site.yml roles/common/{tasks,handlers,templates,files,vars,defaults,meta}/main.yml
How to Create a Simple Ansible Roles Directory Structure
By default there is no “Roles” directory in your Ansible directory, so you have to create it first.
$ sudo mkdir /etc/ansible/roles
Use the following Ansible Galaxy command to create a simple directory structure for a role.
$ sudo ansible-galaxy init [/Path/to/Role_Name]
What’s Ansible Galaxy?
Ansible Galaxy refers to the Galaxy Website, a free platform for finding, downloading and sharing community developed roles.
The Galaxy website offers pre-packaged units such as roles and collections. Provisioning infrastructure, deploy applications and you’ll find plenty of roles for all the tasks that you do on a daily basis.
While writing this article I saw 23478 results and it is growing on a daily basis.
To prove this, we are going to create the “webserver” role. To do so, run the following command.
$ sudo ansible-galaxy init /etc/ansible/roles/webserver
- Role /etc/ansible/roles/webserver was created successfully
Once you have created a new role, use the tree commmand to view the detailed directory structure.
$ tree /etc/ansible/roles/webserver

/etc/ansible/roles/webserver
├── defaults
│   └── main.yml
├── files
├── handlers
│   └── main.yml
├── meta
│   └── main.yml
├── README.md
├── tasks
│   └── main.yml
├── templates
├── tests
│   ├── inventory
│   └── test.yml
└── vars
    └── main.yml
 8 directories, 8 files
It comes with 8 directories and 8 files, details are as follows.
- defaults: Default variables for the role
- handlers: It contains handlers, which may be used by this role or even anywhere outside this role.
- meta: Defines some meta data for this role.
- tasks: It contains the main list of tasks to be executed by the role.
- templates: It contains templates which can be deployed via this role.
- vars: Other variables for the role.
This is a sample playbook that sets up the Apache Web server on Debian and Red Hat-based systems.
$ sudo nano /etc/ansible/playbooks/webserver.yml

---
- hosts: web
  become: yes
  name: "Install and Configure Apache Web Server on Linux"
  tasks:
    - name: "Install Apache Web Server on RHEL Based Systems"
      yum: name=httpd update_cache=yes state=latest
      when: ansible_facts['os_family']|lower == "redhat"

    - name: "Install Apache Web Server on Debian Based Systems"
      apt: name=apache2 update_cache=yes state=latest
      when: ansible_facts['os_family']|lower == "debian"

    - name: "Start the Apache Web Server"
      service:
        name: httpd
        state: started
        enabled: yes

    - name: "Enable mod_rewrite module"
      apache2_module:
        name: rewrite
        state: present

      notify:
      - restart apache

  handlers:
    - name: "Restart Apache2 Web Server"
      service:
        name: apache2
        state: restarted

    - name: "Restart httpd Web Server"
      service:
        name: httpd
        state: restarted
Let’s break the playbook above into Ansible roles. If you only have simple contents, add them to the “main.yml” file, otherwise create separate “xyz.yml” files for each task.
Make a note: “notify” should be included in the last task, which is why we have added it to the “module.yml” file.
Create a separate task to install the Apache Web Server on Red Hat-based systems.
$ sudo vi /etc/ansible/roles/webserver/tasks/redhat.yml

---
- name: "Install Apache Web Server on RHEL Based Systems"
  yum:
    name: httpd
    update_cache: yes
    state: latest
Create a separate task to install the Apache Web Server on Debian-based systems.
$ sudo vi /etc/ansible/roles/webserver/tasks/debian.yml

---
- name: "Install Apache Web Server on Debian Based Systems"
  apt:
    name: apache2
    update_cache: yes
    state: latest
Create a separate task to start the Apache web server on Red Hat based systems.
$ sudo vi /etc/ansible/roles/webserver/tasks/service-httpd.yml

---
- name: "Start the Apache Web Server"
  service:
    name: httpd
    state: started
    enabled: yes
Create a separate task to start the Apache web server on Debian based systems.
$ sudo vi /etc/ansible/roles/webserver/tasks/service-apache2.yml

---
- name: "Start the Apache Web Server"
  service:
    name: apache2
    state: started
    enabled: yes
Create a separate task to copy the index file into the Apache web root directory.
$ sudo nano /etc/ansible/roles/webserver/tasks/configure.yml

---
- name: Copy index.html file
  copy: src=files/index.html dest=/var/www/html
Create a separate task to install rewrite module on Debian based systems.
$ sudo nano /etc/ansible/roles/webserver/tasks/modules.yml

---
- name: "Enable mod_rewrite module"
  apache2_module:
    name: rewrite
    state: present

  notify:
  - restart apache
Finally import all tasks into the “main.yml” file of the Tasks directory.
$ sudo nano /etc/ansible/roles/webserver/tasks/main.yml

---
tasks file for /etc/ansible/roles/webserver
- import_tasks: redhat.yml
  when: ansible_facts['os_family']|lower == 'redhat'

- import_tasks: debian.yml
  when: ansible_facts['os_family']|lower == 'debian'

- import_tasks: service-httpd.yml
- import_tasks: service-apache2.yml
- import_tasks: configure.yml
- import_tasks: modules.yml
  when: ansible_facts['os_family']|lower == 'debian'
Add the handler information to the “main.yml” file of the handlers directory.
$ sudo nano /etc/ansible/roles/webserver/handlers/main.yml

---
#handlers file for /etc/ansible/roles/webserver
- name: "Restart httpd Web Server"
  service:
    name: httpd
    state: restarted

- name: "Restart Apache2 Web Server"
  service:
    name: apache2
    state: restarted
Add an index.html file to the files directory. This is the file you want to copy on the target server.
$ sudo nano /etc/ansible/roles/webserver/files/index.html

This is the test page of 2DayGeek.com for Ansible Tutorials
You have successfully broken the playbook into Ansible roles using the steps above. Now, your new Ansible role may look like the one below.
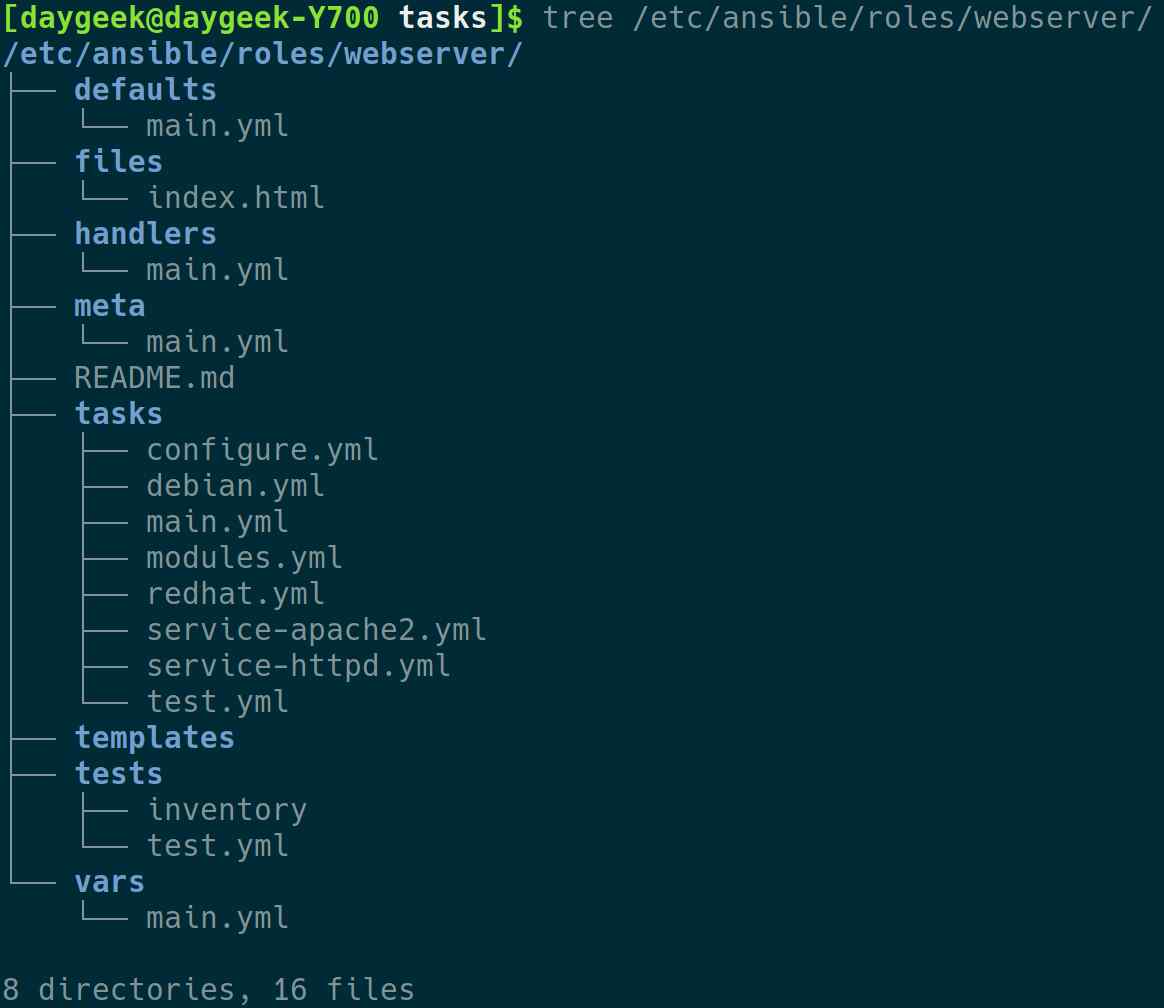
If you have done everything for your Ansible role, then finally import this role into your playbook.
$ sudo nano /etc/ansible/playbooks/webserver-role.yml

---
- hosts: all
  become: yes
  name: "Install and Configure Apache Web Server on Linux"
  roles:
  - webserver
Once you have done everything, I advise you to check the Playbook syntax before executing it.
$ ansible-playbook /etc/ansible/playbooks/webserver-role.yml --syntax-check

playbook: /etc/ansible/playbooks/webserver-role.yml
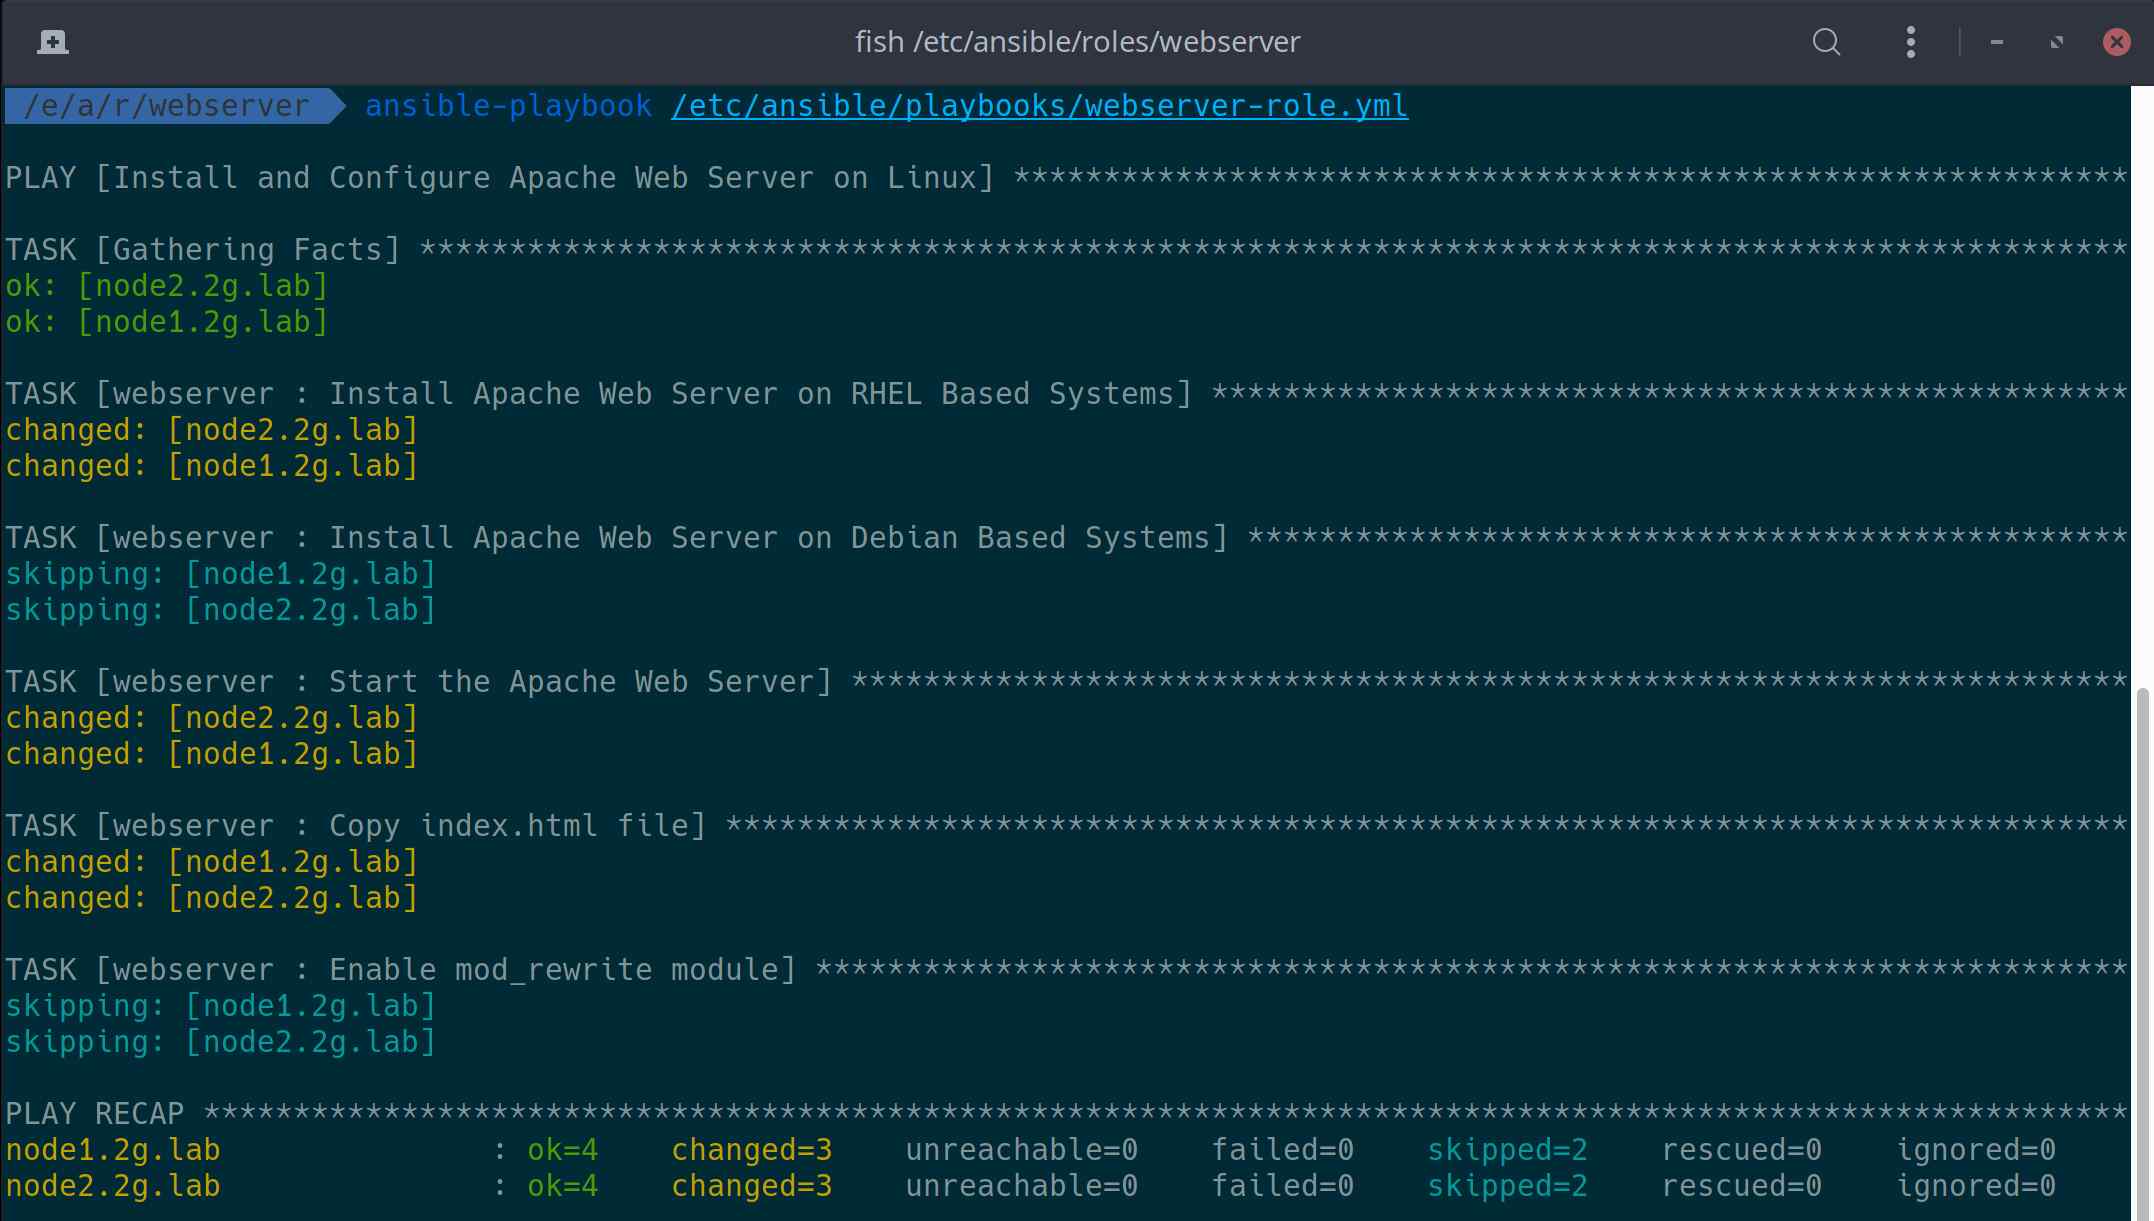
Finally execute the Ansible playbook to see the magic.
Hope this tutorial helped you to learn about the Ansible roles. If you are satisfied, please share the article on social media. If you would like to improve this article, add your comments in the comment section.