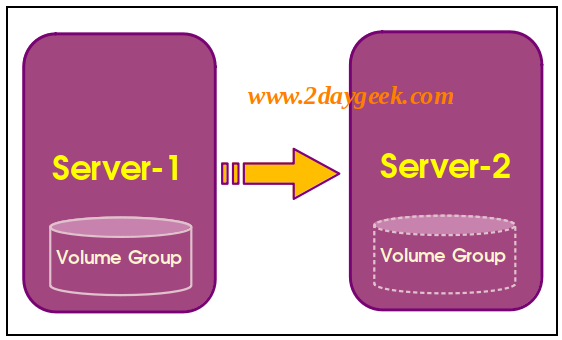
There are situations where we would be required to move a whole volume group from one system to another system for some requirement. As part of this, it also moves underlying logical volumes (LVM) too.
It is very easy and can be done using vgexport and vgimport commands.
This article will guide you on how to move or migrate LVM and volume group from one server to another.
Let’s move a volume group named ‘server1_data_vg‘ from one system to another, which is currently holding the following LVM ‘/dev/server1_data_vg/lvol1’ and it’s mounted under ‘/data’.
Make a Note: Though not necessary, always back up existing data as a precaution in order to rollback.
As a prerequisite, find the block devices mapped to the volume group named ‘server1_data_vg’. This is needed later when you need to remove them from the system.
pvs

PV VG Fmt Attr PSize PFree
/dev/sdb lvm2 a-- 10.00g 0.00g
/dev/sdc lvm2 a-- 25.00g 0.00g
Step-1: Unmounting the file system
Unmount the desired filesystem. In this case, it would be ‘/data’ mount point. If it’s busy, use Lazy unmount option ‘-l or –lazy’
umount /data
Step-2: De-activating the volume group
Mark the volume group inactive, which removes it from the kernel table, clean up all references to this volume group and prevents any further activity on it.
vgchange -an server1_data_vg

vgchange -- volume group "server1_data_vg" successfully deactivated
Step-3: Exporting the volume group
Export the volume group. This prevents it from being accessed on the current system and prepares it to be removed. It only exports the VG configuration, but the data remains intact on disk.
vgexport server1_data_vg

vgexport -- volume group "server1_data_vg" successfully exported
Step-4: Detaching the disk/LUN
Remove the block device from the system and inform the respective team to unmap the disk or LUN.
echo 1 > /sys/block/sdb/device/delete
- For ‘vmdk’ disk, the VMWare team needs to unmap the disk from ‘Server 1’.
- For storage ‘LUNs’, the SAN team needs to unmap the disk from ‘Server 1’, but if it’s a VM, the same LUN must first unmapped at the VMWare level and then at Storage end.
Step-5: Presenting the Disk to the new Server
Respective team to map the disk to the system based on the setup. In this case, it would be mapped to ‘Server-2’.
- For ‘vmdk’ disk, the VMWare team needs to map the disk to the ‘Server 2’.
- For storage LUNs, the SAN team needs to map the disk directly to the ‘Server 2’, but If it’s a VM, the same LUN should be mapped at Storage level and then at VMWare end.
Once disk/LUN mapped, scan the disk/LUN to discover them at OS level.
for disk_scan in `ls /sys/class/scsi_hosts`; do echo "Scanning $disk_scan…Completed"; echo "- - -" > /sys/class/scsi_hosts/$disk_scan/scan; done

Scanning host0...Completed
Scanning host1...Completed
Scanning host2...Completed
.
.
Scanning host[N]...Completed
Now, you can see the exported VGs in the pvscan output.
pvscan

PV /dev/sdb is in exported VG server1_data_vg [<10.00 GiB / 0 free]
PV /dev/sdc VG app lvm2 [<25.00 GiB / 0 free]
Total: 2 [<34.99 GiB] / in use: 2 [<34.99 GiB] / in no VG: 0 [0 ]
Step-6: Importing the volume group
Import the volume group as shown below:
vgimport server1_data_vg

Volume group "server1_data_vg" successfully imported
Step-7: Activating the volume group
Activate the volume group as shown below:
vgchange -ay server1_data_vg

1 logical volume(s) in volume group "server1_data_vg" now active
Step-8: Mounting the file system
Finally create directory and mount the imported logical volume or disk on the server 2.
mkdir -p /data

mount /dev/server1_data_vg/lvol1 /data
Conclusion
In this tutorial, we’ve shown you how to move a Volume Group from one Linux system to another. This article can be used whenever you want to perform the similar activity.
If you have any questions or feedback, feel free to comment below. Kindly support us by sharing this article with wider circle.