LibreOffice has Calc, Impress, Draw, Base, Math and word processing component which called Writer.
It has all the usual features such as spell check, thesaurus, hyphenation, find and replace, autocorrect, creating tables, inserting table of contents and indexes, mail mergers and others.
More features includes Templates and styles, Page layout methods, frames, columns, tables, automatic table of contents, embedding graphics, spreadsheets, export to pdf including bookmarks, document digital signature, form design and filling. Not only resume, letters, applications, forms, brouchers, templates, business cards, calendar, reports, eBook and newsletter can be generated in speed with high quality but students can produce finished and formatted Essays from expert writers.
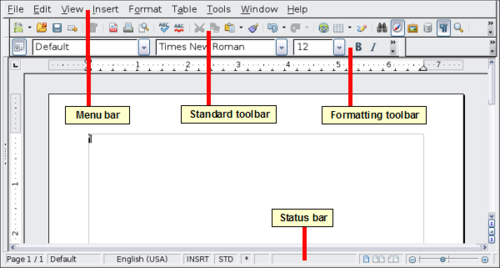
The Interface
The interface is not different than Microsoft word as shown in the figure below. Top menu covers multiple options like File, Edit, View, Insert, Format, Table and Tools etc.
- File: From File you can select open existing or new document by clicking New.
- Edit: It contains all the essential commands to edit contents of current document
- View: This menu comprises of tools helping to control on screen display of your document
- Insert: It helps inserting new elements to your document such as images, media, charts, objects, hyperlink, comments, symbols, footnotes and section.
- Format: In order to format your documents and layouts format command helps.
- Styles: It has Set, Create, Edit, Update and Load to manage style of your text document
- Table: With the help of table and its combined tools one can easily insert, edit and delete also can insert its elements to a text document.
- Tools: It contains Menu configuration tools, gallery of object art to add to your document and setting program preferences.
- Help: Help tool is there to start, control and help you on various aspects of LibreOffice.
Status Bar
As in Microsoft Word, status bar in Writer give basic information regarding document, page numbers, document zoom pan and word count.
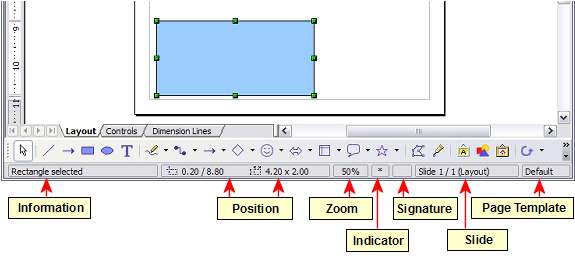
Page number: It shows total numbers of pages of the document, current page number and sequence number if it is different. Suppose from page number 3 in the document you restarted the page numbers, its page number will be 1 and sequence number will be 3.
If there is any bookmark explained in the document, right click on the field, a list of bookmarks will appear, selection your required one through. If you want to quickly jump on the specific page double click on the option available and navigator opens, click in the page number field and type the sequence number of the required page and press Enter.
The word count: The word count and total number of characters of the document can be seen in the status bar. This number always kept up to date as you add or delete words from document.
Page style: You can change the page style of your document any time by right clicking in page style field. A popup will comes up with different page style which can be clicked and chosen.
Language: This option will help people for spell check, hyphenation and thesaurus. By clicking this pop up menu will comes up in which you can change your language to any other. Spell check can also be stopped by clicking None (Do not check spelling) option in the very same menu. Any directly formatted language settings can be reset to the default language from this menu.
Insert mode: In insert mode, this area usually remains blank. Double click will initiate Overwrite mode while single click to return to insert mode. In insert mode after the cursor text will instantly appears as you typed, while in overwrite mode, text after the cursor position will immediately be replaced with the new typed text.
Selection mode: This option helps in changing different selection modes. The icon does not change, but when you hover the mouse pointer over this field, a tooltip indicates which mode is active. When you click in the field, a context menu displays the available options:
- Standard selection: Click in the text where you want to position the cursor and click in a cell to make it the active cell. Any other selection is deselected.
- Extending selection (F8): Clicking in the text extends or crops the current selection.
- Adding selection (Shift+F8): A new selection is added to an existing selection. The result is a multiple selection.
- Block selection (Ctrl+Shift+F8): A block of text can be selected.
On Windows systems, you can hold down the Alt key while dragging to select a block of text. You do not need to enter the block selection mode.
Sidebar
Sidebar in Writer as shown below is located on the right side of the edit view (View > Sidebar).
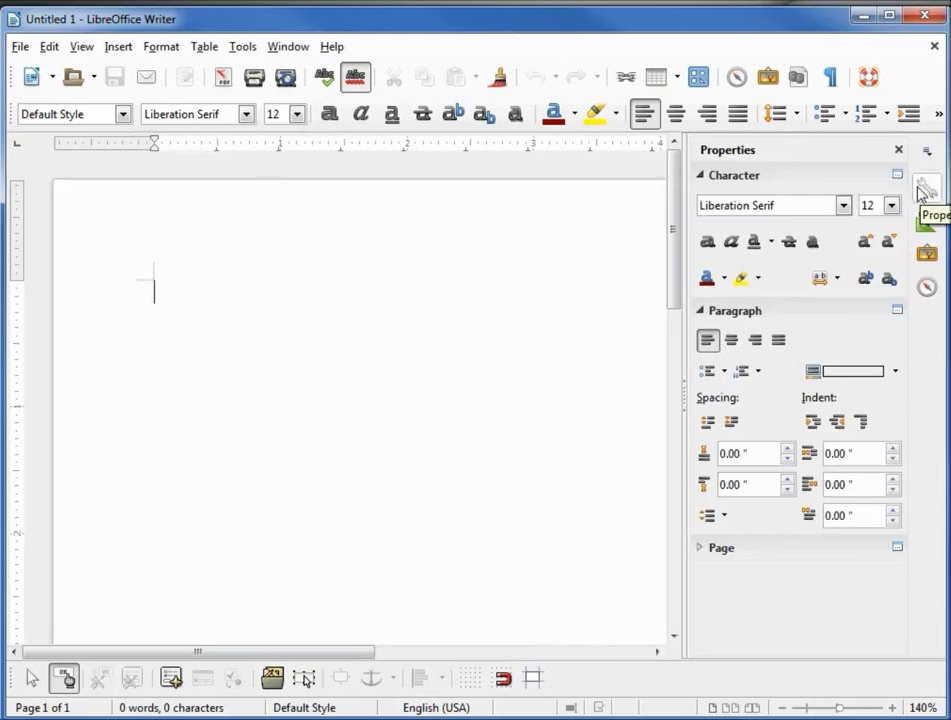
Sidebar is very interactive and mixture of dialogs and tool bars which consists of five groups: Properties, Styles and Formatting, Gallery, Navigator and Manage Changes. Each groups has its on icon on the Tab panel to the right of the sidebar, allowing you to switch between them. Each deck consists of a title bar and one or more content panels.
Both toolbars and side bar panels contribute with many functions such as making selective text bold or italic does exists in both toolbar Formatting and Character panel of the properties deck. In some panels there are more options and choices which can be availed by clicking on More options button.
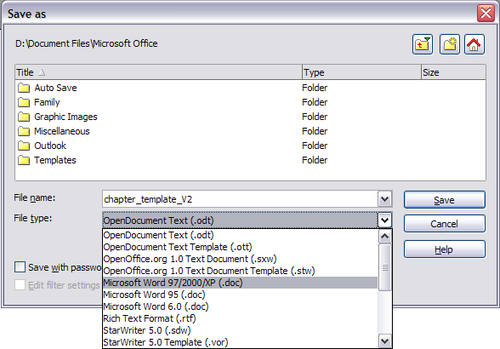
Saving File into MS Word Format
When your finish editing or creating your document simply by click save option in File menu you can save your document with its unique extension ODT unlike DOC Microsoft word extension. If your client or user doesn’t have the ability to access retrieve ODT file you can save file by going into File and clicking Save As, which will variety of other save options.
From the drop down list you can select save documents in Microsoft Word version 6.0/95 file format. Click save but be watchful if you need to edit your document for any reason, all the changes after your save to word will only appear in Microsoft word file not in ODT file. To avoid this pester you always need to finish your task and then save an extra copy as Microsoft word.